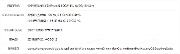
博文推荐|Pulsar 独立集群如何实现单一、共享 BookKeeper
本文翻译自 StreamNative 博客《Pulsar Isolation Part III: Separate Pulsar Clusters Sharing a Single BookKeeper Cluster》,作者高冉。
译者简介
姚余钱@深圳觉行科技有限公司,致力于医疗大数据领域。热衷开源,活跃于 Apache Pulsar 社区。
这是关于在 Apache Pulsar 中实现资源隔离四篇博客系列中的第三篇博客。第一篇博客概述了在 Pulsar 中实现隔离的三种方法:
1.使用 BookKeeper 独立集群的 Pulsar 独立集群:这种无共享方法提供了最高级别的隔离,适用于存储高度敏感的数据,例如个人身份信息或财务记录。我们在本系列中的第二篇博客提供了此方法的分步教程。
2.共享一个 BookKeeper 集群的 Pulsar 独立集群:这种方式利用单独的 Pulsar broker 集群来隔离终端用户,并允许用户根据场景使用不同的身份验证方法。同时,您可以获得使用共享存储层的优势,例如减少硬件占用空间以及降低相关的硬件和维护成本。
3.Pulsar 单集群和 BookKeeper 单集群:这是比较传统的方法,主要利用 Pulsar 内置多租户特性。
在本博客中,我们将通过示例展示如何实现单一、共享 BookKeeper 的方法。我们将按照以下步骤部署共享一个 BookKeeper 集群的两个 Pulsar 集群:
1.部署共享一个 BookKeeper 集群的两个 Pulsar 集群
2.验证 Pulsar 集群之间的数据隔离
3.bookie 扩缩容
设置共享 BookKeeper 集群
首先,我们在 8 核 CPU 、16GB 内存的计算机上设置共享 BookKeeper 集群。图 1 和图 2 展示了 BookKeeper 集群。
所有元数据服务(ZooKeeper 服务)都是单节点。我们不会在本博客中详细讨论这些。
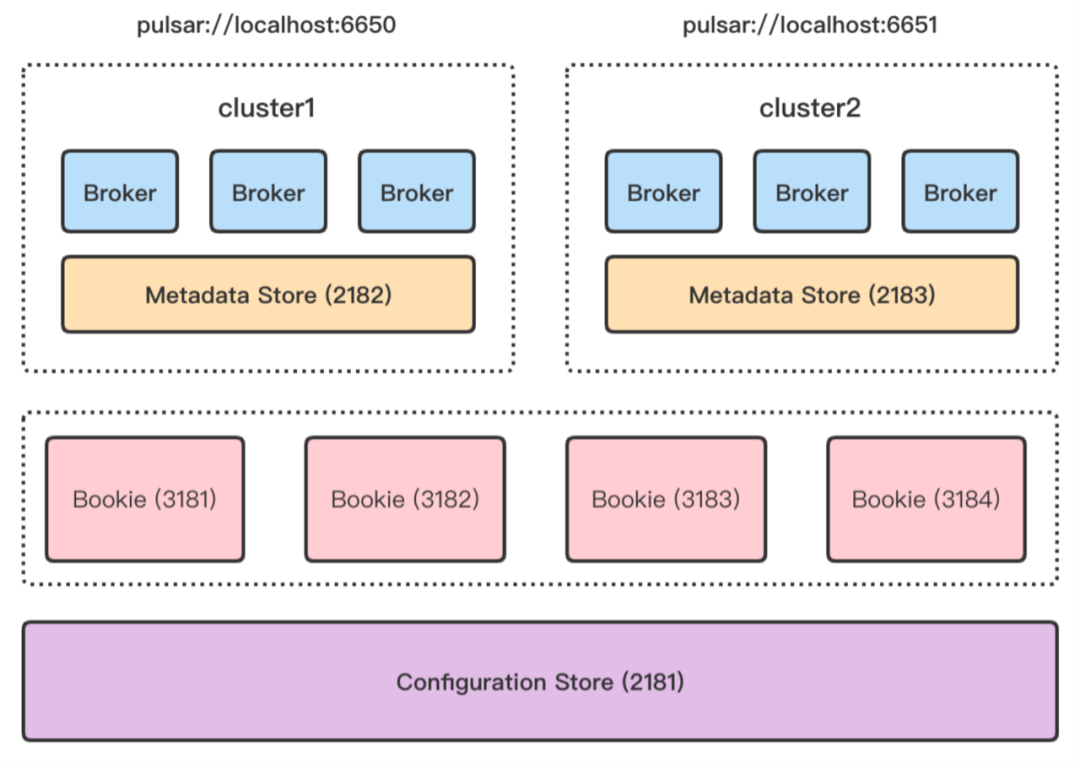
图 1:每个集群都有自己的 brokers 和本地元数据存储,并共享 BookKeeper 和配置存储( Configuration Store)。
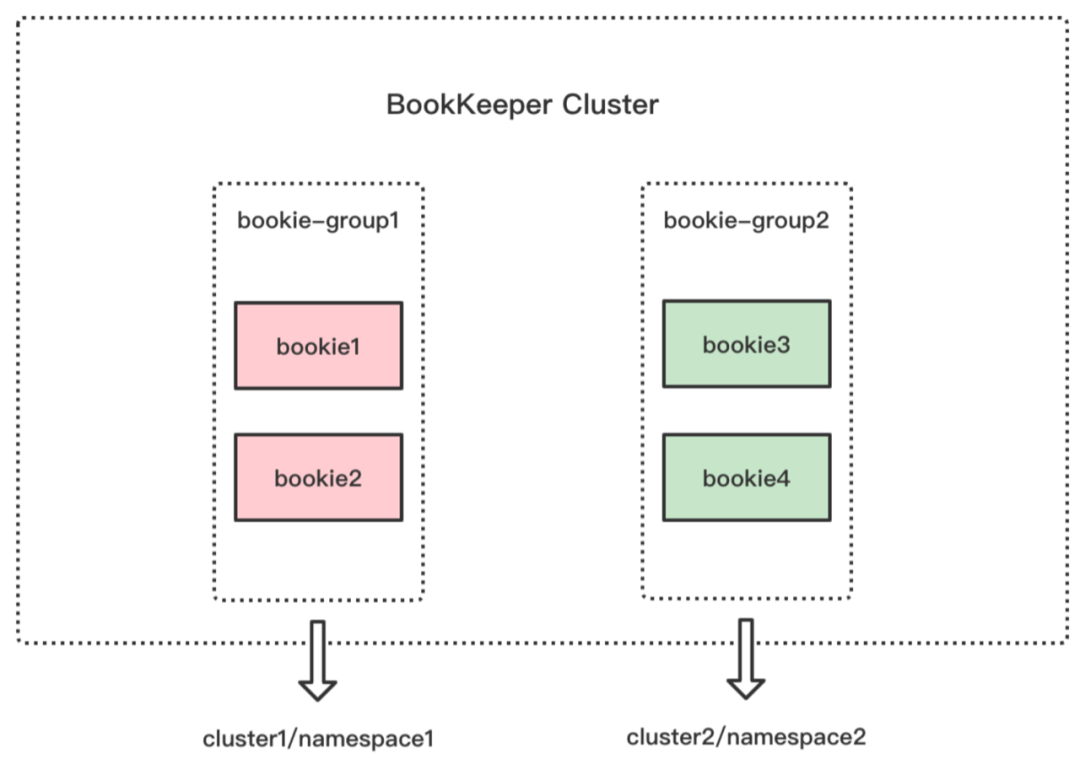
图 2:在共享的 BookKeeper 集群中,每个集群都有自己的 bookie 关联组。这些 bookie 组确保每个集群各自的数据彼此隔离。
部署集群
1. 下载[1]最新的 Pulsar 二进制包。博文发布时使用的包是 2.8.1 (目前最新版为 2.10.0)。
2. 解压二进制压缩包。
tar -zxvf apache-pulsar-2.8.1-bin.tar.gz3. 准备以下集群目录,按照下表中的说明更改每个目录的配置。
将当前目录用作 PULSAR_HOME 并创建以下目录拓扑。
cp -r apache-pulsar-2.8.1 configuration-store2
mkdir -p bk-cluster
cp -r apache-pulsar-2.8.1 bk-cluster/bk1
cp -r apache-pulsar-2.8.1 bk-cluster/bk2
cp -r apache-pulsar-2.8.1 bk-cluster/bk3
cp -r apache-pulsar-2.8.1 bk-cluster/bk4
mkdir -p cluster1
cp -r apache-pulsar-2.8.1 cluster1/zk1
cp -r apache-pulsar-2.8.1 cluster1/broker1
mkdir -p cluster2
cp -r apache-pulsar-2.8.1 cluster2/zk1
cp -r apache-pulsar-2.8.1 cluster2/broker1
目录的拓扑结构概述如下。
• PULSAR_HOME
• configuration-store
• bk-cluster
• bk1
• bk2
• bk3
• bk4
• bk5
• cluster1
• zk1
• broker1
• cluster2
• zk1
• broker1
组件
更改配置
configuration-store
clientPort=2181
aadmin.serverPort=9991
bk-cluster/bk1
bookiePort=3181
allowLoopback=true
zkServers=localhost:2181
httpServerPort=8011
bk-cluster/bk2
bookiePort=3182
allowLoopback=true
zkServers=localhost:2181
httpServerPort=8012
bk-cluster/bk3
bookiePort=3183
allowLoopback=true
zkServers=localhost:2181
httpServerPort=8013
bk-cluster/bk4
bookiePort=3184
allowLoopback=true
zkServers=localhost:2181
httpServerPort=8014
bk-cluster/bk5
bookiePort=3185
allowLoopback=true
zkServers=localhost:2181
httpServerPort=8015
cluster1/zk1
clientPort=2182
admin.serverPort=9992
cluster1/broker1
zookeeperServers=localhost:2182
configurationStoreServers=localhost:2181
brokerServicePort=6650
webServicePort=8080
bookkeeperMetadataServiceUri=zk://localhost:2181/ledgers
managedLedgerMaxEntriesPerLedger=100
managedLedgerMinLedgerRolloverTimeMinutes=0
cluster2/zk1
clientPort=2183
admin.serverPort=9993
cluster2/broker1
zookeeperServers=localhost:2183
configurationStoreServers=localhost:2181
brokerServicePort=6651 webServicePort=8081 bookkeeperMetadataServiceUri=zk://localhost:2181/ledgers managedLedgerMaxEntriesPerLedger=100 managedLedgerMinLedgerRolloverTimeMinutes=0
4. 启动并初始化配置存储和元数据存储。
$PULSAR_HOME/configuration-store/bin/pulsar-daemon start configuration-store
$PULSAR_HOME/cluster1/zk1/bin/pulsar-daemon start zookeeper
$PULSAR_HOME/cluster2/zk1/bin/pulsar-daemon start zookeeper

$PULSAR_HOME/configuration-store/bin/pulsar initialize-cluster-metadata \
--cluster cluster1 \
--zookeeper localhost:2182 \
--configuration-store localhost:2181 \
--web-service-url http://localhost:8080/ \
--broker-service-url pulsar://localhost:6650/

./configuration-store/bin/pulsar initialize-cluster-metadata \
--cluster cluster2 \
--zookeeper localhost:2183 \
--configuration-store localhost:2181 \
--web-service-url http://localhost:8081/ \
--broker-service-url pulsar://localhost:6651/
5. 初始化 BookKeeper 元数据并启动 bookie 集群。
$PULSAR_HOME/bk-cluster/bk1/bin/bookkeeper shell metaformat

$PULSAR_HOME/bk-cluster/bk1/bin/pulsar-daemon start bookie
$PULSAR_HOME/bk-cluster/bk2/bin/pulsar-daemon start bookie
$PULSAR_HOME/bk-cluster/bk3/bin/pulsar-daemon start bookie
$PULSAR_HOME/bk-cluster/bk4/bin/pulsar-daemon start bookie
6. 在 cluster1 和 cluster2 中启动 broker。
$PULSAR_HOME/cluster1/broker1/bin/pulsar-daemon start broker
$PULSAR_HOME/cluster2/broker1/bin/pulsar-daemon start broker
7. 检查 brokers。
$PULSAR_HOME/cluster1/broker1/bin/pulsar-admin --admin-url http://localhost:8080 brokers list cluster1
"localhost:8080"
$PULSAR_HOME/cluster1/broker1/bin/pulsar-admin --admin-url http://localhost:8081 brokers list cluster2
"localhost:8081"
8. 检查 cluster1 和 cluster2 的 bookie 列表。如下所示,它们共享 bookie 集群。
$PULSAR_HOME/cluster1/broker1/bin/pulsar-admin --admin-url http://localhost:8080 bookies list-bookies
{
  "bookies" : [ {
    "bookieId" : "127.0.0.1:3181"
  }, {
    "bookieId" : "127.0.0.1:3182"
  }, {
    "bookieId" : "127.0.0.1:3183"
  }, {
    "bookieId" : "127.0.0.1:3184"
  } ]
}
$PULSAR_HOME/cluster1/broker1/bin/pulsar-admin --admin-url http://localhost:8081 bookies list-bookies
{
  "bookies" : [ {
    "bookieId" : "127.0.0.1:3181"
  }, {
    "bookieId" : "127.0.0.1:3182"
  }, {
    "bookieId" : "127.0.0.1:3183"
  }, {
    "bookieId" : "127.0.0.1:3184"
  } ]
}
Bookie 机架配置(Rack Placement)
为了归档资源隔离,我们需要将 4 个 bookie 节点拆分为 2 个资源组。
1. 为 cluster1 设置 bookie rack。
$PULSAR_HOME/cluster1/broker1/bin/pulsar-admin --admin-url http://localhost:8080 bookies set-bookie-rack \
--bookie 127.0.0.1:3181 \
--hostname 127.0.0.1:3181 \
--group group-bookie1 \
--rack rack1

$PULSAR_HOME/cluster1/broker1/bin/pulsar-admin --admin-url http://localhost:8080 bookies set-bookie-rack \
--bookie 127.0.0.1:3182 \
--hostname 127.0.0.1:3182 \
--group group-bookie1 \
--rack rack1


$PULSAR_HOME/cluster1/broker1/bin/pulsar-admin --admin-url http://localhost:8080 bookies set-bookie-rack \
--bookie 127.0.0.1:3183 \
--hostname 127.0.0.1:3183 \
--group group-bookie2 \
--rack rack2


$PULSAR_HOME/cluster1/broker1/bin/pulsar-admin --admin-url http://localhost:8080 bookies set-bookie-rack \
--bookie 127.0.0.1:3184 \
--hostname 127.0.0.1:3184 \
--group group-bookie2 \
--rack rack2
2. 检查 cluster1 的 bookie rack placement。
$PULSAR_HOME/cluster1/broker1/bin/pulsar-admin --admin-url http://localhost:8080 bookies racks-placement
"group-bookie1    {127.0.0.1:3181=BookieInfoImpl(rack=rack1, hostname=127.0.0.1:3181), 127.0.0.1:3182=BookieInfoImpl(rack=rack1, hostname=127.0.0.1:3182)}"
"group-bookie2    {127.0.0.1:3183=BookieInfoImpl(rack=rack2, hostname=127.0.0.1:3183), 127.0.0.1:3184=BookieInfoImpl(rack=rack2, hostname=127.0.0.1:3184)}"
3. 为 cluster2 设置 bookie rack。
$PULSAR_HOME/cluster1/broker1/bin/pulsar-admin --admin-url http://localhost:8081 bookies set-bookie-rack \
--bookie 127.0.0.1:3181 \
--hostname 127.0.0.1:3181 \
--group group-bookie1 \
--rack rack1

$PULSAR_HOME/cluster1/broker1/bin/pulsar-admin --admin-url http://localhost:8081 bookies set-bookie-rack \
--bookie 127.0.0.1:3182 \
--hostname 127.0.0.1:3182 \
--group group-bookie1 \
--rack rack1


$PULSAR_HOME/cluster1/broker1/bin/pulsar-admin --admin-url http://localhost:8081 bookies set-bookie-rack \
--bookie 127.0.0.1:3183 \
--hostname 127.0.0.1:3183 \
--group group-bookie2 \
--rack rack2


$PULSAR_HOME/cluster1/broker1/bin/pulsar-admin --admin-url http://localhost:8081 bookies set-bookie-rack \
--bookie 127.0.0.1:3184 \
--hostname 127.0.0.1:3184 \
--group group-bookie2 \
--rack rack2
4. 检查 cluster2 的 bookie rack placement。
$PULSAR_HOME/cluster1/broker1/bin/pulsar-admin --admin-url http://localhost:8081 bookies racks-placement
"group-bookie1    {127.0.0.1:3181=BookieInfoImpl(rack=rack1, hostname=127.0.0.1:3181), 127.0.0.1:3182=BookieInfoImpl(rack=rack1, hostname=127.0.0.1:3182)}"
"group-bookie2    {127.0.0.1:3183=BookieInfoImpl(rack=rack2, hostname=127.0.0.1:3183), 127.0.0.1:3184=BookieInfoImpl(rack=rack2, hostname=127.0.0.1:3184)}"
通过 Bookie 关联组验证命名空间隔离
现在我们已经配置好了所有东西,让我们通过设置 bookie 关联组来验证命名空间隔离。
1. 在 cluster1 中创建命名空间。
$PULSAR_HOME/cluster1/broker1/bin/pulsar-admin --admin-url http://localhost:8080 namespaces create -b 30 -c cluster1 public/c1-ns12. 为命名空间设置一个 bookie 关联组。
$PULSAR_HOME/cluster1/broker1/bin/pulsar-admin --admin-url http://localhost:8080 namespaces set-bookie-affinity-group public/c1-ns1 \
--primary-group group-bookie1
3. 检查命名空间的 bookie 关联组。
$PULSAR_HOME/cluster1/broker1/bin/pulsar-admin --admin-url http://localhost:8080 namespaces get-bookie-affinity-group public/c1-ns14. 向命名空间 public/c1-ns1 的主题生产一些消息。
# set retention for namespace `public/c1-ns1` to avoid messages were deleted automatically
cluster1/broker1/bin/pulsar-admin --admin-url http://localhost:8080 namespaces set-retention -s 1g -t 3d public/c1-ns1
$PULSAR_HOME/cluster1/broker1/bin/pulsar-client --url pulsar://localhost:6650 produce -m 'hello' -n 300 public/c1-ns1/t1
5. 检查主题内部的统计信息。
$PULSAR_HOME/cluster1/broker1/bin/pulsar-admin --admin-url http://localhost:8080 topics stats-internal public/c1-ns1/t1我们应该得到主题中的一个 ledger 列表。在本例中,它是 ledgers 0、2 和 3。
  "ledgers" : [ {
    "ledgerId" : 0,
    "entries" : 100,
    "size" : 5400,
    "offloaded" : false,
    "underReplicated" : false
  }, {
    "ledgerId" : 2,
    "entries" : 100,
    "size" : 5616,
    "offloaded" : false,
    "underReplicated" : false
  }, {
    "ledgerId" : 3,
    "entries" : 100,
    "size" : 5700,
    "offloaded" : false,
    "underReplicated" : false
  } ]
检查每个 ledger 集合,以确认 ledger 已写入属于 group-bookie1 的 bookie。
$PULSAR_HOME/bk-cluster/bk1/bin/bookkeeper shell ledgermetadata -ledgerid 0
# check ensembles
ensembles={0=[127.0.0.1:3181, 127.0.0.1:3182]}

$PULSAR_HOME/bk-cluster/bk1/bin/bookkeeper shell ledgermetadata -ledgerid 2
# check ensembles
ensembles={0=[127.0.0.1:3182, 127.0.0.1:3181]}

$PULSAR_HOME/bk-cluster/bk1/bin/bookkeeper shell ledgermetadata -ledgerid 3
# check ensembles
ensembles={0=[127.0.0.1:3182, 127.0.0.1:3181]}
6. 在 cluster2 中重复这些步骤,以便我们可以将 cluster1 的命名空间与 cluster2 的命名空间隔离开来。
迁移命名空间
迁移 Bookie 关联组
现在我们已经验证了命名空间隔离,如果 bookie 组没有足够的空间,我们可以将 bookie 关联组迁移到命名空间。
1. 修改命名空间的 bookie 关联组。
$PULSAR_HOME/cluster1/broker1/bin/pulsar-admin --admin-url http://localhost:8080 namespaces set-bookie-affinity-group public/c1-ns1 --primary-group group-bookie22. 卸载命名空间,使 bookie 关联组更改生效。
$PULSAR_HOME/cluster1/broker1/bin/pulsar-admin --admin-url http://localhost:8080 namespaces unload public/c1-ns13. 再次向主题 public/c1-ns1/t1 生产消息。
$PULSAR_HOME/cluster1/broker1/bin/pulsar-client --url pulsar://localhost:6650 produce -m 'hello' -n 300 public/c1-ns1/t14. 检查集合是否有新添加的 ledger。我们可以看到 group-bookie2 中已经添加了一个新的 ledger。
$PULSAR_HOME/cluster1/broker1/bin/pulsar-admin --admin-url http://localhost:8080 topics stats-internal public/c1-ns1/t1 "ledgers" : [ {
"ledgerId" : 0,
"entries" : 100,
"size" : 5400,
"offloaded" : false,
"underReplicated" : false
}, {
"ledgerId" : 2,
"entries" : 100,
"size" : 5616,
"offloaded" : false,
"underReplicated" : false
}, {
"ledgerId" : 3,
"entries" : 100,
"size" : 5700,
"offloaded" : false,
"underReplicated" : false
}, {
"ledgerId" : 15,
"entries" : 100,
"size" : 5400,
"offloaded" : false,
"underReplicated" : false
}, {
"ledgerId" : 16,
"entries" : 100,
"size" : 5616,
"offloaded" : false,
"underReplicated" : false
}, {
"ledgerId" : 17,
"entries" : 100,
"size" : 5700,
"offloaded" : false,
"underReplicated" : false
}]让我们检查新添加的 ledger(15、16、17)集合,以确认 ledger 已写入属于 group-bookie2 的 bookie。
$PULSAR_HOME/bk-cluster/bk1/bin/bookkeeper shell ledgermetadata -ledgerid 15
# check ensembles
ensembles={0=[127.0.0.1:3184, 127.0.0.1:3183]}

$PULSAR_HOME/bk-cluster/bk1/bin/bookkeeper shell ledgermetadata -ledgerid 16
# check ensembles
ensembles={0=[127.0.0.1:3183, 127.0.0.1:3184]}

$PULSAR_HOME/bk-cluster/bk1/bin/bookkeeper shell ledgermetadata -ledgerid 17
# check ensembles
ensembles={0=[127.0.0.1:3183, 127.0.0.1:3184]}
Bookie 扩缩容
最终,我们的数据量将超过 BookKeeper 集群的容量,我们需要扩大 bookie 的数量。在本节中,我们将向你展示如何添加新的 bookie 并将其分配给现有的 bookie 关联组。
扩容
1. 启动一个新的 bookie 节点 bk-5。
cp -r apache-pulsar-2.8.1 bk-cluster/bk5
$PULSAR_HOME/bk-cluster//bk-cluster/bk5/bin/pulsar-daemon start bookie
2. 将新添加的 bookie 节点加到 group-bookie1。
$PULSAR_HOME/cluster1/broker1/bin/pulsar-admin --admin-url http://localhost:8080 bookies set-bookie-rack \
--bookie 127.0.0.1:3185 \
--hostname 127.0.0.1:3185 \
--group group-bookie2 \
--rack rack2
3. 检查 bookie rack placement。
$PULSAR_HOME/cluster1/broker1/bin/pulsar-admin --admin-url http://localhost:8080  bookies racks-placement
"group-bookie1    {127.0.0.1:3181=BookieInfoImpl(rack=rack1, hostname=127.0.0.1:3181), 127.0.0.1:3182=BookieInfoImpl(rack=rack1, hostname=127.0.0.1:3182)}"
"group-bookie2    {127.0.0.1:3183=BookieInfoImpl(rack=rack2, hostname=127.0.0.1:3183), 127.0.0.1:3184=BookieInfoImpl(rack=rack2, hostname=127.0.0.1:3184), 127.0.0.1:3185=BookieInfoImpl(rack=rack2, hostname=127.0.0.1:3185)}"
4 卸载命名空间 public/c1-ns1,使 bookie 关联组更改生效。
$PULSAR_HOME/cluster1/broker1/bin/pulsar-admin --admin-url http://localhost:8080 namespaces unload public/c1-ns15. 再次向主题 public/c1-ns1/t1 生产一些消息。
$PULSAR_HOME/cluster1/bin/pulsar-client --url pulsar://localhost:6650 produce -m 'hello' -n 300 public/c1-ns1/t16. 查看主题 public/c1-ns1/t1 新增的 ledger。
$PULSAR_HOME/cluster1/broker1/bin/pulsar-admin --admin-url http://localhost:8080 topics stats-internal public/c1-ns1/t1$PULSAR_HOME/bk-cluster/bk1/bin/bookkeeper shell ledgermetadata -ledgerid ledgerid我们可以看到新添加的 ledger 现存于新添加的 bookie 节点中。
缩容
在分布式系统中,单个组件发生故障的情况并不少见。在本节中,我们将模拟其中一个 bookie 的故障,并证明共享的 BookKeeper 集群能够容忍故障事件。您还可以参考 https://bookkeeper.apache.org/docs/4.14.0/admin/decomission/ 获取详细示例。
1. 确保关联组中有足够的 bookie。
例如,如果 broker 的配置 managedLedgerDefaultEnsembleSize 为 2,那么在我们缩容 bookie 之后,我们应该至少还有 2 个 bookie 属于关联组 。
我们可以检查 bookie rack placement。
$PULSAR_HOME/cluster1/broker1/bin/pulsar-admin --admin-url http://localhost:8080 bookies racks-placement2. 从关联 bookie 组中删除 bookie。
$PULSAR_HOME/cluster1/broker1/bin/pulsar-admin --admin-url http://localhost:8080 bookies delete-bookie-rack -b 127.0.0.1:31853. 检查是否存在未复制的 ledger,鉴于我们已经删除了一个 bookie,检查结果应该是可预料的。
$PULSAR_HOME/bk-cluster/bk1/bin/bookkeeper shell listunderreplicated4. 停止 bookie。
$PULSAR_HOME/bk-cluster/bk5/bin/pulsar-daemon stop bookie5. 停用 bookie。
$PULSAR_HOME/bk-cluster/bk1/bin/bookkeeper shell decommissionbookie -bookieid 127.0.0.1:31856. 检查已停用 bookie 中的 ledger。
$PULSAR_HOME/bk-cluster/bk1/bin/bookkeeper shell listledgers -bookieid 127.0.0.1:31857. 列出 bookie。
$PULSAR_HOME/bk-cluster/bk1/bin/bookkeeper shell listbookies -rw -h系列后续
我们已经展示了如何通过共享一个 BookKeeper 的两个 Puslar 集群来实现隔离。你可以按照相同的步骤部署多个 Pulsar 集群。请继续关注本系列的最后一篇博客,我们将展示如何使用单个 Pulsar 集群实现隔离!
同时,可查看以下 Pulsar 资源:
1. 获取[2] David Kjerrumgaard 的《Manning's Apache Pulsar in Action》电子书。
2. 在 Slack 上加入 Pulsar 社区[3]
相关阅读
引用链接
[1] 下载: https://www.apache.org/dyn/mirrors/mirrors.cgi?action=download&filename=pulsar/pulsar-2.8.1/apache-pulsar-2.8.1-bin.tar.gz[2] 获取: https://app.jingsocial.com/microFrontend/leadGeneration/jsf-leads/list/contentMarketing/25dkCJUkjtVYUue9TsmKLc/GFeMfZiTPHEW5KucED4hLD[3] 加入 Pulsar 社区: https://apache-pulsar.herokuapp.com/
▼ 关注「Apache Pulsar」,获取更多技术干货 ▼
👇🏻加入 Apache Pulsar 中文交流群👇🏻
本文分享自微信公众号 - ApachePulsar(ApachePulsar)。
如有侵权,请联系 support@oschina.cn 删除。
本文参与“OSC源创计划”,欢迎正在阅读的你也加入,一起分享。
|


- 上一条: 你不知道的 HTTPS 压测 2022-05-11
- 下一条: 为了让女朋友运动起来,小伙儿不仅买单车还设计了智能防盗单车锁 2022-05-11
- 博文推荐|BookKeeper - Apache Pulsar 高可用 / 强一致 / 低延迟的存储实现 2022-06-09
- 博文推荐|基于 Apache Pulsar 的分布式锁 2021-12-16
- Pulsar vs Kafka?一文掌握高性能消息组件Pulsar基础知识 2022-01-17
- 博文干货|在 Kotlin 中使用 Apache Pulsar 2022-03-01
- 技术干货|一文彻底读懂高性能消息组件Apache Pulsar 2022-01-18