Kafka成长3:Producer 元数据拉取源码原理(上)

上一节我们分析了Producer的核心组件,我们得到了一张关键的组件图。你还记得么?
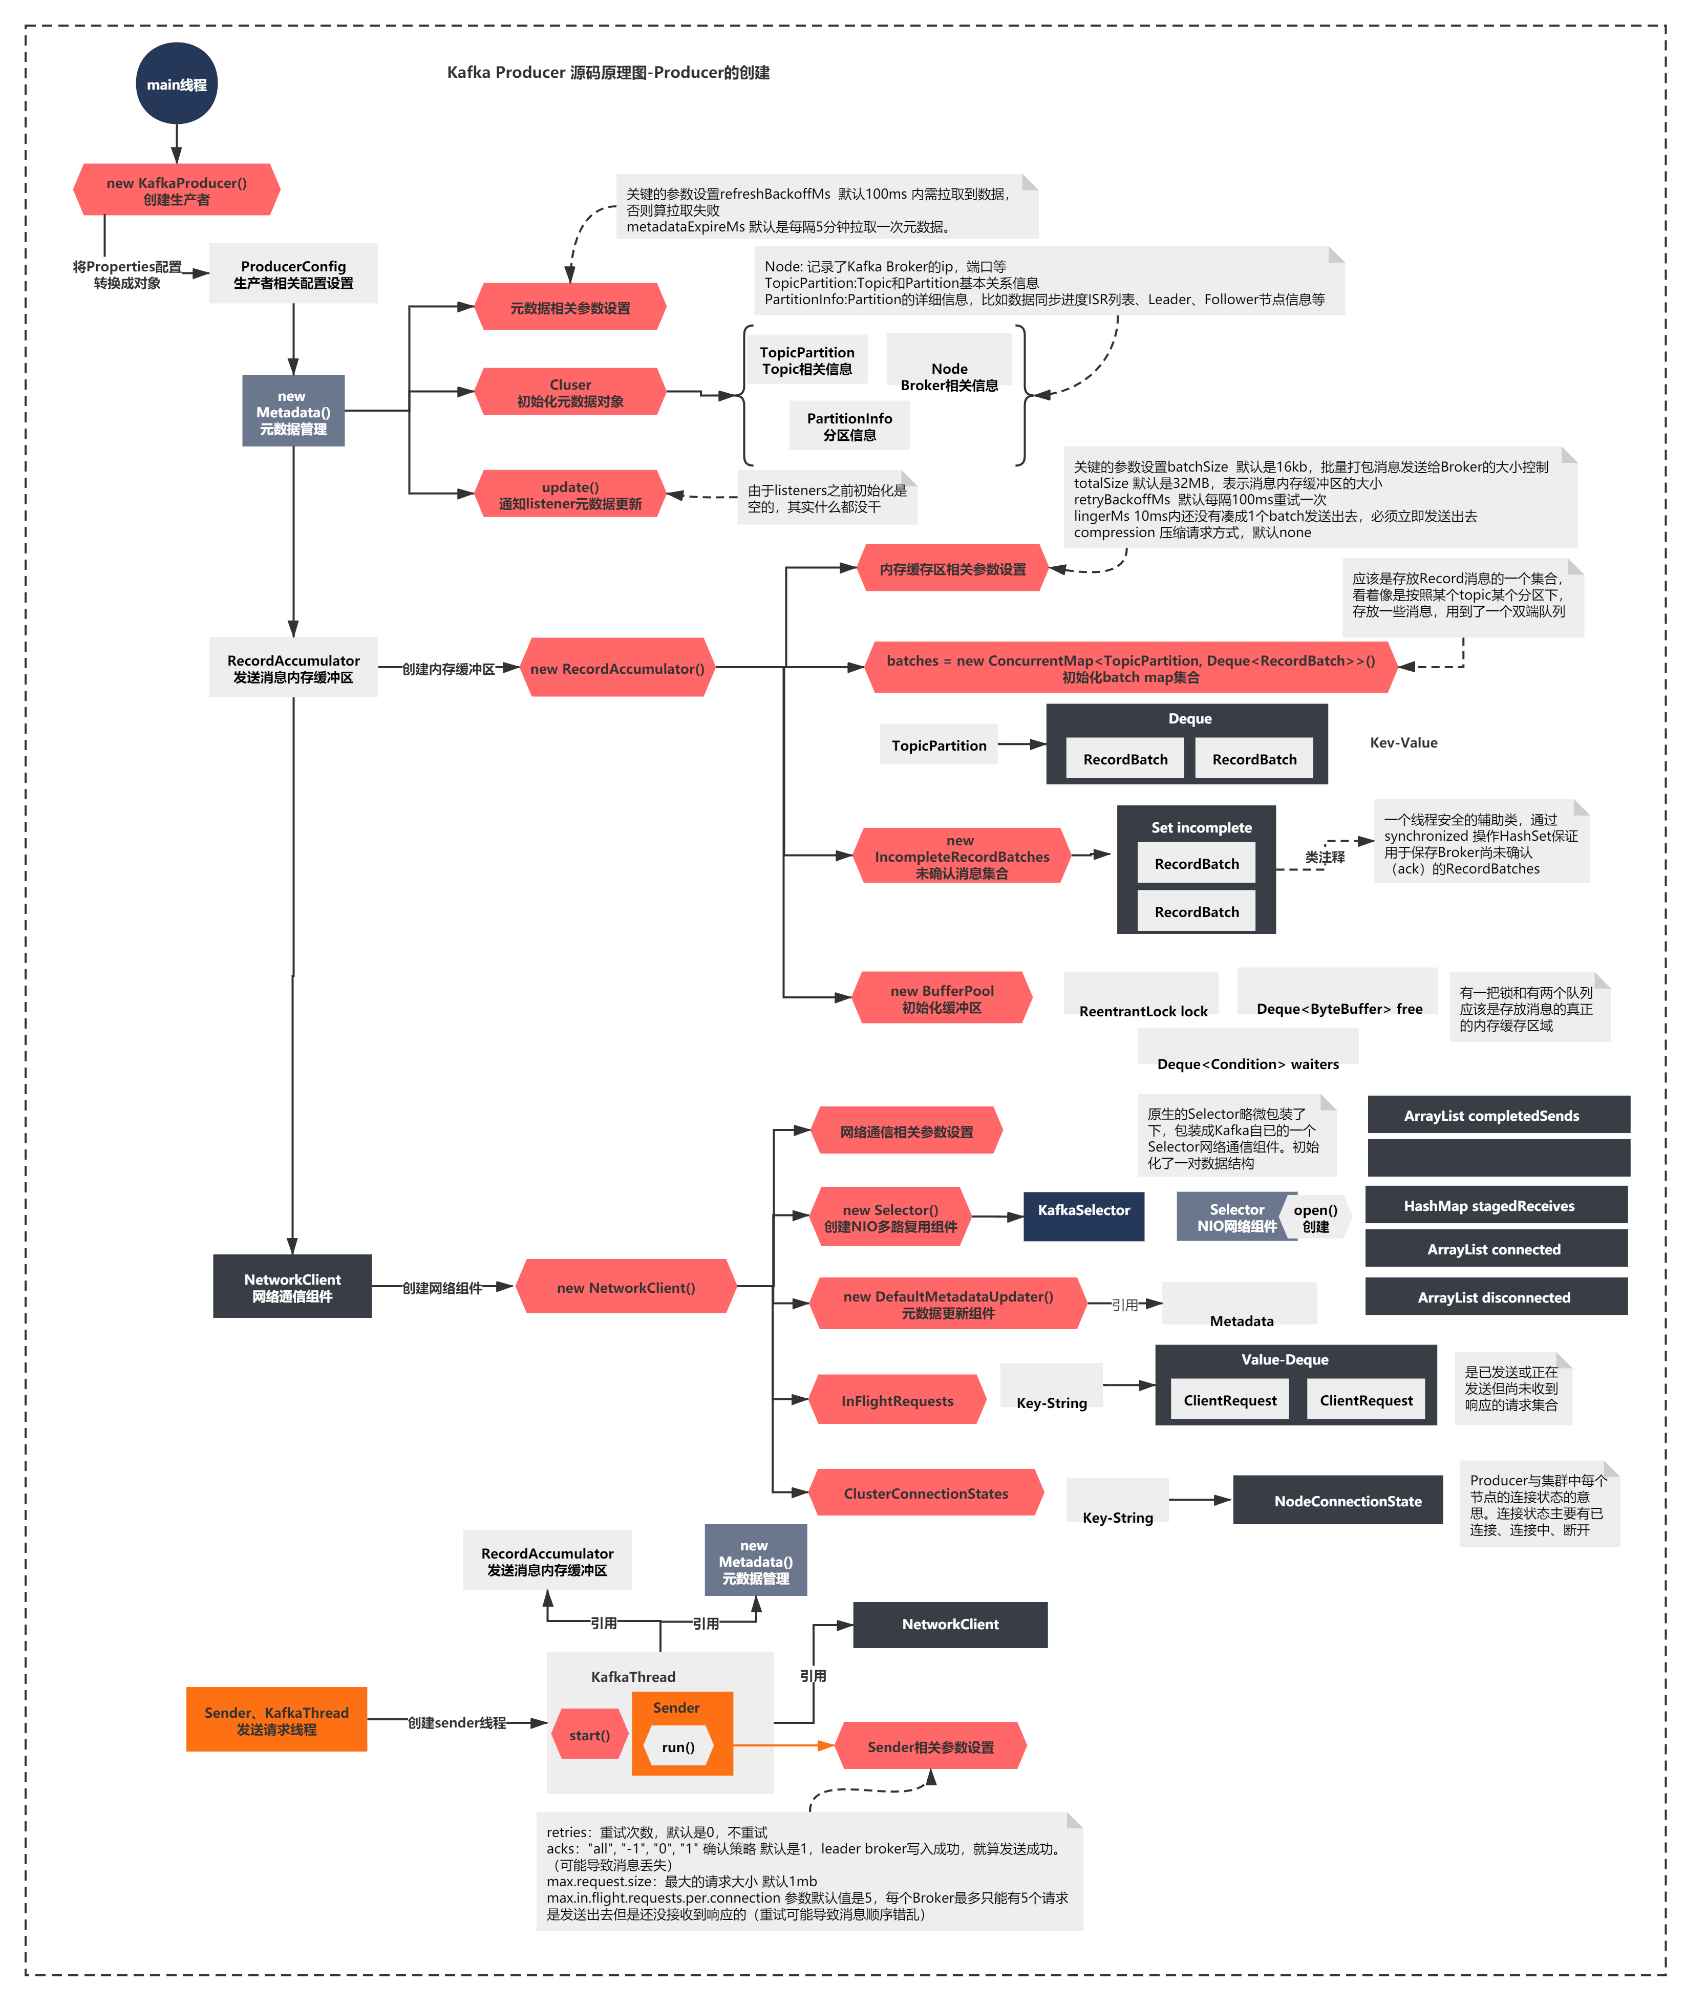
简单概括下上面的图就是:
创建了Metadata组件,内部通过Cluster维护元数据
初始化了发送消息的内存缓冲器RecordAccumulator
创建了NetworkClient,内部最重要的是创建了NIO的Selector组件
启动了一个Sender线程,Sender引用了上面的所有组件,开始执行run方法。
图的最下方可以看到,上一节截止到了run方法的执行,这一节我们首先会看看run方法核心脉络做了什么。接着分析下Producer第一个核心流程:元数据拉取的源码原理。
让我们开始吧!
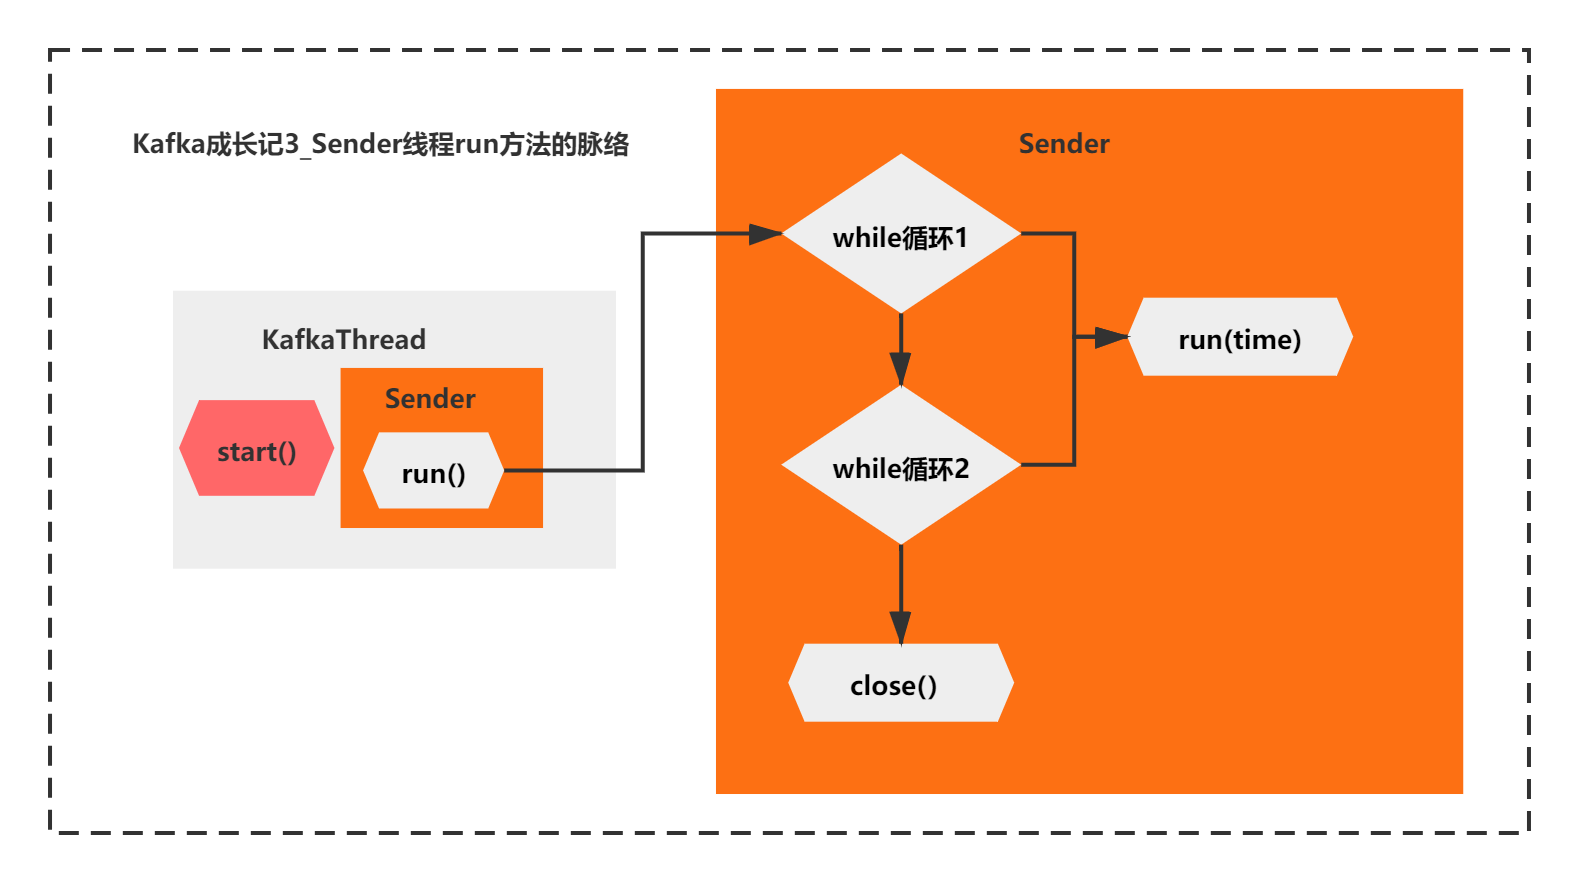
Sender的run方法在做什么?
这一节我们就继续分析下,sender的run方法开始执行会做什么。
 public void run() {

        log.debug("Starting Kafka producer I/O thread.");


        // main loop, runs until close is called

        while (running) {

            try {

                run(time.milliseconds());

            } catch (Exception e) {

                log.error("Uncaught error in kafka producer I/O thread: ", e);

            }

        }


        log.debug("Beginning shutdown of Kafka producer I/O thread, sending remaining records.");


        // okay we stopped accepting requests but there may still be

        // requests in the accumulator or waiting for acknowledgment,

        // wait until these are completed.

        while (!forceClose && (this.accumulator.hasUnsent() || this.client.inFlightRequestCount() > 0)) {

            try {

                run(time.milliseconds());

            } catch (Exception e) {

                log.error("Uncaught error in kafka producer I/O thread: ", e);

            }

        }

        if (forceClose) {

            // We need to fail all the incomplete batches and wake up the threads waiting on

            // the futures.

            this.accumulator.abortIncompleteBatches();

        }

        try {

            this.client.close();

        } catch (Exception e) {

            log.error("Failed to close network client", e);

        }


        log.debug("Shutdown of Kafka producer I/O thread has completed.");

    }
这个run方法的核心脉络很简单。主要就是2个while循环+线程的close,而2个while循环,他们都调用了run(long time)的这个方法。
通过注释你可以看到,第二个while是处理特殊情况的,当第一个while退出后,还有未发送的请求,需要第二个while循环处理完成,才会关闭线程。
整体脉络如下图所示:
接着其实就该看下run方法主要在干什么了?
   /**

     * Run a single iteration of sending

     *

     * @param now

     *            The current POSIX time in milliseconds

     */

    void run(long now) {

        Cluster cluster = metadata.fetch();

        // get the list of partitions with data ready to send

        RecordAccumulator.ReadyCheckResult result = this.accumulator.ready(cluster, now);


        // if there are any partitions whose leaders are not known yet, force metadata update

        if (result.unknownLeadersExist)

            this.metadata.requestUpdate();


        // remove any nodes we aren't ready to send to

        Iterator<Node> iter = result.readyNodes.iterator();

        long notReadyTimeout = Long.MAX_VALUE;

        while (iter.hasNext()) {

            Node node = iter.next();

            if (!this.client.ready(node, now)) {

                iter.remove();

                notReadyTimeout = Math.min(notReadyTimeout, this.client.connectionDelay(node, now));

            }

        }


        // create produce requests

        Map<Integer, List<RecordBatch>> batches = this.accumulator.drain(cluster,

                                                                         result.readyNodes,

                                                                         this.maxRequestSize,

                                                                         now);

        if (guaranteeMessageOrder) {

            // Mute all the partitions drained

            for (List<RecordBatch> batchList : batches.values()) {

                for (RecordBatch batch : batchList)

                    this.accumulator.mutePartition(batch.topicPartition);

            }

        }


        List<RecordBatch> expiredBatches = this.accumulator.abortExpiredBatches(this.requestTimeout, now);

        // update sensors

        for (RecordBatch expiredBatch : expiredBatches)

            this.sensors.recordErrors(expiredBatch.topicPartition.topic(), expiredBatch.recordCount);


        sensors.updateProduceRequestMetrics(batches);

        List<ClientRequest> requests = createProduceRequests(batches, now);

        // If we have any nodes that are ready to send + have sendable data, poll with 0 timeout so this can immediately

        // loop and try sending more data. Otherwise, the timeout is determined by nodes that have partitions with data

        // that isn't yet sendable (e.g. lingering, backing off). Note that this specifically does not include nodes

        // with sendable data that aren't ready to send since they would cause busy looping.

        long pollTimeout = Math.min(result.nextReadyCheckDelayMs, notReadyTimeout);

        if (result.readyNodes.size() > 0) {

            log.trace("Nodes with data ready to send: {}", result.readyNodes);

            log.trace("Created {} produce requests: {}", requests.size(), requests);

            pollTimeout = 0;

        }

        for (ClientRequest request : requests)

            client.send(request, now);


        // if some partitions are already ready to be sent, the select time would be 0;

        // otherwise if some partition already has some data accumulated but not ready yet,

        // the select time will be the time difference between now and its linger expiry time;

        // otherwise the select time will be the time difference between now and the metadata expiry time;

        this.client.poll(pollTimeout, now);

    }
上面的代码,你如果第一次看,你肯定会觉得,这个脉络非常不清晰,不知道重点在哪里。不过还好有些注释,你能大体猜到他在干嘛。
accumulator的ready,networkclient的ready、networkclient的send、networkclient的poll
这些好像是在准备内存区域、准备网络连接的node节点、发送数据、拉取响应结果的意思。
可是如果你猜不到,该怎么办呢?
这时候就可以祭出debug这个杀器了。由于是producer,我们可以在Hellowolrd的这个客户端打断点,一步一步看下。
当你对run方法一步一步打了断点之后你会发现:
accumulator的ready,networkclient的ready、networkclient的send 这些的逻辑几乎都没有执行,全部都是初始化空对象,或者方法内部直接return。
直接一路执行到了client.poll方法。如下图所示:

那么,你可以得出一个结论,while第一次循环这个run方法的核心逻辑,其实只有一句话:
client.poll(pollTimeout, now)
整体脉络如下所示:
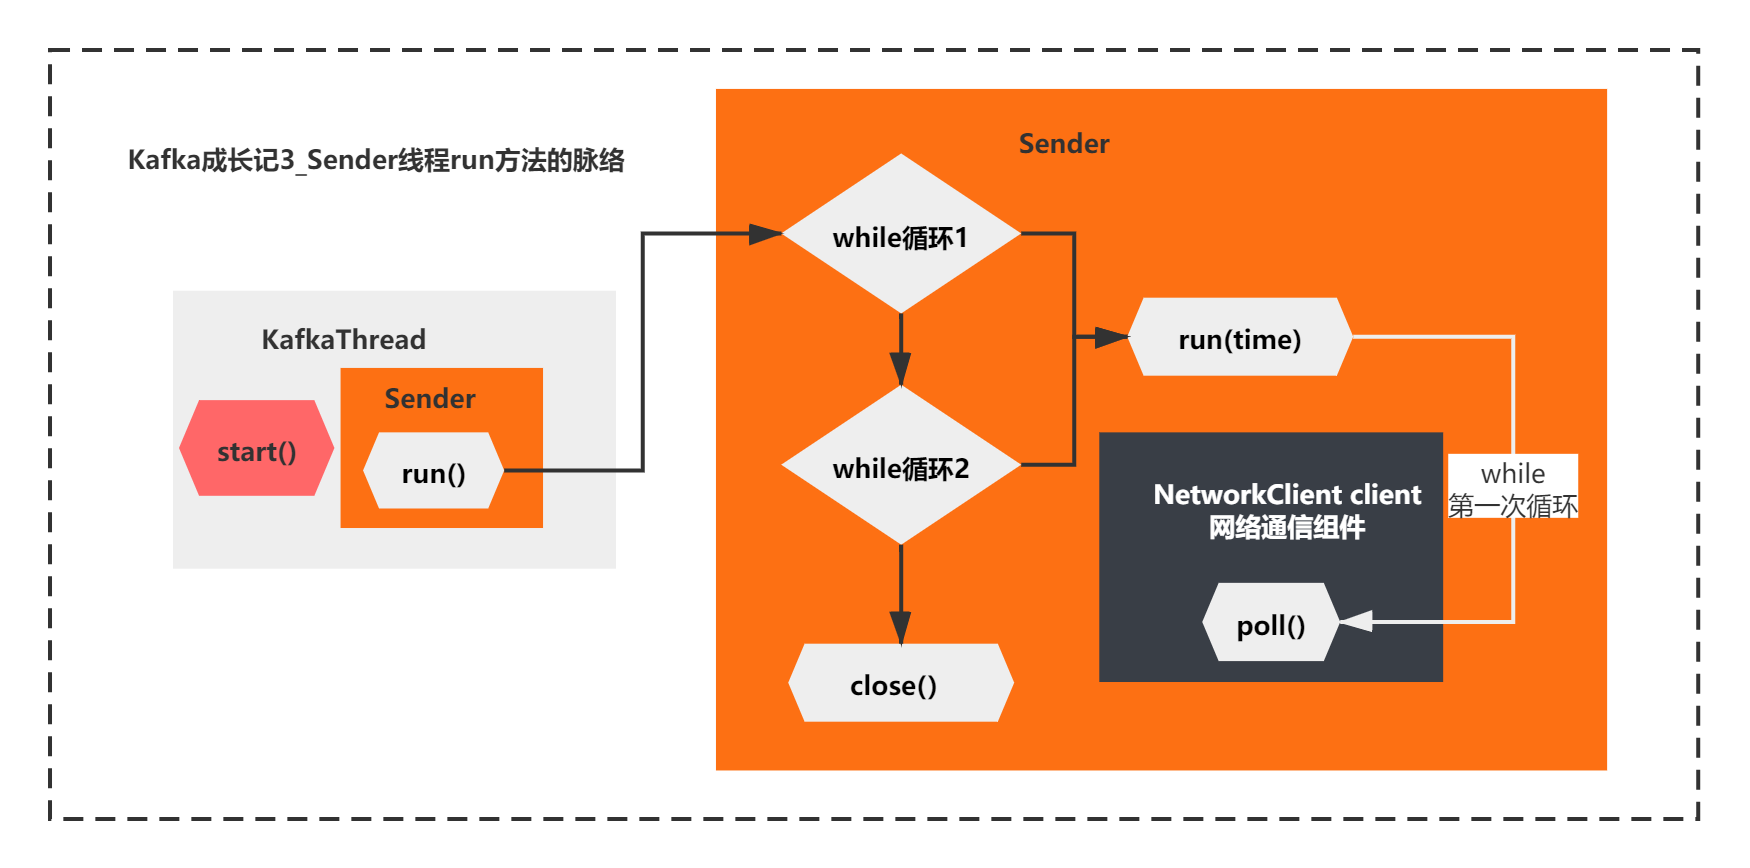
看来接下来,这个NetworkClient的poll方法,就是关键中的关键了:
    /**

     * Do actual reads and writes to sockets.

     * 对套接字进行实际读取和写入

     *

     * @param timeout The maximum amount of time to wait (in ms) for responses if there are none immediately,

     *                must be non-negative. The actual timeout will be the minimum of timeout, request timeout and

     *                metadata timeout

     * @param now The current time in milliseconds

     * @return The list of responses received

     */

    @Override

    public List<ClientResponse> poll(long timeout, long now) {

        long metadataTimeout = metadataUpdater.maybeUpdate(now);

        try {

            this.selector.poll(Utils.min(timeout, metadataTimeout, requestTimeoutMs));

        } catch (IOException e) {

            log.error("Unexpected error during I/O", e);

        }


        // process completed actions

        long updatedNow = this.time.milliseconds();

        List<ClientResponse> responses = new ArrayList<>();

        handleCompletedSends(responses, updatedNow);

        handleCompletedReceives(responses, updatedNow);

        handleDisconnections(responses, updatedNow);

        handleConnections();

        handleTimedOutRequests(responses, updatedNow);


        // invoke callbacks

        for (ClientResponse response : responses) {

            if (response.request().hasCallback()) {

                try {

                    response.request().callback().onComplete(response);

                } catch (Exception e) {

                    log.error("Uncaught error in request completion:", e);

                }

            }

        }


        return responses;

    }
这个方法的脉络就清晰多了,通过方法名和注释,我们几乎可以猜出他的一些作用主要有:
1)注释说:对套接字进行实际读取和写入
2)metadataUpdater.maybeUpdate(),你还记得NetworkClient的组件DefaultMetadataUpdater么,方法名意思是可能进行元数据更新。这个好像很关键的样子
3)接着执行了Selector的poll方法,这个是NetworkClient的另一个组件Selector,还记得么?它底层封装了原生的NIO Selector。这个方法应该也比较关键。
4)后续对response执行了一系列的方法,从名字上看, handleCompletedSends 处理完成发送的请求、handleCompletedReceives处理完成接受的请求、handleDisconnections处理断开连接的请求、handleConnections处理连接成功的请求、处理超时的请求handleTimedOutRequests。根据不同情况有不同的处理。
5)最后还有一个response的相关的回调处理,如果注册了回调函数,会执行下。这个应该不是很关键的逻辑
也就是简单的说就是NetworkClient执行poll方法,主要通过selector处理请求的读取和写入,对响应结果做不同的处理而已。
如下图所示:
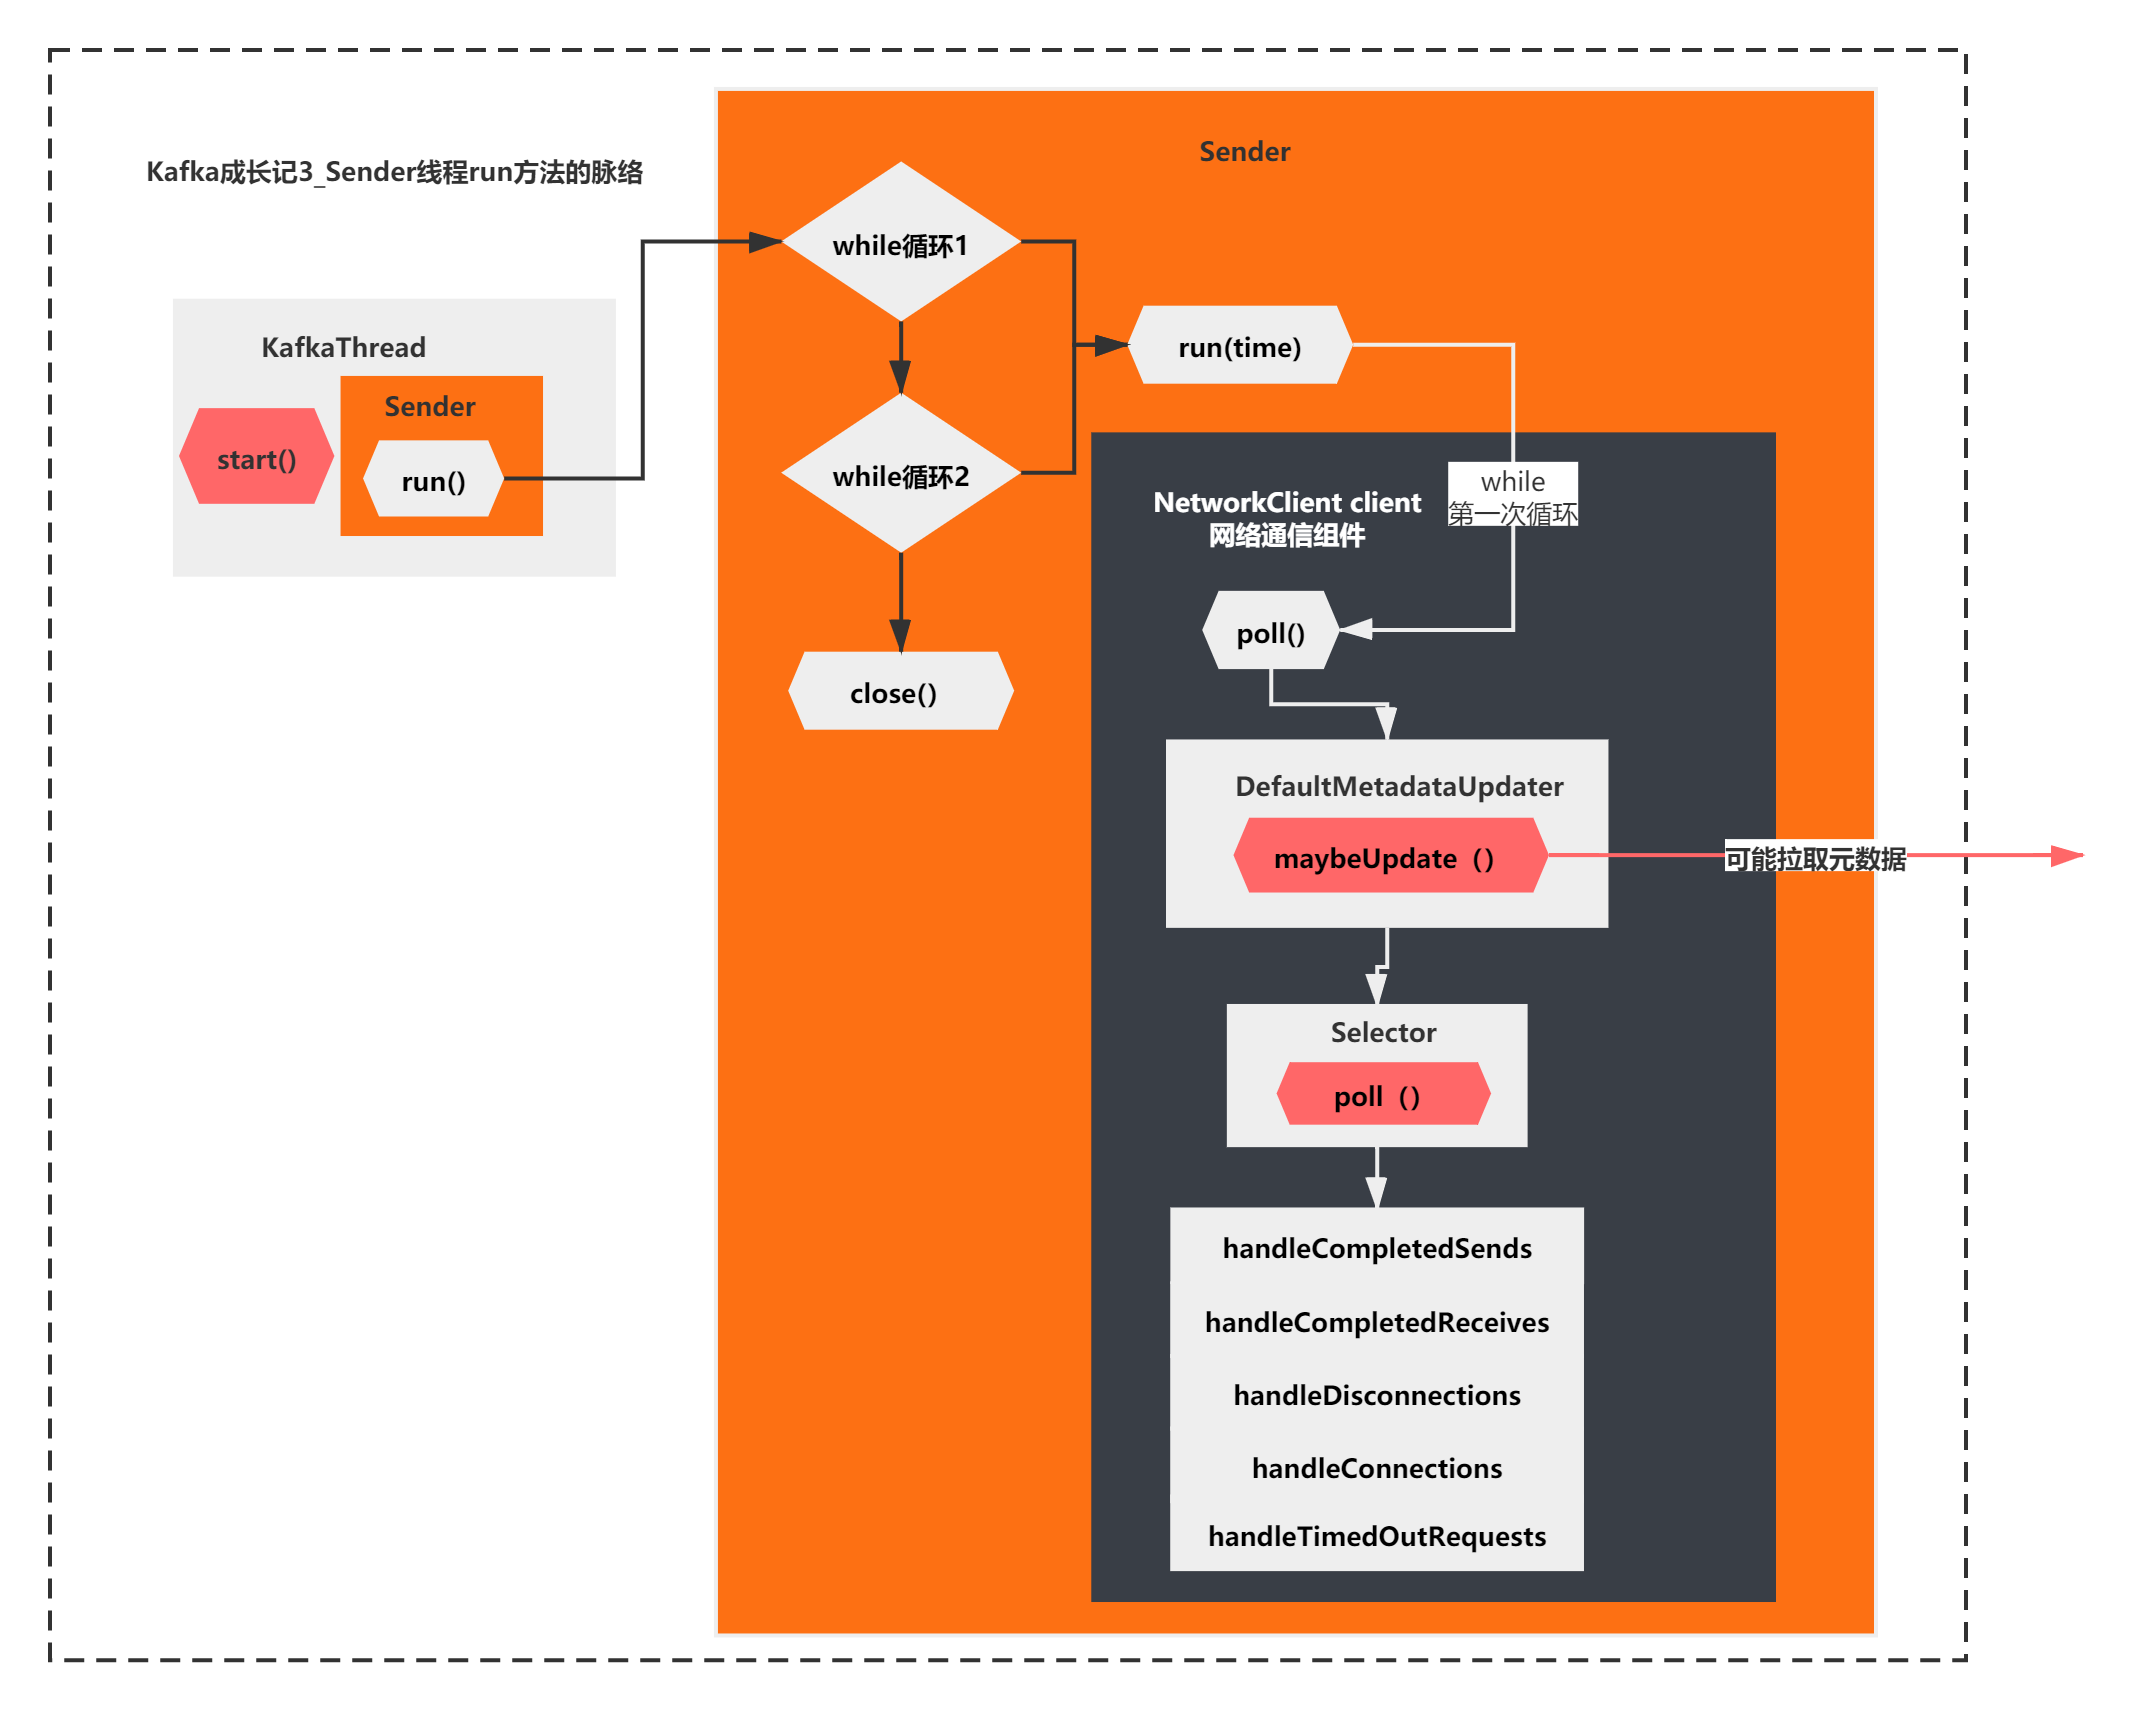
到这里其实我们基本摸清出了run方法主要在做的一件事情了,由于是第一次循环,之前的accumulator的ready,networkclient的ready、networkclient的send 什么都没做,第一次while循环run方法核心执行的是networkclient.poll方法。而poll方法的主要逻辑就是上面图中所示的了。
maybeUpdate可能在在拉取元数据?
刚才我们分析到,poll方法首先执行的是DefaultMetadataUpdater的maybeUpdate方法,它是可能更新的意思。我们来一起看下他的逻辑吧。
        public long maybeUpdate(long now) {

            // should we update our metadata?

            long timeToNextMetadataUpdate = metadata.timeToNextUpdate(now);

            long timeToNextReconnectAttempt = Math.max(this.lastNoNodeAvailableMs + metadata.refreshBackoff() - now, 0);

            long waitForMetadataFetch = this.metadataFetchInProgress ? Integer.MAX_VALUE : 0;

            // if there is no node available to connect, back off refreshing metadata

            long metadataTimeout = Math.max(Math.max(timeToNextMetadataUpdate, timeToNextReconnectAttempt),

                    waitForMetadataFetch);


            if (metadataTimeout == 0) {

                // Beware that the behavior of this method and the computation of timeouts for poll() are

                // highly dependent on the behavior of leastLoadedNode.

                Node node = leastLoadedNode(now);

                maybeUpdate(now, node);

            }


            return metadataTimeout;

        }


   /**

     * The next time to update the cluster info is the maximum of the time the current info will expire and the time the

     * current info can be updated (i.e. backoff time has elapsed); If an update has been request then the expiry time

     * is now

     */

    public synchronized long timeToNextUpdate(long nowMs) {

        long timeToExpire = needUpdate ? 0 : Math.max(this.lastSuccessfulRefreshMs + this.metadataExpireMs - nowMs, 0);

        long timeToAllowUpdate = this.lastRefreshMs + this.refreshBackoffMs - nowMs;

        return Math.max(timeToExpire, timeToAllowUpdate);

    }
原来这里有一个时间的判断,当判断满足才会执行maybeUpdate。
这个时间计算好像比较复杂,但是大体可以看出来,metadataTimeout是根据三个时间综合判断出来的,如果是0才会执行真正的maybeUpdate()。
像这种时候,我们可以直接在metadataTimeout这里打一个断点,看下它的值是如何计算的,比如下图:
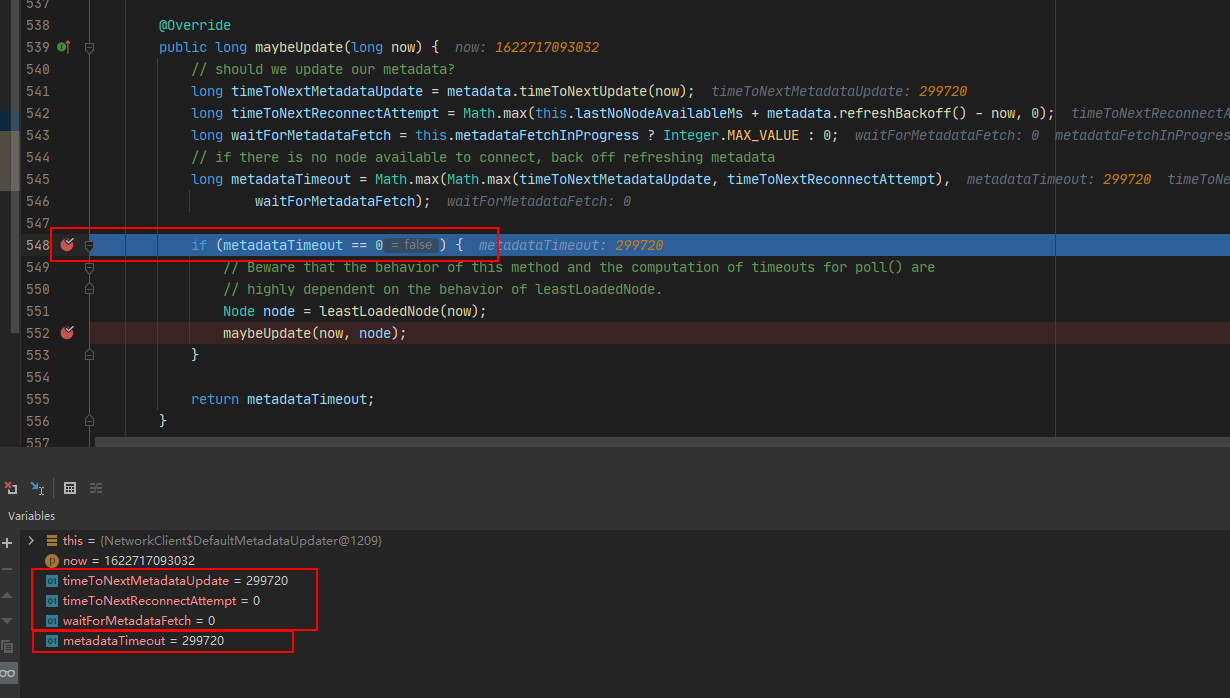
你会发现,当第一次执行while循环,执行到poll方法,执行到这个maybeUpdate的时候,决定metadataTimeout的3个值,有两个是0,其中一个是非0,是一个299720的值。最终导致metadataTimeout也是非0,是299720。
也就是说,第一次while循环不会执行maybeUpdate的任何逻辑。

那么接着向下执行 Selector的poll()方法。
   /**

     * Do whatever I/O can be done on each connection without blocking. This includes completing connections, completing

     * disconnections, initiating new sends, or making progress on in-progress sends or receives.

     * 在不阻塞的情况下,在每个连接上做任何可以做的 I/O。这包括完成连接完成、断开连接,启动新的发送,或在进行中的发送或接收请求

     */

    @Override

    public void poll(long timeout) throws IOException {

        if (timeout < 0)

            throw new IllegalArgumentException("timeout should be >= 0");


        clear();


        if (hasStagedReceives() || !immediatelyConnectedKeys.isEmpty())

            timeout = 0;


        /* check ready keys */

        long startSelect = time.nanoseconds();

        //这个方法是NIO底层Selector.select(),会阻塞监听

        int readyKeys = select(timeout);

        long endSelect = time.nanoseconds();

        currentTimeNanos = endSelect;

        this.sensors.selectTime.record(endSelect - startSelect, time.milliseconds());


        //如果监听到有操作的SelectionKeys,也就是readyKeys>0< 会执行一些操作

        if (readyKeys > 0 || !immediatelyConnectedKeys.isEmpty()) {

            pollSelectionKeys(this.nioSelector.selectedKeys(), false);

            pollSelectionKeys(immediatelyConnectedKeys, true);

        }


        addToCompletedReceives();


        long endIo = time.nanoseconds();

        this.sensors.ioTime.record(endIo - endSelect, time.milliseconds());

        maybeCloseOldestConnection();

    }


    private int select(long ms) throws IOException {

        if (ms < 0L)

            throw new IllegalArgumentException("timeout should be >= 0");


        if (ms == 0L)

            return this.nioSelector.selectNow();

        else

            return this.nioSelector.select(ms);

    }
上面的脉络主要是2步:
1)select(timeout): NIO底层selector.select(),会阻塞监听
2)pollSelectionKeys(): 监听到有操作的SelectionKeys,做了一些操作
也就是说,最终,Sender线程的run方法,第一次while循环执行poll方法,最后什么都没干,会被selector.select()阻塞住。
如下图所示:

new KafkaProducer之后
分析完了run方法的执行 ,我们分析的KafkaProducerHelloWorld第一步new KafkaProducer()基本就完成了。
大家经历了一节半的时间,终于分析清楚了KafkaProducer创建的原理。不不知道你对Kafka的Producer是不是有了更深的理解了。
分析了new KafkaProducer()之后呢?
我们继续接着KafkaProducerHelloWorld往下分析,你还记得KafkaProducerHelloWorld的代码么?
public class KafkaProducerHelloWorld {
public static void main(String[] args) throws Exception {
//配置Kafka的一些参数
Properties props = new Properties();
props.put("bootstrap.servers", "mengfanmao.org:9092");
props.put("key.serializer", "org.apache.kafka.common.serialization.StringSerializer");
props.put("value.serializer", "org.apache.kafka.common.serialization.StringSerializer");
// 创建一个Producer实例
KafkaProducer<String, String> producer = new KafkaProducer<>(props);
// 封装一条消息
ProducerRecord<String, String> record = new ProducerRecord<>(
"test-topic", "test-key", "test-value");
// 同步方式发送消息,会阻塞在这里,直到发送完成
// producer.send(record).get();
// 异步方式发送消息,不阻塞,设置一个监听回调函数即可
producer.send(record, new Callback() {
@Override
public void onCompletion(RecordMetadata metadata, Exception exception) {
if(exception == null) {
System.out.println("消息发送成功");
} else {
exception.printStackTrace();
}
}
});
Thread.sleep(5 * 1000);
// 退出producer
producer.close();
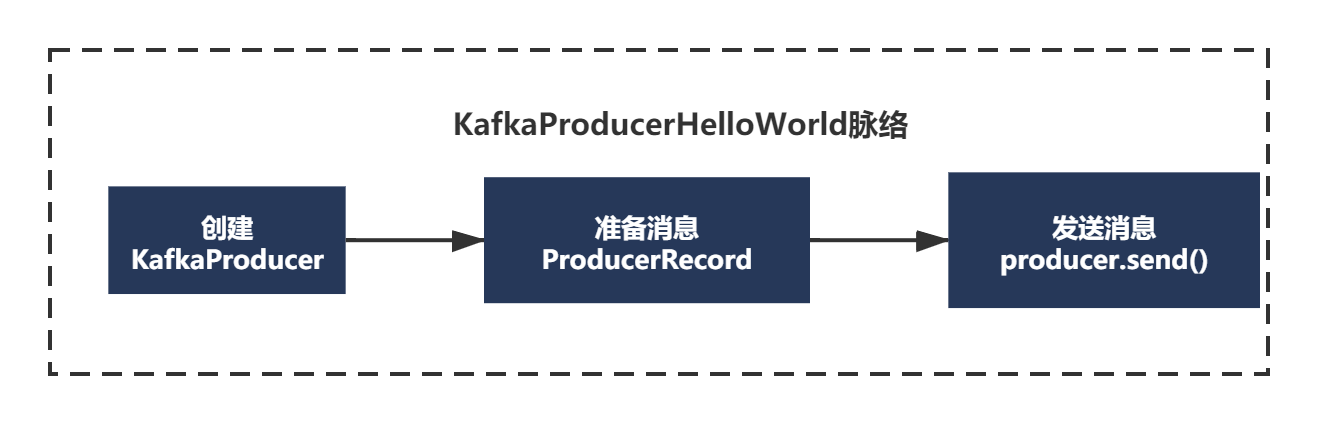
}KafkaProducerHelloWorld主要就3步:
1)new KafkaProducer 这个我们已经分析完了,主要分析了配置文件的解析、各个组件是什么、有什么,还有就是刚才分析的run线程第一次循环到底执行了什么。
2) new ProducerRecord 创建待发送的消息
3) producer.send() 发送消息
首先创建待发送的消息:
ProducerRecord<String, String> record = new ProducerRecord<>("test-topic", "test-key", "test-value");


public ProducerRecord(String topic, K key, V value) {

    this(topic, null, null, key, value);

}

    /**

     * Creates a record with a specified timestamp to be sent to a specified topic and partition

     * 创建具有指定时间戳的记录以发送到指定主题和分区

     * @param topic The topic the record will be appended to

     * @param partition The partition to which the record should be sent

     * @param timestamp The timestamp of the record

     * @param key The key that will be included in the record

     * @param value The record contents

     */

    public ProducerRecord(String topic, Integer partition, Long timestamp, K key, V value) {

        if (topic == null)

            throw new IllegalArgumentException("Topic cannot be null");

        if (timestamp != null && timestamp < 0)

            throw new IllegalArgumentException("Invalid timestamp " + timestamp);

        this.topic = topic;

        this.partition = partition;

        this.key = key;

        this.value = value;

        this.timestamp = timestamp;

    }
我们之前提过,Record表示了一条消息的抽象封装。这个ProducerRecord其实就表示了一条消息。
从构造函数的注释可以看出来**,ProducerRecord可以指定往哪个topic,哪一个分区partition,并且消息可以设置一个时间戳。分区和时间戳默认可以不指定**
其实看这块源码,我们主要得到的信息就是这些了,这些都比较简单。就不画图了。
发送消息时的元数据拉取触发
当Producer和Record都创建好了之后,可以用同步或者异步的方式发送消息。
// 同步方式发送消息,会阻塞在这里,直到发送完成

// producer.send(record).get();


// 异步方式发送消息,不阻塞,设置一个监听回调函数即可

producer.send(record, new Callback() {

    @Override

    public void onCompletion(RecordMetadata metadata, Exception exception) {

        if(exception == null) {

            System.out.println("消息发送成功");

        } else {

            exception.printStackTrace();

        }

    }

});


    //同步发送

    @Override

    public Future<RecordMetadata> send(ProducerRecord<K, V> record) {

        return send(record, null);

    }

    //异步发送

    public Future<RecordMetadata> send(ProducerRecord<K, V> record, Callback callback) {

        // intercept the record, which can be potentially modified; this method does not throw exceptions

        ProducerRecord<K, V> interceptedRecord = this.interceptors == null ? record : this.interceptors.onSend(record);

        return doSend(interceptedRecord, callback);

    }
同步和异步的整个发送逻辑如下图所示:
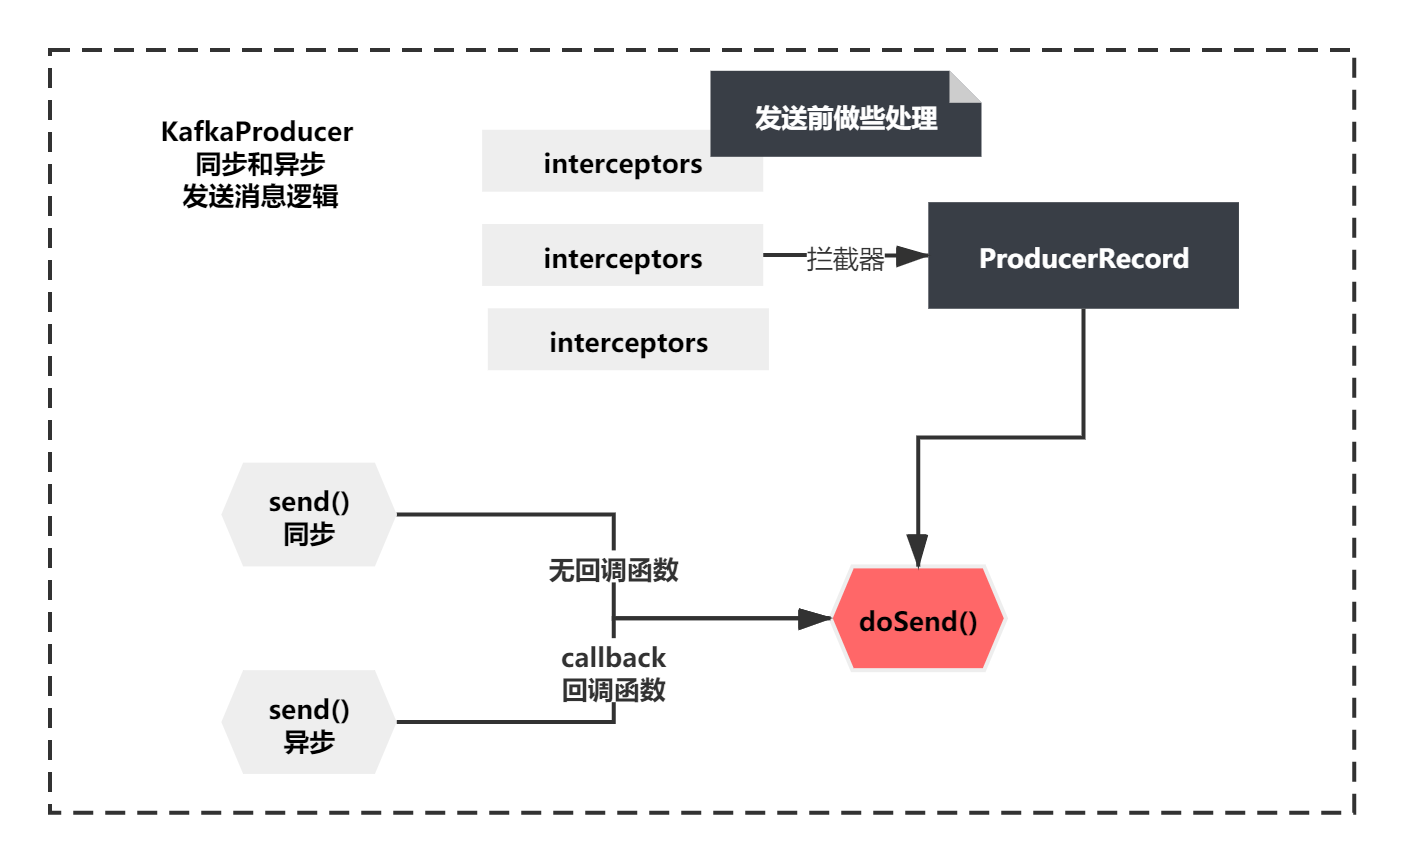
从上图你会发现,但是无论同步发送还是异步底层都会调用同一个方法doSend()。区别就是有没有callBack回调函数而已,他们还都在调用前注册一些拦截器,这里我们抓大放小下,我们重点还是关注doSend方法。
doSend方法如下:
/**
* Implementation of asynchronously send a record to a topic. Equivalent to <code>send(record, null)</code>.
* See {@link #send(ProducerRecord, Callback)} for details.
*/
private Future<RecordMetadata> doSend(ProducerRecord<K, V> record, Callback callback) {
TopicPartition tp = null;
try {
// first make sure the metadata for the topic is available
long waitedOnMetadataMs = waitOnMetadata(record.topic(), this.maxBlockTimeMs);
long remainingWaitMs = Math.max(0, this.maxBlockTimeMs - waitedOnMetadataMs);
byte[] serializedKey;
try {
serializedKey = keySerializer.serialize(record.topic(), record.key());
} catch (ClassCastException cce) {
throw new SerializationException("Can't convert key of class " + record.key().getClass().getName() +
" to class " + producerConfig.getClass(ProducerConfig.KEY_SERIALIZER_CLASS_CONFIG).getName() +
" specified in key.serializer");
}
byte[] serializedValue;
try {
serializedValue = valueSerializer.serialize(record.topic(), record.value());
} catch (ClassCastException cce) {
throw new SerializationException("Can't convert value of class " + record.value().getClass().getName() +
" to class " + producerConfig.getClass(ProducerConfig.VALUE_SERIALIZER_CLASS_CONFIG).getName() +
" specified in value.serializer");
}
int partition = partition(record, serializedKey, serializedValue, metadata.fetch());
int serializedSize = Records.LOG_OVERHEAD + Record.recordSize(serializedKey, serializedValue);
ensureValidRecordSize(serializedSize);
tp = new TopicPartition(record.topic(), partition);
long timestamp = record.timestamp() == null ? time.milliseconds() : record.timestamp();
log.trace("Sending record {} with callback {} to topic {} partition {}", record, callback, record.topic(), partition);
// producer callback will make sure to call both 'callback' and interceptor callback
Callback interceptCallback = this.interceptors == null ? callback : new InterceptorCallback<>(callback, this.interceptors, tp);
RecordAccumulator.RecordAppendResult result = accumulator.append(tp, timestamp, serializedKey, serializedValue, interceptCallback, remainingWaitMs);
if (result.batchIsFull || result.newBatchCreated) {
log.trace("Waking up the sender since topic {} partition {} is either full or getting a new batch", record.topic(), partition);
this.sender.wakeup();
}
return result.future;
// handling exceptions and record the errors;
// for API exceptions return them in the future,
// for other exceptions throw directly
} catch (ApiException e) {
log.debug("Exception occurred during message send:", e);
if (callback != null)
callback.onCompletion(null, e);
this.errors.record();
if (this.interceptors != null)
this.interceptors.onSendError(record, tp, e);
return new FutureFailure(e);
} catch (InterruptedException e) {
this.errors.record();
if (this.interceptors != null)
this.interceptors.onSendError(record, tp, e);
throw new InterruptException(e);
} catch (BufferExhaustedException e) {
this.errors.record();
this.metrics.sensor("buffer-exhausted-records").record();
if (this.interceptors != null)
this.interceptors.onSendError(record, tp, e);
throw e;
} catch (KafkaException e) {
this.errors.record();
if (this.interceptors != null)
this.interceptors.onSendError(record, tp, e);
throw e;
} catch (Exception e) {
// we notify interceptor about all exceptions, since onSend is called before anything else in this method
if (this.interceptors != null)
this.interceptors.onSendError(record, tp, e);
throw e;
}
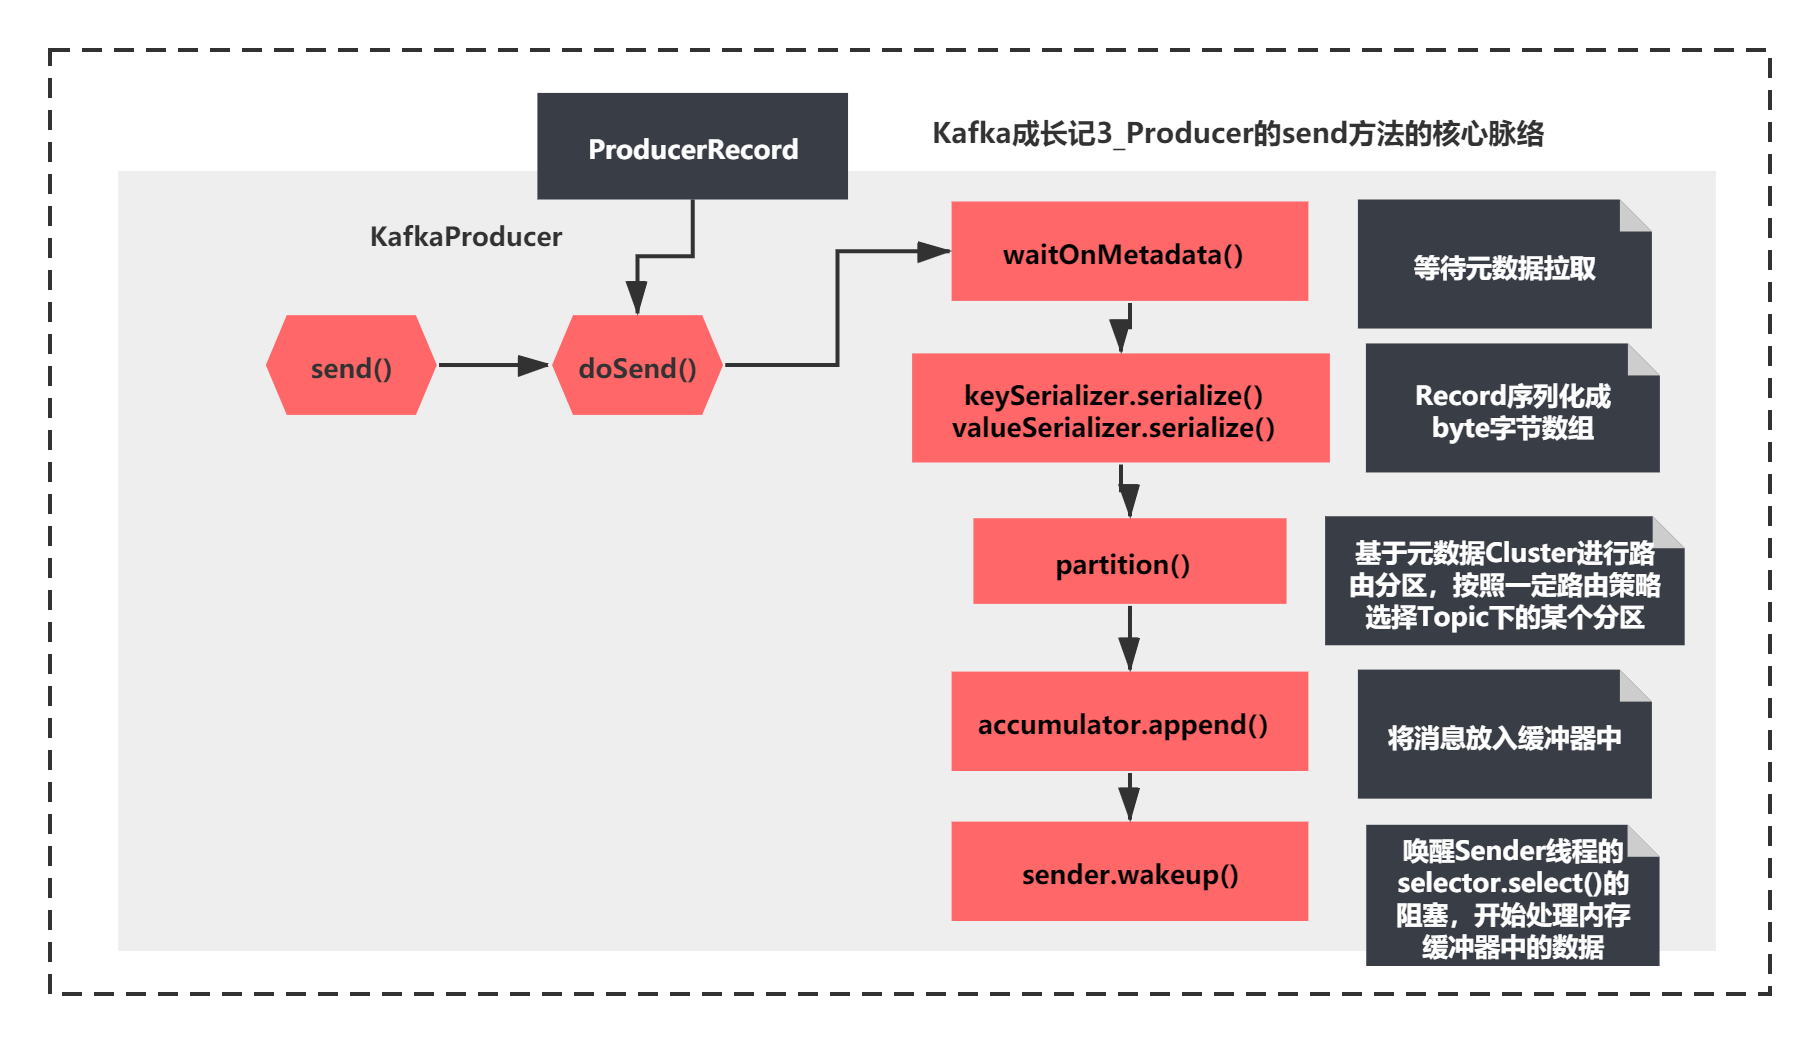
}这个方法的脉络虽然比较长,但是脉络还是比较清晰,主要先执行了:
1)waitOnMetadata 应该是等待元数据拉取
2)keySerializer.serialize和valueSerializer.serialize,很明显就是将Record序列化成byte字节数组
3)通过partition进行路由分区,按照一定路由策略选择Topic下的某个分区
4)accumulator.append将消息放入缓冲器中
5)唤醒Sender线程的selector.select()的阻塞,开始处理内存缓冲器中的数据。
用图来表示如下所示:
这两节我们重点分析元数据拉取的这个场景的源码原理。
所以这里我们着重先看下步骤1 ,之后的4步我们之后会分析到的。
waitOnMetadata 如何等待元数据拉取的?
既然send的第一步是执行waitOnMetadata方法,首先看下它的代码:
 /**

     * Wait for cluster metadata including partitions for the given topic to be available.

     * @param topic The topic we want metadata for

     * @param maxWaitMs The maximum time in ms for waiting on the metadata

     * @return The amount of time we waited in ms

     */

    private long waitOnMetadata(String topic, long maxWaitMs) throws InterruptedException {

        // add topic to metadata topic list if it is not there already.

        if (!this.metadata.containsTopic(topic))

            this.metadata.add(topic);


        if (metadata.fetch().partitionsForTopic(topic) != null)

            return 0;


        long begin = time.milliseconds();

        long remainingWaitMs = maxWaitMs;

        while (metadata.fetch().partitionsForTopic(topic) == null) {

            log.trace("Requesting metadata update for topic {}.", topic);

            int version = metadata.requestUpdate();

            sender.wakeup();

            metadata.awaitUpdate(version, remainingWaitMs);

            long elapsed = time.milliseconds() - begin;

            if (elapsed >= maxWaitMs)

                throw new TimeoutException("Failed to update metadata after " + maxWaitMs + " ms.");

            if (metadata.fetch().unauthorizedTopics().contains(topic))

                throw new TopicAuthorizationException(topic);

            remainingWaitMs = maxWaitMs - elapsed;

        }

        return time.milliseconds() - begin;

    }


    /**

     * Get the current cluster info without blocking

     */

    public synchronized Cluster fetch() {

        return this.cluster;

    }


    public synchronized int requestUpdate() {

        this.needUpdate = true;

        return this.version;

    }


    /**

     * Wait for metadata update until the current version is larger than the last version we know of

     */

    public synchronized void awaitUpdate(final int lastVersion, final long maxWaitMs) throws InterruptedException {

        if (maxWaitMs < 0) {

            throw new IllegalArgumentException("Max time to wait for metadata updates should not be < 0 milli seconds");

        }

        long begin = System.currentTimeMillis();

        long remainingWaitMs = maxWaitMs;

        while (this.version <= lastVersion) {

            if (remainingWaitMs != 0)

                wait(remainingWaitMs);

            long elapsed = System.currentTimeMillis() - begin;

            if (elapsed >= maxWaitMs)

                throw new TimeoutException("Failed to update metadata after " + maxWaitMs + " ms.");

            remainingWaitMs = maxWaitMs - elapsed;

        }

    }
这个方法核心就是判断了是否有Cluster元数据信息,如果没有,进行了如下操作:
1)metadata.requestUpdate(); 更新了一个needUpdate标记,这个值会影响之前maybeUpdate的metadataTimeout的计算,可以让metadataTimeout为0
2)sender.wakeup();唤醒之前nioSelector.select()的阻塞,继续执行
3)metadata.awaitUpdate(version, remainingWaitMs); 主要进行了版本比较,如果不是最新版本,调用了Metadata.wait()方法(wait方法是每个Object都会有的方法,一般和notify或者notifyAll组合使用)
整个过程我直接用图给大家表示一下,如下所示:
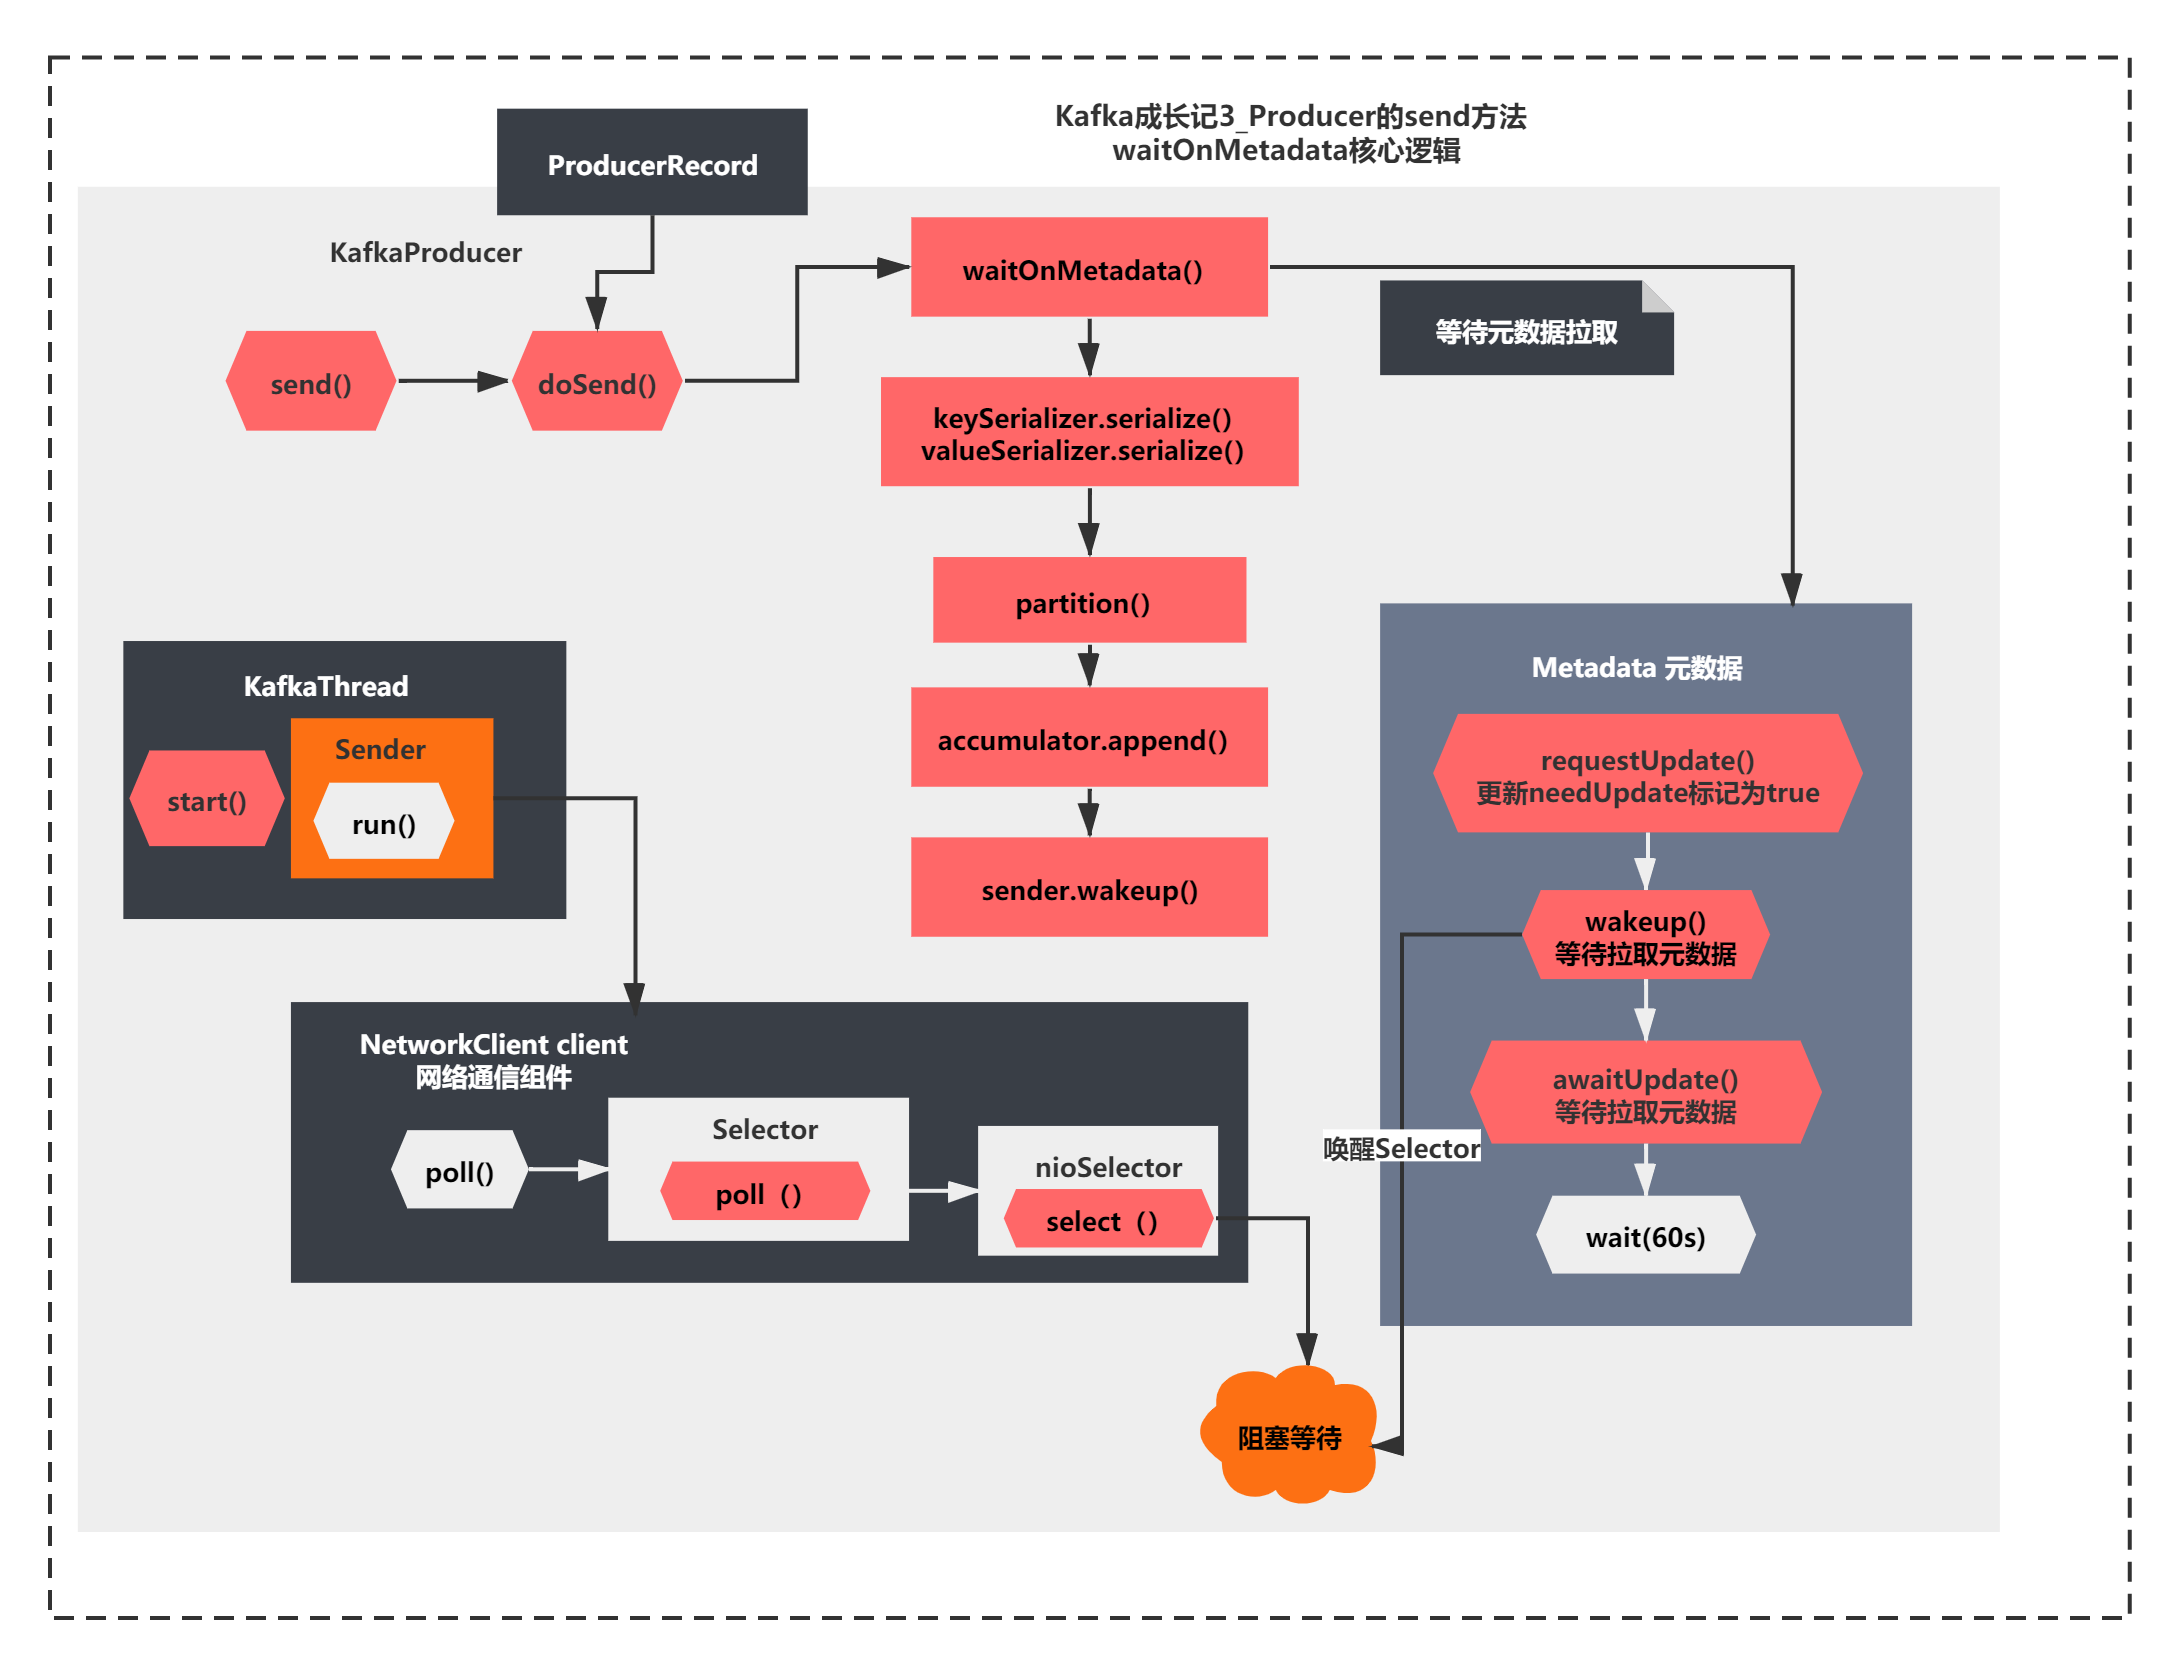
整个图就是今天我们分析的关键结果了,**这里通过两种阻塞和唤醒机制,一个是NIO中Selector的select()和wakeUp(),一个是MetaData对象的wait()和notifyAll()机制。**所以这里要结合之前Sender线程的阻塞逻辑一起来理解。
是不是很有意思一种使用,这里没有用任何线程的join、sleep、wait、park、unpark、notify这些方法。
小结
最后我们简单小结下,这里一节我们主要分析了如下Producer的源码原理:
初始化KafkaProducer时并没有去拉取元数据,但是创建了Selector组件,启动了Sender线程,select阻塞等待请求响应。由于还没有发送任何请求,所以初始化时并没有去真正拉取元数据。
真正拉取元数据是在第一次send方法调用时,会唤醒唤醒Selector之前阻塞的select(),进入第二次while循环,从而发送拉取元数据请求,并且通过Obejct.wait的机制等待60s,等到从Broker拉取元数据成功后,才会继续执行真正的生产消息的请求,否则会报拉取元数据超时异常。
这一节我们只是看到了进行了wait如何等待元数据拉取。
而唤醒Selector的select之后应该会进入第二次while循环
那第二次while循环如何发送请求拉取元数据请求,并且在成功后notifyAll()进行唤醒操作的呢?
让我们下一节继续分析,大家敬请期待! 我们下一节见!
本文由博客一文多发平台 OpenWrite 发布!
|


- 上一条: Redis 日志篇:无畏宕机与快速恢复的杀手锏 2021-09-29
- 下一条: Kafka成长记4:Producer 元数据拉取源码原理(下) 2021-10-08
- Kafka成长记4:Producer 元数据拉取源码原理(下) 2021-10-08
- 6张图为你分析Kafka Producer 消息缓存模型 2022-03-21
- 为什么 HTTP/3 基于UDP,可靠么? 2021-07-22
- 【Kafka核心原理解析】之调优策略解析 2022-01-25
- 一文详解Kafka API 2022-02-11