深度学习框架量化感知训练的思考及OneFlow的解决方案

作者 | BBuf
原文首发于公众号GiantPandaCV
0x0.总览
相信不少小伙伴都了解或者使用了一些深度学习框架比如PyTorch,TensorFlow,OneFlow(也是笔者目前正在参与开发的)。但当大家使用深度学习框架的训练量化方案时如果第一感觉是太复杂了,那么你可能会对这篇文章感兴趣!因为我在2个月前开始接触这个项目前,对量化感知训练的知识积累也非常少,并且我也会认为各个框架的量化感知训练方案很复杂,甚至不想研究这些API。
这篇文章我会以PyTorch的两代量化方案开始切入谈一谈他们的好处和坏处,然后我会讲讲我在吸收PyTorch的部分优秀成果(FX模块)并加上一些自己的想法后把OneFlow的量化感知训练方案做成了什么样。这里先罗列一下这篇文章中涉及到的知识点:
PyTorch FX模块
Eager Pass
量化感知训练
Conv+BN的融合
OneFlow的动静转换(nn.Graph)
ONNX
TensorRT
如果你对上面的任意一个知识点不熟悉,那也完全没有关系。实际上即使你只会用PyTorch搭建模型,也可以快速把本文的量化感知训练方案用起来。因为量化感知训练的工作和模型转化成ONNX以及用TensorRT来部署运行的代码在OneFlow社区中均开源了。
简单总结一下就是,用户可以基于OneFlow搭建一个动态图模型(即nn.Module,算子的API和PyTorch基本一样),然后调用下面的几行代码就可以完成这个动态图模型(是一个nn.Module)自动在合适的位置插入量化模块生成一个量化模型(仍然是nn.Module),然后基于这个量化模型完成量化感知训练。
gm: flow.fx.GraphModule = flow.fx.symbolic_trace(net)
qconfig = {
    'quantization_bit': 8,
    'quantization_scheme': "symmetric",
    'quantization_formula': "cambricon",
    'per_layer_quantization': True,
    'momentum': 0.95,
}

net = quantization_aware_training(gm, flow.randn(1, 3, 32, 32), qconfig)
net = net.to(device)
在训练完成后,调用下面的代码完成训练量化模型到ONNX的转换,并使用TensorRT在GPU上推理。
quantization_resnet18 = quantization_aware_training(gm, flow.randn(1, 3, 32, 32).to("cuda"), qconfig)
quantization_resnet18 = quantization_resnet18.to("cuda")
quantization_resnet18.eval()
checkpoint = flow.load('/home/zhangxiaoyu/oneflow-cifar/checkpoint/epoch_11_val_acc_83.280000')
quantization_resnet18.load_state_dict(checkpoint)

origin_gm: flow.fx.GraphModule = flow.fx.symbolic_trace(resnet18)
dequantization_resnet18 = dequantization_aware_training(origin_gm, gm, flow.randn(1, 3, 32, 32).to("cuda"), qconfig)
dequantization_resnet18 = dequantization_resnet18.to("cuda")
dequantization_resnet18.eval()

class ResNet18Graph(flow.nn.Graph):
    def __init__(self):
        super().__init__()
        self.m = dequantization_resnet18

    def build(self, x):
        out = self.m(x)
        return out

def test_resnet():
    resnet_graph = ResNet18Graph()
    resnet_graph._compile(flow.randn(1, 3, 32, 32).to("cuda"))
    with tempfile.TemporaryDirectory() as tmpdirname:
        flow.save(dequantization_resnet18.state_dict(), tmpdirname)
        convert_to_onnx_and_check(resnet_graph, flow_weight_dir=tmpdirname, onnx_model_path="/tmp", print_outlier=True)
        ipt_dict, onnx_res = run_onnx("/tmp/model.onnx", get_onnx_provider("cpu"))
        trt_res = run_tensorrt("/tmp/model.onnx", ipt_dict[list(ipt_dict.keys())[0]])
        compare_result(onnx_res, trt_res, atol=1e-4, print_outlier=True)

test_resnet()用户只需要使用上面示例中的短短几十行代码就可以完成一个端到端的量化感知训练到GPU部署的全流程。所以我认为这项工作是有趣并且相对简洁的,当然我更希望听到用户的想法,然后就写了这篇文章来分享这个项目。这个项目的所有代码均开源在了OneFlow社区,下面是对应的链接。如果你使用这个方案碰到了什么问题都可以第一时间联系我。我的个人微信号是bbuf23333,来时请备注 量化感知训练
OneFlow FX(用来实现量化感知训练的基础设施):https://github.com/Oneflow-Inc/oneflow/pull/5939
OneFlow Cifar(基于OneFlow FX量化训练Cifar10):https://github.com/BBuf/oneflow-cifar
OneFlow->ONNX和TensorRT运行:
https://github.com/Oneflow-Inc/oneflow_convert/pull/45
0x1. PyTorch量化方案的沉浮
这一节主要基于PyTorch的官方文档:https://pytorch.org/docs/1.9.0/quantization.html来进行说明。PyTorch第一代量化方案叫作Eager Mode Quantization,然后从1.8开始推出FX Graph Mode Quantization。Eager Mode Quantization需要用户手动更改模型,并手动指定需要融合的Op。FX Graph Mode Quantization解放了用户,一键自动量化,无需用户修改模型和关心内部操作。这个改动具体可以体现在下面的图中。
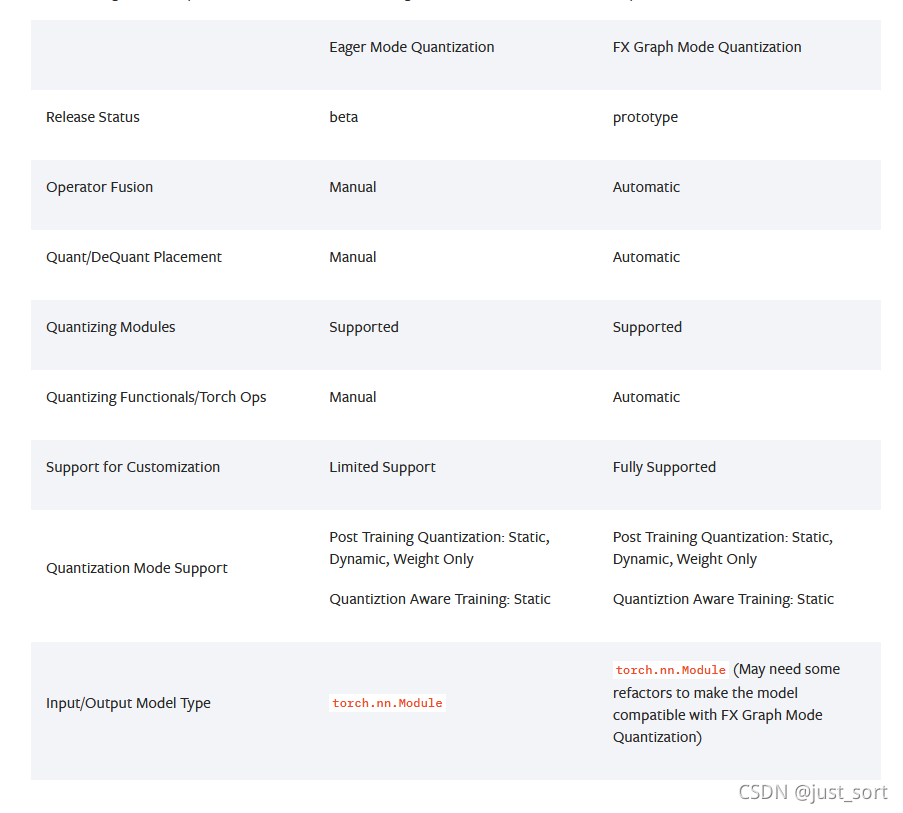
下面分别解释一下PyTorch这两种量化方式的区别。
Eager Mode Quantization
class Net(nn.Module):

    def __init__(self, num_channels=1):
        super(Net, self).__init__()
        self.conv1 = nn.Conv2d(num_channels, 40, 3, 1)
        self.conv2 = nn.Conv2d(40, 40, 3, 1)
        self.fc = nn.Linear(5*5*40, 10)

    def forward(self, x):
        x = F.relu(self.conv1(x))
        x = F.max_pool2d(x, 2, 2)
        x = F.relu(self.conv2(x))
        x = F.max_pool2d(x, 2, 2)
        x = x.reshape(-1, 5*5*40)
        x = self.fc(x)
return xPyoTrch可以在nn.Module的foward里面随意构造网络,可以调用其它nn.Module,也可以调用nn.functional.xxx,甚至可以在里面写If这种控制逻辑。但这也带来了一个问题,就是在Eager层面比较难获取这个模型的图结构。所以在Eager Mode Quantization中,要量化这个网络必须做手动修改:
class NetQuant(nn.Module):

    def __init__(self, num_channels=1):
        super(NetQuant, self).__init__()
        self.conv1 = nn.Conv2d(num_channels, 40, 3, 1)
        self.relu1 = nn.ReLU()
        self.pool1 = nn.MaxPool2d(2, 2)
        self.conv2 = nn.Conv2d(40, 40, 3, 1)
        self.relu2 = nn.ReLU()
        self.pool2 = nn.MaxPool2d(2, 2)
        self.fc = nn.Linear(5*5*40, 10)

        self.quant = torch.quantization.QuantStub()
        self.dequant = torch.quantization.DeQuantStub()

    def forward(self, x):
        x = self.quant(x)
        x = self.relu1(self.conv1(x))
        x = self.pool1(x)
        x = self.relu2(self.conv2(x))
        x = self.pool2(x)
        x = x.reshape(-1, 5*5*40)
        x = self.fc(x)
        x = self.dequant(x)
return x也就是说,除了Conv,Linear这些含有参数的Module外,ReLU,MaxPool2d也要在__init__中定义,Eager Mode Quantization才可以正确处理。
除了这一点,还有一些情况是需要Fuse之后做量化比如Conv+ReLU,那么还需要手动指定这些层进行折叠,目前这种量化模式支持ConV + BN、ConV + BN + ReLU、Conv + ReLU、Linear + ReLU、BN + ReLU的折叠。
model = NetQuant()model.qconfig = torch.quantization.get_default_qconfig('fbgemm')
modules_to_fuse = [['conv1', 'relu1'], ['conv2', 'relu2']]  # 指定合并layer的名字
model_fused = torch.quantization.fuse_modules(model, modules_to_fuse)
model_prepared = torch.quantization.prepare(model_fused)
post_training_quantize(model_prepared, train_loader)   # 这一步是做后训练量化
model_int8 = torch.quantization.convert(model_prepared)整个流程比较逆天,不知道有没有人用。不过公众号有小伙伴确实用过,见文章:PyTorch量化感知训练详解
FX Graph Mode Quantization
关于PyTorch FX模块是什么,我们放到下一节来讲。
由于 PyTorch FX 可以自动跟踪 forward 里面的代码,因此它是真正记录了网络里面的每个节点,在 fuse 和动态插入量化节点方面,比 Eager 模式强太多。对于前面那个模型代码,我们不需要对网络做修改,直接让 FX 帮我们自动修改网络即可,一个使用示例如下:
from torch.quantization import get_default_qconfig, quantize_jit
from torch.quantization.quantize_fx import prepare_fx, convert_fx
model = Net()
qconfig = get_default_qconfig("fbgemm")
qconfig_dict = {"": qconfig}
model_prepared = prepare_fx(model, qconfig_dict)
post_training_quantize(model_prepared, train_loader)      # 这一步是做后训练量化
model_int8 = convert_fx(model_prepared)
基于这两套量化方案来看,基于FX的量化方案显然更加优秀,因为它不需要用户在定义模型的时候做什么额外限制,用户仍然是随心所欲的写模型代码就行了,这才符合人的常识。我在做OneFlow的量化感知训练方案时也正是基于FX这个基础设施(我将其核心功能移植到了OneFlow框架下,代码链接第一节给了)来完成的。
另外在TensorRT的工程中:https://github.com/NVIDIA/TensorRT/tree/master/tools/pytorch-quantization发现PyTorch量化模型要转为ONNX来部署现在似乎还是得基于第一个版本的方案,PyTorch FX这边似乎想直接从nn.Module转到TensorRT,不经过ONNX的中间表示,所以我这里的技术路线还是有点不一样。
0x2. OneFlow FX (在Eager中写Pass)
FX可以用来做什么?
FX可以将一个nn.Module变换后生成另外一个nn.Module,只需要在这个架构的基础上实现一些Transformation(也可以叫Pass),比如在Conv后自动插入伪量化节点实现训练量化,然后生成GraphModule(这个也是nn.Module)进行训练和转为ONNX进行部署。
OneFlow FX模块在这个PR(https://github.com/Oneflow-Inc/oneflow/pull/5939)中实现,这里复用了PyTorch FX基础设施的核心逻辑和代码,这个PR里的主要工作为:
[x] 精简PyTorch FX的特殊设计比如对_C的Trace,和Jit的交互。保留核心功能,即Symbolic Tracing,Intermediate Representation和Transformation以及Python Codegen这4个组成部分。
[x] 分步实现以上四大功能的代码,完全适配OneFlow的相关设计,现在可以一键import oneflow.fx来体验。可以Trace住基本所有OneFlow API搭建的Eager模型的结构,并将其变换成一个等价的
nn.Module,我们还可以在这个nn.Module的基础上自定义自己的Transformation Pass,我这里实现了Shape Infer和Quantization以及Dequantization的Pass。[x] 增加AlexNet,ResNet50,MobileNetV2等模型的测试。
然后分享一下OneFlow FX的整体思路。
先看一个示例:
import oneflow
    # Simple module for demonstration
    class MyModule(oneflow.nn.Module):
        def __init__(self):
            super().__init__()
            self.param = oneflow.nn.Parameter(oneflow.rand(3, 4))
            self.linear = oneflow.nn.Linear(4, 5)
        def forward(self, x):
            return self.linear(x + self.param).clamp(min=0.0, max=1.0)
    module = MyModule()
    from oneflow.fx import symbolic_trace
    # Symbolic tracing frontend - captures the semantics of the module
    symbolic_traced : oneflow.fx.GraphModule = symbolic_trace(module)
    # High-level intermediate representation (IR) - Graph representation
    print(symbolic_traced.graph)
    """
    graph():
        %x : [#users=1] = placeholder[target=x]
        %param : [#users=1] = get_attr[target=param]
        %add : [#users=1] = call_function[target=operator.add](args = (%x, %param), kwargs = {})
        %linear : [#users=1] = call_module[target=linear](args = (%add,), kwargs = {})
        %clamp : [#users=1] = call_method[target=clamp](args = (%linear,), kwargs = {min: 0.0, max: 1.0})
        return clamp

    """
    # Code generation - valid Python code
    print(symbolic_traced.code)
    """
    def forward(self, x):
        param = self.param
        add = x + param;  x = param = None
        linear = self.linear(add);  add = None
        clamp = linear.clamp(min = 0.0, max = 1.0);  linear = None
        return clamp
"""在FX中有一个Proxy类,它会把OneFlow中所有的call_method和call_function以及math库中的函数和常见的魔法函数都包装一遍来记录OneFlow中所有的运算符,这个在import oneflow.fx时就做好了。然后在传入一个nn.Module调用symbolic_trace进行跟踪代码的时候会首先处理__init__中的其它nn.Module,把这些nn.Module也用Proxy包起来,同时输入数据也要包起来。
用Proxy包好所有程序中可能存在的运算符之后就执行一遍forward,这个forward的输入数据不再是Tensor而是Proxy(Tensor)。由于程序的执行过程类似于一个运算符和数据入栈出栈的过程,所以我们可以直接按照这个执行顺序将刚才用Proxy记录下来的数据和Op进行unpack,unpack之后可以拿到真实的Tensor, Parameter和运算符等等,我们将这些数据和运算符当作点和边去构造一个新的Graph。那么Graph是怎么转化成nn.Module的呢?FX中通过引入GraphModule的数据结构来持有这个Graph,此外GraphModule还持有code和foward成员,这两者都是基于Graph自动生成的,注意GraphModule仍然是nn.Module。
自动生成的代码就是GraphModule中的code,打印出来其实就是整个forward函数的完整执行过程。
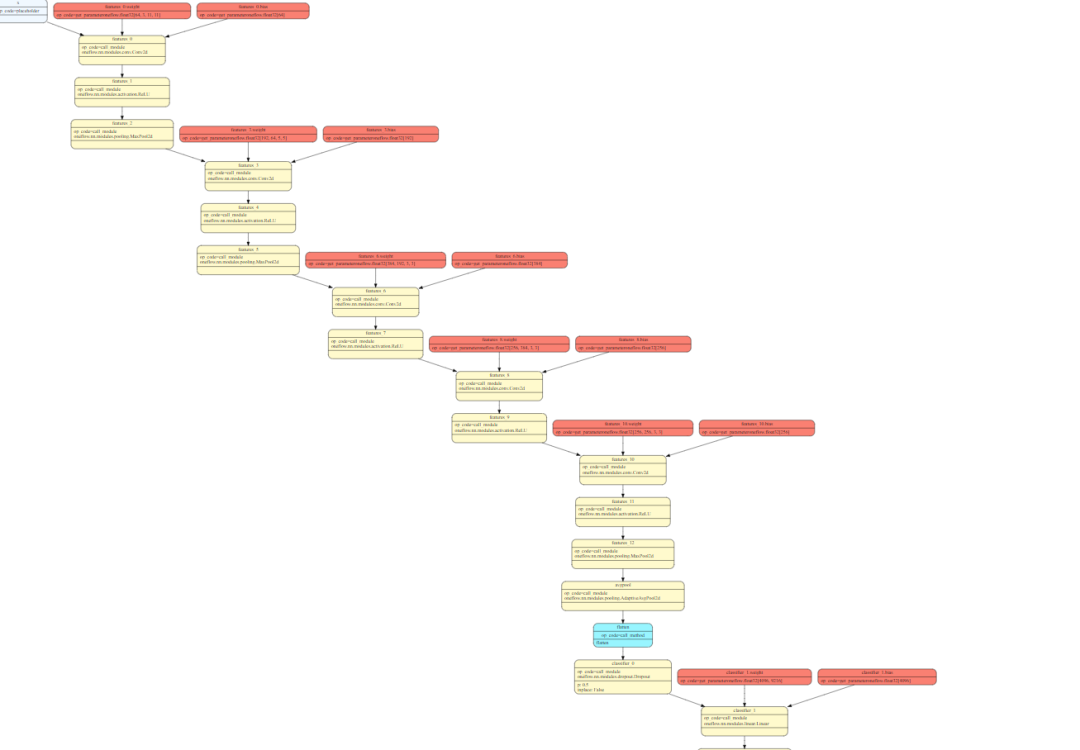
另外FX还提供了一个Interpreter类用来让用户自定义nn.Module的执行过程,比如这个PR提供了一个基于这个类做所有中间Tensor形状推导的Pass。另外还提供了一个基于pydot将GraphModule结构可视化的Pass,如下图。
相信到这里大家对FX有一个了解了,这里最棒的一个功能就是我们可以对nn.Module进行修改,然后返回变化后的nn.Module。说
到这里,我们自然能想到量化感知训练不就是把Conv+BN或者Conv,Linear等组件替换为插入了伪量化节点的组件吗?所以我们基于FX来写一个Pass就可以完成这件事了。
这就是上面说的,FX支持在Eager写Pass。
然而FX也存在缺陷,目前无法处理控制流,需要注意网络中不要带控制流(不过这一点暂时影响不大,因为用户一般都不会部署含有控制流的网络,如果有这个需求我们可以交流)。
0x3. 实现量化感知训练Pass
有了OneFlow FX之后我们就可以实现一个量化感知训练的Pass来将用户自定义的网络中自动插入量化感知训练组件来完成量化感知训练了。
以ResNet18为例,它只有Conv+BN这种模式,即对于任意一个卷积层后面都跟了一个BN层,在推理的时候TensorRT会做Conv+BN的融合,那么我们在训练的时候也是必须要做Conv+BN的融合的,不然会影响部署的精度。所以,我们首先需要把BN层的参数和卷积层的参数融合,然后再对这个参数做量化,具体过程如下图所示:

下面是Conv和BN融合的公式:
所以:
公式中的,和分别表示卷积层的权值与偏置,和分别为卷积层的输入与输出,则根据的计算公式,可以推出融合了batchnorm参数之后的权值与偏置,和。
按照这个公式就可以实现Conv+BN融合后的量化感知训练组件,在实现中对训练和推理的处理有些不一样的地方,我在代码中标注出来了。
class QConvBN(flow.nn.Module):
    def __init__(
        self,
        conv_module,
        bn_module,
        quantization_bit=8,
        quantization_scheme="symmetric",
        quantization_formula="google",
        per_layer_quantization=True,
        momentum=0.95,
    ):
        super().__init__()
        self.quantization_bit = quantization_bit
        self.quantization_scheme = quantization_scheme
        self.quantization_formula = quantization_formula
        self.per_layer_quantization = per_layer_quantization
        self.conv_module = conv_module
        self.bn_module = bn_module

        self.moving_min_max_observer = flow.nn.MovingAverageMinMaxObserver(
            training=self.training,
            quantization_formula=quantization_formula,
            stop_update_after_iters=1,
            quantization_bit=quantization_bit,
            quantization_scheme=quantization_scheme,
            momentum=momentum,
        )

        self.min_max_observer = flow.nn.MinMaxObserver(
            quantization_formula=quantization_formula,
            quantization_bit=quantization_bit,
            quantization_scheme=quantization_scheme,
            per_layer_quantization=per_layer_quantization,
        )

        self.fake_quantization = flow.nn.FakeQuantization(
            quantization_formula=quantization_formula,
            quantization_bit=quantization_bit,
            quantization_scheme=quantization_scheme,
        )

    def fold_bn(self, mean, std):
        if self.bn_module.affine:
            gamma_ = self.bn_module.weight / std
            weight = self.conv_module.weight * gamma_.view(
                self.conv_module.out_channels, 1, 1, 1
            )
            if self.conv_module.bias is not None:
                bias = (
                    gamma_ * self.conv_module.bias - gamma_ * mean + self.bn_module.bias
                )
            else:
                bias = self.bn_module.bias - gamma_ * mean
        else:
            gamma_ = 1 / std
            weight = self.conv_module.weight * gamma_
            if self.conv_module.bias is not None:
                bias = gamma_ * self.conv_module.bias - gamma_ * mean
            else:
                bias = -gamma_ * mean

        return weight, bias

    def forward(self, x):
        scale, zero_point = self.moving_min_max_observer(
            x, flow.tensor([0], dtype=flow.int64).to(x.device.type)
        )
        x = self.fake_quantization(x, scale, zero_point)
        if self.training:
            y = flow.nn.functional.conv2d(
                x,
                self.conv_module.weight,
                self.conv_module.bias,
                stride=self.conv_module.stride,
                padding=self.conv_module.padding,
                dilation=self.conv_module.dilation,
                groups=self.conv_module.groups,
            )
            y = y.permute(1, 0, 2, 3)  # NCHW -> CNHW
            y = y.view(self.conv_module.out_channels, -1)  # CNHW -> C,NHW
            mean = y.mean(1)
            var = y.var(1)
            with flow.no_grad():
                self.bn_module.running_mean = (
                    self.bn_module.momentum * self.bn_module.running_mean
                    + (1 - self.bn_module.momentum) * mean
                )
                self.bn_module.running_var = (
                    self.bn_module.momentum * self.bn_module.running_var
                    + (1 - self.bn_module.momentum) * var
                )
        else:
            mean = flow.Tensor(self.bn_module.running_mean)
            var = flow.Tensor(self.bn_module.running_var)

        std = flow.sqrt(var + self.bn_module.eps)
        weight, bias = self.fold_bn(mean, std)

        weight_scale, weight_zero_point = self.min_max_observer(weight)
        res = flow.nn.functional.conv2d(
            x,
            self.fake_quantization(weight, weight_scale, weight_zero_point),
            bias,
            stride=self.conv_module.stride,
            padding=self.conv_module.padding,
            dilation=self.conv_module.dilation,
            groups=self.conv_module.groups,
        )
return res实现了这个组件之后我们就可以实现一个量化感知训练Pass,即将用户的nn.Module抽象的计算图中的Conv+BN都替换成这个QConvBN组件,替换部分的代码实现如下:
for x in gm.graph.nodes:
        if x.target in insert_place:
            with gm.graph.inserting_after(x):
                y = x.next
                if (
                    isinstance(insert_op_state[x.target], flow.nn.Conv2d)
                    and y.target in insert_place
                    and isinstance(insert_op_state[y.target], flow.nn.BatchNorm2d)
                ):
                    now_target = get_current_module_space(x.target)
                    if now_target == "":
                        now_target = f"fake_conv_bn.{cnt}"
                    else:
                        now_target = (
                            f"{get_current_module_space(x.target)}.fake_conv_bn.{cnt}"
                        )
                    gm.add_submodule(
                        now_target,
                        QConvBN(
                            insert_op_state[x.target],
                            insert_op_state[y.target],
                            quantization_bit,
                            quantization_scheme,
                            quantization_formula,
                            per_layer_quantization,
                            momentum,
                        ),
                    )
                    y.replace_all_uses_with(x)
                    gm.graph.erase_node(y)
                    gm.delete_submodule(y.target)
                    qconvbn = gm.graph.call_module(module_name=now_target, args=x.args,)
                    cnt = cnt + 1
                    x.replace_all_uses_with(qconvbn)
                    gm.graph.erase_node(x)
gm.delete_submodule(x.target)在gm(ResNet18 Trace出来的GraphModule,仍然是nn.Module)中找到Conv+BN的组件,将其删除然后替换成QConvBN组件。
0x4. 基于ResNet18量化感知训练Cifar10
基于上面实现的量化Pass,我们就可以方便的对自定义的模型进行量化感知训练了,以ResNet18为例,我们在原始的动态图训练代码基础上加上下面几行代码就可以了。
gm: flow.fx.GraphModule = flow.fx.symbolic_trace(net)
qconfig = {
    'quantization_bit': 8,
    'quantization_scheme': "symmetric",
    'quantization_formula': "cambricon",
    'per_layer_quantization': True,
    'momentum': 0.95,
}

net = quantization_aware_training(gm, flow.randn(1, 3, 32, 32), qconfig)
net = net.to(device)这里qconfig让用户可以方便的配置OneFlow支持的各种量化方式。具体可以看之前的文章介绍:基于OneFlow实现量化感知训练
第一个net就是用户定义的动态图模型,经过这个Pass之后获得新的net,新的net就已经自动插入好了量化感知训练组件。其它的训练和测试的过程和普通的FP32训练完全一致,就不赘述了。我基于ResNet18在Cifar10上训练了几个OneFlow支持的量化配置,均训练了200个Epoch,超参一致,结果如下:
Note:
The `momentum` parameter in the `MovingAverageMinMaxObserver` class defaults to 0.95, which will not be changed in the following experiments.
## Accuracy
| Model             | quantization_bit | quantization_scheme | quantization_formula | per_layer_quantization | Acc |
| ----------------- | ----------- | ----------- | ----------- | ----------- | ----------- |
| ResNet18          |  8     |  symmetric      | google       |   True     |  95.19%      |
| ResNet18          |  8     |  symmetric      | google       |   False    |  95.24%      |
| ResNet18          |  8     |  affine         | google       |   True     |  95.32%      |
| ResNet18          |  8     |  affine         | google       |   False    |  95.30%      |
| ResNet18 | 8 | symmetric | cambricon | True | 95.19% |工程地址:https://github.com/BBuf/oneflow-cifar。ResNet18在Cifar10上基于FP32训练的精度是:95.62%。这里各种量化参数下的量化感知训练精度均和原始精度持平。上面的cambricon代表的是寒武纪量化方案,google代表的是Google的量化方案。
0x5. 基于量化感知训练模型改写原始模型
上面我们已经基于量化感知训练模型进行了量化感知训练,接下来我们要考虑怎么部署这个量化感知训练模型了。显然现在这个模型不是我们期望部署的样子,因为我们用来部署的模型BN应该已经合并到卷积层里了,而不是被保留下来。所以我们要基于量化感知训练模型的参数对原始模型进行改写,然后将其用于转化ONNX再到TensorRT。
这里和量化感知训练类似,我们实现一个dequantization Pass。这个Pass用来将QConvBN组件替换成一个DConv2d组件。DConv2d组件代码实现如下:
class DConv2d(flow.nn.Conv2d):
    def __init__(
        self,
        in_channels,
        out_channels,
        kernel_size,
        stride,
        padding,
        dilation,
        groups,
        quantization_bit=8,
        quantization_scheme="symmetric",
        quantization_formula="google",
        per_layer_quantization=True,
        momentum=0.95,
    ) -> None:
        super(DConv2d, self).__init__(
            in_channels, out_channels, kernel_size, stride, padding, dilation, groups
        )

        self.moving_min_max_observer = flow.nn.MovingAverageMinMaxObserver(
            training=self.training,
            quantization_formula=quantization_formula,
            stop_update_after_iters=1,
            quantization_bit=quantization_bit,
            quantization_scheme=quantization_scheme,
            momentum=momentum,
        )

        self.min_max_observer = flow.nn.MinMaxObserver(
            quantization_formula=quantization_formula,
            quantization_bit=quantization_bit,
            quantization_scheme=quantization_scheme,
            per_layer_quantization=per_layer_quantization,
        )

        self.fake_quantization = flow.nn.FakeQuantization(
            quantization_formula=quantization_formula,
            quantization_bit=quantization_bit,
            quantization_scheme=quantization_scheme,
        )

        self.register_buffer("new_zero", flow.Tensor(1))
        self.new_zero.fill_(0)

    def forward(self, x):
        scale, zero_point = self.moving_min_max_observer(
            x, self.new_zero.to(flow.int64).to(x.device.type)
        )
        x = self.fake_quantization(x, scale, zero_point)
        return flow.nn.functional.conv2d(
            x,
            self.weight,
            self.bias,
            stride=self.stride,
            padding=self.padding,
            dilation=self.dilation,
            groups=self.groups,
)然后我们只需要将原始的ResNet18模型里面的Conv+BN换成这个组件即可,请注意:这个组件的权重和偏置以及moving_min_max_observer的moving_min/max参数要赋值为训练好的量化感知模型的QConvBN组件对应的权重和偏置以及moving_min_max_observer的moving_min/max参数。dequantization Pass的核心部分如下:
for x in origin_gm.graph.nodes:
        if x.target in insert_place:
            with origin_gm.graph.inserting_after(x):
                y = x.next
                if (
                    isinstance(insert_op_state[x.target], flow.nn.Conv2d)
                    and y.target in insert_place
                    and isinstance(insert_op_state[y.target], flow.nn.BatchNorm2d)
                ):
                    now_target = get_current_module_space(x.target)
                    if now_target == "":
                        now_target = f"fake_conv_bn.{cnt}"
                    else:
                        now_target = (
                            f"{get_current_module_space(x.target)}.fake_conv_bn.{cnt}"
                        )

                    dequanzation_conv = DConv2d(
                        quantization_op_state[now_target].conv_module.in_channels,
                        quantization_op_state[now_target].conv_module.out_channels,
                        quantization_op_state[now_target].conv_module.kernel_size,
                        quantization_op_state[now_target].conv_module.stride,
                        quantization_op_state[now_target].conv_module.padding,
                        quantization_op_state[now_target].conv_module.dilation,
                        quantization_op_state[now_target].conv_module.groups,
                        quantization_bit,
                        quantization_scheme,
                        quantization_formula,
                        per_layer_quantization,
                        momentum,
                        )
                    mean = flow.Tensor(quantization_op_state[now_target].bn_module.running_mean)
                    var = flow.Tensor(quantization_op_state[now_target].bn_module.running_var)
                    std = flow.sqrt(var + quantization_op_state[now_target].bn_module.eps)

                    if quantization_op_state[now_target].bn_module.affine:
                        gamma_ = quantization_op_state[now_target].bn_module.weight / std
                        weight = quantization_op_state[now_target].conv_module.weight * gamma_.view(
                            quantization_op_state[now_target].conv_module.out_channels, 1, 1, 1
                        )
                        if quantization_op_state[now_target].conv_module.bias is not None:
                            bias = (
                                gamma_ * quantization_op_state[now_target].conv_module.bias - gamma_ * mean + quantization_op_state[now_target].bn_module.bias
                            )
                        else:
                            bias = quantization_op_state[now_target].bn_module.bias - gamma_ * mean
                    else:
                        gamma_ = 1 / std
                        weight = quantization_op_state[now_target].conv_module.weight * gamma_
                        if quantization_op_state[now_target].conv_module.bias is not None:
                            bias = gamma_ * quantization_op_state[now_target].conv_module.bias - gamma_ * mean
                        else:
                            bias = -gamma_ * mean

                    dequanzation_conv.weight = flow.nn.Parameter(weight)
                    dequanzation_conv.bias = flow.nn.Parameter(bias)
                    dequanzation_conv.moving_min_max_observer.moving_max = quantization_op_state[now_target].moving_min_max_observer.moving_max
                    dequanzation_conv.moving_min_max_observer.moving_min = quantization_op_state[now_target].moving_min_max_observer.moving_min

                    origin_gm.add_submodule(
                        now_target,
                        dequanzation_conv,
                    )
                    y.replace_all_uses_with(x)
                    origin_gm.graph.erase_node(y)
                    origin_gm.delete_submodule(y.target)
                    qconvbn = origin_gm.graph.call_module(module_name=now_target, args=x.args,)
                    cnt = cnt + 1
                    x.replace_all_uses_with(qconvbn)
                    origin_gm.graph.erase_node(x)
origin_gm.delete_submodule(x.target)这里手动执行了Conv和BN融合的工作并把融合后的权重和偏置赋给DConv2d组件。
0x6. 转换ONNX以及TensorRT推理
基于量化感知训练的模型以及dequantization Pass,我们就可以获得用于推理时的nn.Module了。我们将这个nn.Module转换成ONNX然后再放到TensorRT中进行推理就可以了。这部分的示例代码在:https://github.com/Oneflow-Inc/oneflow_convert/blob/add_fx_train_quantization/examples/oneflow2onnx/quantization/test_resnet18.py。我们截取核心部分进行解释。
# 加载训练好的量化模型权重
quantization_resnet18 = quantization_aware_training(gm, flow.randn(1, 3, 32, 32).to("cuda"), qconfig)
quantization_resnet18 = quantization_resnet18.to("cuda")
quantization_resnet18.eval()
checkpoint = flow.load('/home/zhangxiaoyu/oneflow-cifar/checkpoint/epoch_11_val_acc_83.280000')
quantization_resnet18.load_state_dict(checkpoint)

# 基于量化感知训练模型改写原始模型
origin_gm: flow.fx.GraphModule = flow.fx.symbolic_trace(resnet18)
dequantization_resnet18 = dequantization_aware_training(origin_gm, gm, flow.randn(1, 3, 32, 32).to("cuda"), qconfig)
dequantization_resnet18 = dequantization_resnet18.to("cuda")
dequantization_resnet18.eval()

# nn.Graph是转ONNX的桥梁,是把OneFlow的动态图转为静态图
class ResNet18Graph(flow.nn.Graph):
    def __init__(self):
        super().__init__()
        self.m = dequantization_resnet18

    def build(self, x):
        out = self.m(x)
        return out
# 测试函数
def test_resnet():
    resnet_graph = ResNet18Graph()
    resnet_graph._compile(flow.randn(1, 3, 32, 32).to("cuda"))
    with tempfile.TemporaryDirectory() as tmpdirname:
        flow.save(dequantization_resnet18.state_dict(), tmpdirname)
        convert_to_onnx_and_check(resnet_graph, flow_weight_dir=tmpdirname, onnx_model_path="/tmp", print_outlier=True)
        ipt_dict, onnx_res = run_onnx("/tmp/model.onnx", get_onnx_provider("cpu"))
        trt_res = run_tensorrt("/tmp/model.onnx", ipt_dict[list(ipt_dict.keys())[0]])
        compare_result(onnx_res, trt_res, atol=1e-4, print_outlier=True)

test_resnet()
首先我们使用dequantization Pass将原始模型改写成了部署时的模型,并且在这个Pass中同步处理好了权重的更改。然后我们将现在需要部署的这个模型(类型是nn.Module)通过OneFlow的nn.Graph将其转为静态图,nn.Graph的资料见:
https://docs.oneflow.org/master/basics/08_nn_graph.html。
为什么要nn.Graph这一步?这是因为OneFlow的转化ONNX工具是基于静态图做的,所以额外多了这一步,如果你不想理解也没关系,上面的代码中已经展示了完整的用法了。
要使用OneFlow->ONNX的转化工具需要安装下面的包:
python>=3.5
onnx>=1.8.0
onnxruntime>=1.6.0
oneflow>=0.5.0然后pip install oneflow_onnx
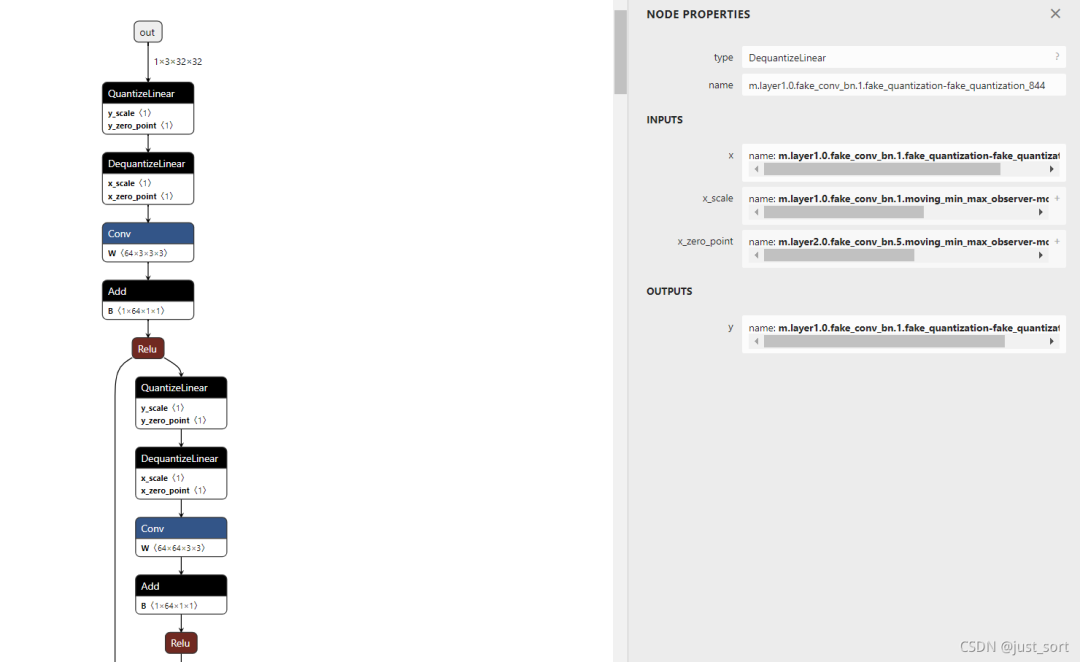
然后调用oneflow_onnx中的convert_to_onnx_and_check API将量化训练模型转化为ONNX。我们看一眼量化感知训练后的ResNet18转化成ONNX之后长什么样子吧。
然后我们还需要用TesnsorRT来运行这个量化感知训练模型,也要配置一些环境。我们需要安装:
onnx>=1.8.0
onnxruntime-gpu>=1.8.0
opencv-python
pytest
nvidia-tensorrt==8.0.0.3
pycuda
flake8
这些包就绪之后就可以使用TensorRT来推理了。即上面的代码:
ipt_dict, onnx_res = run_onnx("/tmp/model.onnx", get_onnx_provider("cpu"))
trt_res = run_tensorrt("/tmp/model.onnx", ipt_dict[list(ipt_dict.keys())[0]])
compare_result(onnx_res, trt_res, atol=1e-4, print_outlier=True)
具体的推理代码和其它细节可以去代码仓库看,这里展示一下最后的结果。在相同的输随机入下,ONNX的结果和TensorRT推理结果基本一致:
-2.9825006 -2.9825
-5.438802 -5.4388037
3.5198674 3.5198674
2.409646 2.4096458
4.5826764 4.5826764
0.019911028 0.019910894
6.6347113 6.634712
-3.5996702 -3.5996711
-1.3407612 -1.340761
-3.8473191 -3.847319
至此,我们完成了将原始的动态图模型通过量化感知训练后部署到了GPU上进行推理,整个过程虽然我开发的波折比较大,但总算完成了基础功能的开发,感谢我的同事们。
我想你可能会好奇,这里为什么没有给精度和速度对比,因为目前我手上卡不够还不能做更好的实验(比如用更大的数据集训练)所以只能用Cifar10跑一下精度。关于速度测试方面,TensorRT那部分需要排除编译engine的影响只计算推理那部分的时间,我还没有改那部分代码,读者如果感兴趣可以先自行计算一下时间。后面可能会专门写一篇文章来介绍一下部署前后的精度和速度对比,另外目前实现的方案可能还存在漏洞需要更加精细的Check。
总的来说,这篇文章只是一篇学习交流笔记,所以目前并不会正式的给出量化感知训练精度和速度的BenchMark。因为在合并到OneFlow主分支前还有诸多的工程问题需要解决。
0x7. 总结
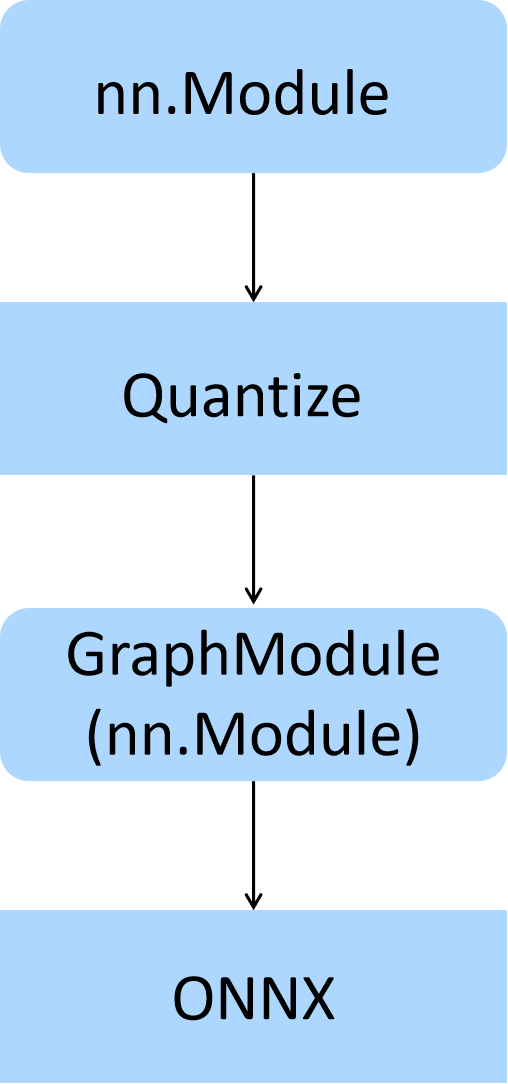
这篇文章分享的是笔者最近在OneFlow做的一个项目,将PyTorch FX移植到OneFlow之后实现了自动量化感知训练动态图模型(在PyTorch和OneFlow中都称为nn.Module)。现在用户可以在自己构建的nn.Module基础上,修改很少的代码即可完成从nn.Module量化感知训练到用TensorRT将量化感知训练后的模型部署到GPU上运行的完整链路。
在TensorRT上推理是利用了ONNX作为中间表示,即Oneflow动态图模型(nn.Module)->OneFlow量化感知训练模型(nn.Module)->OneFlow静态图(nn.Graph)->ONNX->TensorRT。量化感知训练是基于支持在Eager下写Pass的FX模块(FX被PyTorch率先提出,笔者将其基础设施移植到了OneFlow)来完成的。读者如果想体验这个功能可以按照本文的方法进行操作,有任何使用上的问题可以联系笔者。
相关链接和学习资料
https://docs.oneflow.org
https://github.com/Oneflow-Inc/oneflow
https://github.com/Oneflow-Inc/oneflow_convert
https://github.com/BBuf/oneflow-cifar
题图源自Pixabay
其他人都在看
点击“阅读原文”,欢迎下载体验OneFlow新一代开源深度学习框架


|


- 上一条: 计算机架构史上的一次伟大失败,多数人都不知道 2021-10-08
- 下一条: OneFlow v0.5.0正式上线:四大特性实现轻快上手,高效、易用从此兼得 2021-10-08
- 运维与微服务结合?深度解析微服务框架Tars整体解决方案 2022-02-09
- Dubbo3 落地实践及 Mesh 解决方案 2022-05-13
- 数仓中长跳转问题复现及解决方案 2022-03-02
- 以OneFlow为例梳理深度学习框架的那些插值方法 2021-09-09
- OneFlow v0.5.0正式上线:四大特性实现轻快上手,高效、易用从此兼得 2021-10-08