CTPN+CRNN算法端到端实现文字识别的实战开发
本文分享自华为云社区《CTPN+CRNN 算法端到端实现文字识别》,作者:HWCloudAI。
OCR介绍
光学字符识别(英语:Optical Character Recognition,OCR)是指对文本资料的图像文件进行分析识别处理,获取文字及版面信息的过程。发展时间较长,使用很普遍。OCR作为计算机视觉中较早使用深度学习技术的领域,有很多优秀的模型出现。普遍的深度学习下的OCR技术将文字识别过程分为:文本区域检测以及字符识别。
文本区域检测——CTPN模型
文字区域检测:将图片中出现的文本位置检测出来,可能存在不同语言,不同文字大小,不同角度倾斜,不同程度遮挡等情况。CTPN网络结合了CNN与LSTM深度网络,通过固定宽度的anchor提取proposal,能有效的检测出复杂场景的横向分布的文字区域,不定长度文本识别效果较好,是目前使用广泛的文字检测算法。
字符序列检测——CRNN模型
字符识别算法:将文本区域的字符识别出来。通过深度神经网络对目标区域进行特征提取,然后对固定特征进行提取和比对,得出识别结果。采用文本识别网络CRNN+CTC。CRNN全称为卷积循环神经网络,将特征提取,序列建模以及转录整合到统一的模型框架中。主要用于端到端地对不定长的文本序列进行识别,不用先对单个文字进行切割,而是将文本识别转化为时序依赖的序列学习问题,就是基于图像的序列识别。如下图,CRNN网络分为:卷积层、循环层和转录层三部分,CTC为无词典的转录方式, 不会被局限在预定义词汇范围中。
完整的端到端OCR流程
了解了文本区域检测以及字符识别后,下面详细讲解完整的端到端OCR流程:
(1)准备一张含有文字的原图;
(2)对原图进行文字位置的检测,检测结果可能是水平矩形框,也可能是倾斜矩形框;
(3)从原图中把文字框对应的图片切下来,并旋转正,得到水平的文字块切片图;
(4)对每个文字块切片图依次进行字符识别,每个切片图的识别结果汇总起来,就得到原图的文字识别结果。
因此完整的端到端OCR流程是:输入原图 -> 文字检测 -> 文字块切片 -> 字符识别 -> 识别结果汇总。
理论部分到此告一段落,下面开始在ModelArts中体验实战项目开发!
注意事项:
-
本案例使用框架**:** TensorFlow-1.8
-
本案例使用硬件规格**:** 8 vCPU + 64 GiB + 1 x Tesla V100-PCIE-32GB
-
进入运行环境方法:点此链接进入AI Gallery,点击Run in ModelArts按钮进入ModelArts运行环境,如需使用GPU,您可以在ModelArts JupyterLab运行界面右边的工作区进行切换
-
运行代码方法**:** 点击本页面顶部菜单栏的三角形运行按钮或按Ctrl+Enter键 运行每个方块中的代码
-
JupyterLab的详细用法**:** 请参考《ModelAtrs JupyterLab使用指导》
-
碰到问题的解决办法**:** 请参考《ModelAtrs JupyterLab常见问题解决办法》
1. 下载代码和模型
本案例中已经将CTPN和CRNN的代码模型都整合到一起
import os
from modelarts.session import Session
sess = Session()

if sess.region_name == 'cn-north-1':
    bucket_path="modelarts-labs/notebook/DL_ocr_crnn_sequence_recognition/E2E_ocr.zip"
elif sess.region_name == 'cn-north-4':
    bucket_path="modelarts-labs-bj4/notebook/DL_ocr_crnn_sequence_recognition/E2E_ocr.zip"
else:
    print("请更换地区到北京一或北京四")

if not os.path.exists('E2E_ocr'):
    sess.download_data(bucket_path=bucket_path, path="./E2E_ocr.zip")

if os.path.exists('./E2E_ocr.zip'):
    status = os.system("unzip -q E2E_ocr.zip")
    if status == 0:
        os.system("rm E2E_ocr.zip")
Successfully download file modelarts-labs-bj4/notebook/DL_ocr_crnn_sequence_recognition/E2E_ocr.zip from OBS to local ./E2E_ocr.zip2. CTPN相关模块导入
import shutil
import cv2
import numpy as np
import datetime
import os
import sys
import time
import json
import codecs
from PIL import Image
import tensorflow as tf
sys.path.append(os.getcwd() + '/E2E_ocr')
sys.path.append(os.getcwd() + '/E2E_ocr/CRNN/')
from collections import OrderedDict
from tensorflow.contrib import slim

from CTPN import data_provider as data_provider
from CTPN.model import mean_image_subtraction,Bilstm,lstm_fc,loss
from CTPN import vgg
from CTPN import model
from CTPN.utils.rpn_msr.proposal_layer import proposal_layer
from CTPN.utils.text_connector.detectors import TextDetector
from CTPN.utils.image import resize_image
/home/ma-user/anaconda3/envs/TensorFlow-1.8/lib/python3.6/site-packages/tensorflow/python/framework/dtypes.py:519: FutureWarning: Passing (type, 1) or '1type' as a synonym of type is deprecated; in a future version of numpy, it will be understood as (type, (1,)) / '(1,)type'.
_np_qint8 = np.dtype([("qint8", np.int8, 1)])
/home/ma-user/anaconda3/envs/TensorFlow-1.8/lib/python3.6/site-packages/tensorflow/python/framework/dtypes.py:520: FutureWarning: Passing (type, 1) or '1type' as a synonym of type is deprecated; in a future version of numpy, it will be understood as (type, (1,)) / '(1,)type'.
_np_quint8 = np.dtype([("quint8", np.uint8, 1)])
/home/ma-user/anaconda3/envs/TensorFlow-1.8/lib/python3.6/site-packages/tensorflow/python/framework/dtypes.py:521: FutureWarning: Passing (type, 1) or '1type' as a synonym of type is deprecated; in a future version of numpy, it will be understood as (type, (1,)) / '(1,)type'.
_np_qint16 = np.dtype([("qint16", np.int16, 1)])
/home/ma-user/anaconda3/envs/TensorFlow-1.8/lib/python3.6/site-packages/tensorflow/python/framework/dtypes.py:522: FutureWarning: Passing (type, 1) or '1type' as a synonym of type is deprecated; in a future version of numpy, it will be understood as (type, (1,)) / '(1,)type'.
_np_quint16 = np.dtype([("quint16", np.uint16, 1)])
/home/ma-user/anaconda3/envs/TensorFlow-1.8/lib/python3.6/site-packages/tensorflow/python/framework/dtypes.py:523: FutureWarning: Passing (type, 1) or '1type' as a synonym of type is deprecated; in a future version of numpy, it will be understood as (type, (1,)) / '(1,)type'.
_np_qint32 = np.dtype([("qint32", np.int32, 1)])
/home/ma-user/anaconda3/envs/TensorFlow-1.8/lib/python3.6/site-packages/tensorflow/python/framework/dtypes.py:528: FutureWarning: Passing (type, 1) or '1type' as a synonym of type is deprecated; in a future version of numpy, it will be understood as (type, (1,)) / '(1,)type'.
np_resource = np.dtype([("resource", np.ubyte, 1)])3. CRNN相关模块安装与导入
!pip install -i https://pypi.tuna.tsinghua.edu.cn/simple keras==2.1.6
!pip install -i https://pypi.tuna.tsinghua.edu.cn/simple keras_applications==1.0.5
Requirement already satisfied: keras==2.1.6 in /home/ma-user/anaconda3/envs/TensorFlow-1.8/lib/python3.6/site-packages
Requirement already satisfied: numpy>=1.9.1 in /home/ma-user/anaconda3/envs/TensorFlow-1.8/lib/python3.6/site-packages (from keras==2.1.6)
Requirement already satisfied: six>=1.9.0 in /home/ma-user/anaconda3/envs/TensorFlow-1.8/lib/python3.6/site-packages (from keras==2.1.6)
Requirement already satisfied: scipy>=0.14 in /home/ma-user/anaconda3/envs/TensorFlow-1.8/lib/python3.6/site-packages (from keras==2.1.6)
Requirement already satisfied: pyyaml in /home/ma-user/anaconda3/envs/TensorFlow-1.8/lib/python3.6/site-packages (from keras==2.1.6)
Requirement already satisfied: h5py in /home/ma-user/anaconda3/envs/TensorFlow-1.8/lib/python3.6/site-packages (from keras==2.1.6)
[33mYou are using pip version 9.0.1, however version 21.0.1 is available.
You should consider upgrading via the 'pip install --upgrade pip' command.[0m
Requirement already satisfied: keras_applications==1.0.5 in /home/ma-user/anaconda3/envs/TensorFlow-1.8/lib/python3.6/site-packages
Requirement already satisfied: h5py in /home/ma-user/anaconda3/envs/TensorFlow-1.8/lib/python3.6/site-packages (from keras_applications==1.0.5)
Requirement already satisfied: keras>=2.1.6 in /home/ma-user/anaconda3/envs/TensorFlow-1.8/lib/python3.6/site-packages (from keras_applications==1.0.5)
Requirement already satisfied: numpy>=1.9.1 in /home/ma-user/anaconda3/envs/TensorFlow-1.8/lib/python3.6/site-packages (from keras_applications==1.0.5)
Requirement already satisfied: six in /home/ma-user/anaconda3/envs/TensorFlow-1.8/lib/python3.6/site-packages (from h5py->keras_applications==1.0.5)
Requirement already satisfied: pyyaml in /home/ma-user/anaconda3/envs/TensorFlow-1.8/lib/python3.6/site-packages (from keras>=2.1.6->keras_applications==1.0.5)
Requirement already satisfied: scipy>=0.14 in /home/ma-user/anaconda3/envs/TensorFlow-1.8/lib/python3.6/site-packages (from keras>=2.1.6->keras_applications==1.0.5)
[33mYou are using pip version 9.0.1, however version 21.0.1 is available.
You should consider upgrading via the 'pip install --upgrade pip' command.[0mfrom keras.layers import Flatten, BatchNormalization, Permute, TimeDistributed, Dense, Bidirectional, GRU
from keras.layers import Input, Conv2D, MaxPooling2D, ZeroPadding2D,Lambda
from keras.models import Model
from keras.optimizers import SGD
from keras import backend as K
import keys as keys
from CRNN_model import decodeUsing TensorFlow backend.
4. 加载CTPN模型
checkpoint_path = './E2E_ocr/models/checkpoints/'  # 训练模型保存路径
vgg_path = "./E2E_ocr/models/vgg_16.ckpt"          # vgg16预训练模型
image_path = './E2E_ocr/data/CTW-200'              # 训练集图片路径

CHECKPOINT_PATH = './E2E_ocr/models/checkpoints'   # 测试模型保存路径
os.environ['CUDA_VISIBLE_DEVICES'] = '0' #计算设备调用,空值为CPU计算,数字为GPU的序号

tf.reset_default_graph()
# 定义模型输入信息占位符
input_image = tf.placeholder(tf.float32, shape=[None, None, None, 3], name='input_image')
input_im_info = tf.placeholder(tf.float32, shape=[None, 3], name='input_im_info')
init_op = tf.initialize_all_variables()
# 定义模型训练步骤数
global_step = tf.variable_scope('global_step', [], initializer=tf.constant_initializer(0))

# 加载预训练模型
bbox_pred, cls_pred, cls_prob = model.model(input_image)
variable_averages = tf.train.ExponentialMovingAverage(0.997, global_step)
# 将变量存储到saver中
saver = tf.train.Saver(variable_averages.variables_to_restore())

ctpn_sess = tf.Session(config=tf.ConfigProto(allow_soft_placement=True))
with ctpn_sess.as_default():
    # 加载预训练模型权重信息
    ckpt_state = tf.train.get_checkpoint_state(CHECKPOINT_PATH)
    model_path = os.path.join(CHECKPOINT_PATH, os.path.basename(ckpt_state.model_checkpoint_path))
    saver.restore(ctpn_sess, model_path)
print('CTPN model load success')
WARNING:tensorflow:From /home/ma-user/anaconda3/envs/TensorFlow-1.8/lib/python3.6/site-packages/tensorflow/python/util/tf_should_use.py:118: initialize_all_variables (from tensorflow.python.ops.variables) is deprecated and will be removed after 2017-03-02.
Instructions for updating:
Use `tf.global_variables_initializer` instead.
CTPN model load successCTPN为了更好检测出文本区域,anchor为 宽度固定为16 , 高度为[11, 16, 23, 33, 48, 68, 97, 139, 198, 283] 的文本框,共10个anchor。
这样的设计是为了更好检测出文字区域的水平位置,在文字检测中,检测文字的水平范围比较垂直范围要更困难。将anchor的宽度固定,只检测10个高度的anchor,尤其在面对多个分离的文本的情况时,能够更好检测文字的范围。
不同的anchor得到了边界框,利用nms(非极大值抑制)进行边界框回归计算,最终得到细粒度的文本区域。
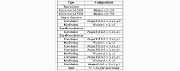
5. 加载CRNN模型
下图给出CRNN的结构参考:
characters = keys.alphabet[:]
nclass=len(characters)+1

input = Input(shape=(32, None, 1), name='the_input')
# CNN卷积层部分
m = Conv2D(64, kernel_size=(3, 3), activation='relu', padding='same', name='conv1')(input)
m = MaxPooling2D(pool_size=(2, 2), strides=(2, 2), name='pool1')(m)
m = Conv2D(128, kernel_size=(3, 3), activation='relu', padding='same', name='conv2')(m)
m = MaxPooling2D(pool_size=(2, 2), strides=(2, 2), name='pool2')(m)
m = Conv2D(256, kernel_size=(3, 3), activation='relu', padding='same', name='conv3')(m)
m = Conv2D(256, kernel_size=(3, 3), activation='relu', padding='same', name='conv4')(m)

m = ZeroPadding2D(padding=(0, 1))(m)
m = MaxPooling2D(pool_size=(2, 2), strides=(2, 1), padding='valid', name='pool3')(m)

m = Conv2D(512, kernel_size=(3, 3), activation='relu', padding='same', name='conv5')(m)
m = BatchNormalization(axis=1)(m)
m = Conv2D(512, kernel_size=(3, 3), activation='relu', padding='same', name='conv6')(m)
m = BatchNormalization(axis=1)(m)
m = ZeroPadding2D(padding=(0, 1))(m)
m = MaxPooling2D(pool_size=(2, 2), strides=(2, 1), padding='valid', name='pool4')(m)
m = Conv2D(512, kernel_size=(2, 2), activation='relu', padding='valid', name='conv7')(m)

m = Permute((2, 1, 3), name='permute')(m)
m = TimeDistributed(Flatten(), name='timedistrib')(m)
# RNN循环层部分
m = Bidirectional(GRU(256, return_sequences=True), name='blstm1')(m)
m = Dense(256, name='blstm1_out', activation='linear')(m)
m = Bidirectional(GRU(256, return_sequences=True), name='blstm2')(m)
y_pred = Dense(nclass, name='blstm2_out', activation='softmax')(m)

basemodel = Model(inputs=input, outputs=y_pred)
basemodel.load_weights('./E2E_ocr/CRNN/model_crnn.h5')
print("CRNN model load success")
CRNN model load success6. 定义文字位置检测函数
from CTPN.utils.text_connector.text_connect_cfg import Config as TextLineCfg

def ctpn_text_detection(img_path):
    """
    CTPN文字位置检测函数
    :param img_path: 图片路径
    :return: img: 需要进行文字检测的图片
    :return: boxes: 图片上检测到的文字框
    """
    try:
        im = cv2.imread(img_path)[:, :, ::-1]
    except Exception as e:
        raise Exception("打开图片文件失败,图片路径:", img_path)
    img, (rh, rw) = resize_image(im)  #对图片进行形状调整
    h, w, c = img.shape
    im_info = np.array([h, w, c]).reshape([1, 3])
    #将图片信息传入模型得出预测结果,分别为文字区域坐标以及其得分
    bbox_pred_val, cls_prob_val = ctpn_sess.run([bbox_pred, cls_prob],feed_dict={input_image: [img],input_im_info: im_info})
    textsegs_total, _ = proposal_layer(cls_prob_val, bbox_pred_val, im_info)
    scores = textsegs_total[:, 0]
    textsegs = textsegs_total[:, 1:5]
    """文本框合并策略"""
    TextLineCfg.MAX_HORIZONTAL_GAP = 50          # 两个框之间的距离小于50,才会被判定为临近框。该值越小,两个框之间要进行合并的要求就越高
    TextLineCfg.TEXT_PROPOSALS_MIN_SCORE = 0.7   # 单个小文本框的置信度,高于这个置信度的框才会被合并。该值越大,越多的框就会被丢弃掉
    TextLineCfg.TEXT_PROPOSALS_NMS_THRESH = 0.2  # 非极大值抑制阈值。该值越大,越多的框就会被丢弃掉
    TextLineCfg.MIN_V_OVERLAPS = 0.7             # 两个框之间的垂直重合度大于0.7,才会被判定为临近框。该值越大,两个在垂直方向上有偏差的框进行合并的可能性就越小
    textdetector = TextDetector(DETECT_MODE='H') # DETECT_MODE有两种取值:'H'和'O','H'模式适合检测水平文字,'O'模式适合检测有轻微倾斜的文字
    """文本框合并策略"""
    boxes = textdetector.detect(textsegs, scores[:, np.newaxis], img.shape[:2])
    boxes = np.array(boxes, dtype=np.int)

    return img, boxes
7. 定义文字块切片函数
def img_transform_perspective(image, points, w_pad_rate=(0.0, 0.0), h_pad_rate=(0.0, 0.0)):
    """
    根据四个点进行透视变换,将四个点表示的四边形图变换成水平矩形图
    :param image: 原图
    :param points: 参考的四个点,坐标顺序是xmin, ymin, xmax, ymin, xmax, ymax, xmin, ymax
    :param w_pad_rate: 数组(rate1, rate2),对图像宽度左右两边的扩宽比例
    :param h_pad_rate: 数组(rate1, rate2),对图像宽度上下两边的扩宽比例
    :return: persp_img: 变换后的图
    :return: points2: 变换后的四点
    """
    if not isinstance(points, np.ndarray):
        points = np.array(points)
    points = points.reshape((4, 2))
    widths = np.linalg.norm(points[::2] - points[1::2], axis=1)  # points的4点组成的四边形的上下两边的长度
    width = int(round(widths.mean()))
    heights = np.linalg.norm(points[:2] - points[3:1:-1], axis=1)  # points的4点组成的四边形的左右两边的长度
    height = int(round(heights.mean()))

    points2 = np.array([[0, 0], [width - 1, 0],
                        [width - 1, height - 1], [0, height - 1]], np.float32)
    points2 += np.array([int(width * w_pad_rate[0]), int(height * h_pad_rate[0])]).reshape(1, 2)
    size = (int(width * (1 + w_pad_rate[0] + w_pad_rate[1])),
            int(height * (1 + h_pad_rate[0] + h_pad_rate[1])))

    mat = cv2.getPerspectiveTransform(points.astype(np.float32), points2)
    persp_img = cv2.warpPerspective(image, mat, size,
                                    borderMode=cv2.BORDER_CONSTANT,
                                    borderValue=(255, 255, 255))

    return persp_img, points2
8. 定义CRNN字符识别函数
def crnn_ocr(img):
"""
CRNN字符识别函数
:param img: 需要进行字符识别的图片
:return: ocr_result: 图片的字符识别结果,数据类型为字符串
"""
img = img.convert('L')
img = img.convert('L') # 图片灰度化
scale = img.size[1] * 1.0 / 32 # 图片尺寸调整,把图片高度调整为32
w = img.size[0] / scale
w = int(w)
img = img.resize((w, 32))
img = np.array(img).astype(np.float32) / 255.0
X = img.reshape((32, w, 1))
X = np.array([X])
y_pred = basemodel.predict(X) # 预测
ocr_result = decode(y_pred) # 处理预测结果
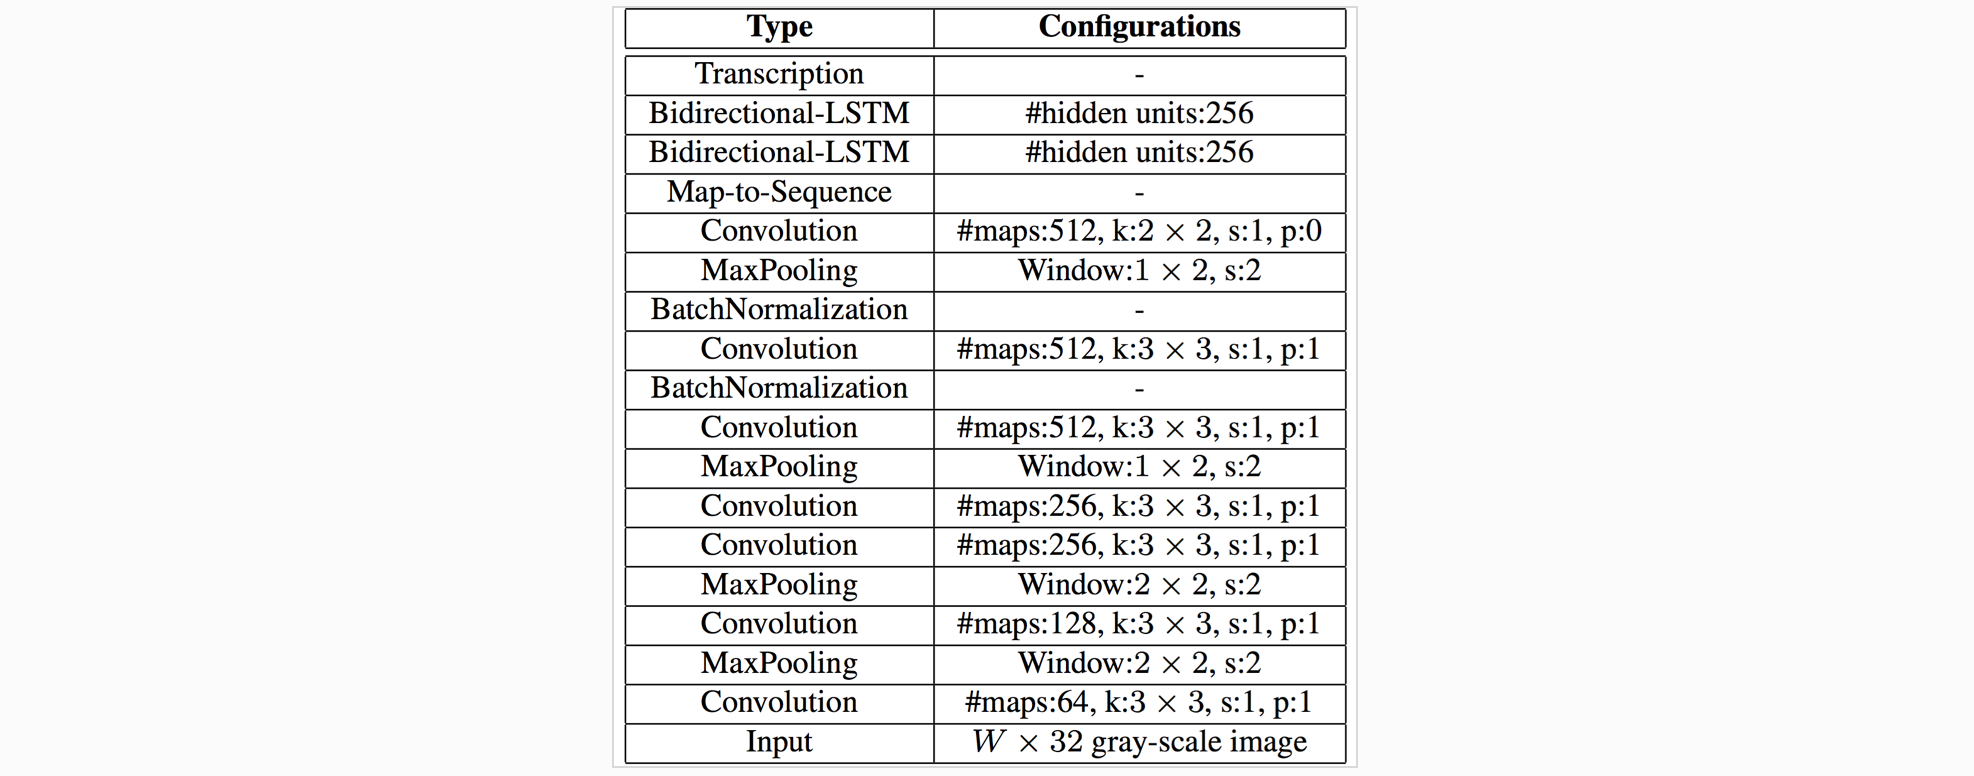
return ocr_result9. 查看原图
img = Image.open('./E2E_ocr/test_dataset/text.png')
img
10. 开始图片测试
test_dir = './E2E_ocr/test_dataset' # 待测试图片目录
save_results = True
output_dir = test_dir + '_output'
if not os.path.exists(output_dir):
os.mkdir(output_dir)
ocr_results = OrderedDict()
files = os.listdir(test_dir)
for file_name in files:
if not (file_name.endswith('jpg') or file_name.endswith('png')
or file_name.endswith('JPG') or file_name.endswith('PNG')):
continue
print(file_name, 'ocr result:')
file_path = os.path.join(test_dir, file_name)
img, boxes = ctpn_text_detection(file_path) # step1, 检测文字位置
sorted_boxes = sorted(boxes.tolist(), key = lambda x: (x[1], x[0])) # step2, 对文字框进行排序,优先按文字框左上顶点的y坐标升序排序,其次按x坐标升序排序
for index, box in enumerate(sorted_boxes):
cut_text_img, _ = img_transform_perspective(img, box[:8]) # step3, 从原图上切割出各个文字块,并将倾斜的文字块变换为水平矩形文字块
ocr_result = crnn_ocr(Image.fromarray(cut_text_img)) # step4, 对每个文字块进行字符识别
ocr_results[str(index)] = ocr_result
print(str(index) + ',', ocr_result)
if save_results:
draw_img = img[:, :, ::-1].copy()
for i, box in enumerate(boxes):
cv2.polylines(draw_img, [box[:8].astype(np.int32).reshape((-1, 1, 2))], True, color=(0, 0, 255), thickness=2)
cv2.imwrite(os.path.join(output_dir, file_name), draw_img)
#将输出结果转为json格式
with codecs.open(os.path.join(output_dir, file_name.split('.')[0] + '.json'), 'w', 'utf-8') as f:
json.dump(ocr_results, f, indent=4, ensure_ascii=False)
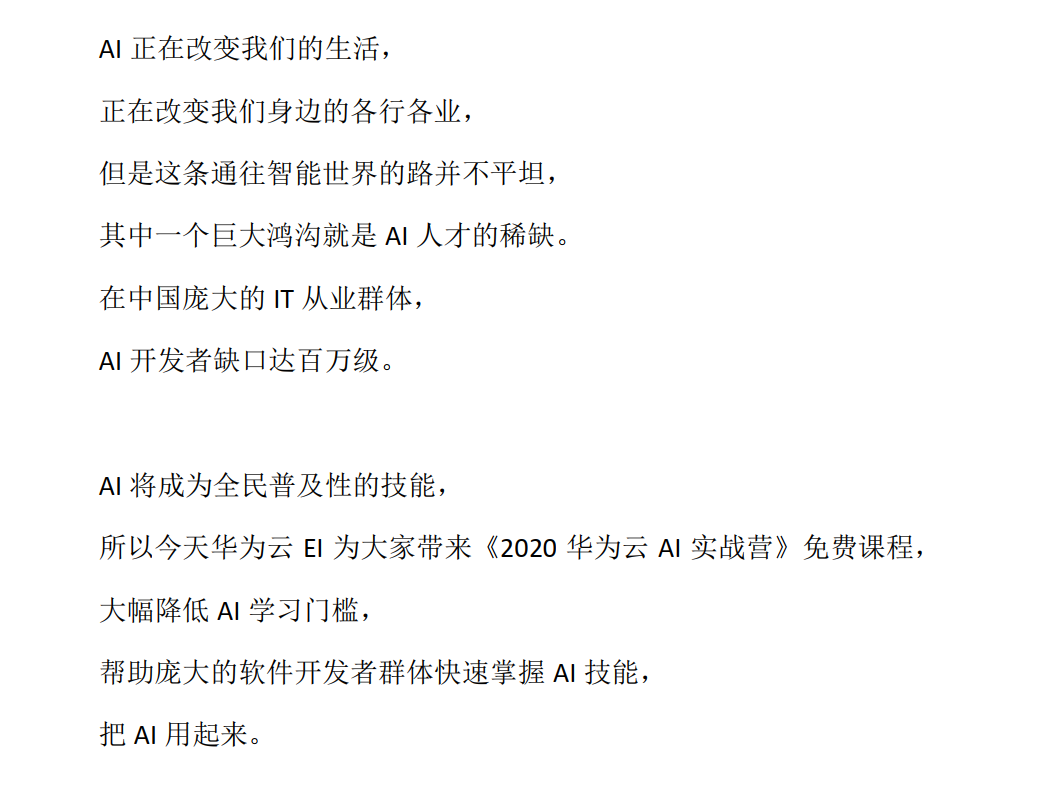
print('end')text.png ocr result:
0, A1正在改变我们的生活,
1, 正在改变我们身边的各行各业,
2, 但是这条通往智能世界的路并不平坦,
3, 其中一个巨大鸿沟就是AI人才的稀缺。
4, 在中国庞大的I从业群体,
5, A开发者缺口达百万级。
6, A1将成为全民普及性的技能,
7, 所以今天华为云El为大家带来《2020华为云AI实战营》免费课程,
8, 大幅降低A1拳习门]椤,
9, 帮助庞大的软件开发者群体快速拳握A1技能,
10, 把AI用起来。
end
|


- 上一条: 监控Kubernetes集群证书过期时间的三种方案 2022-12-08
- 下一条: 教你如何进行数仓字符串、二进制、十六进制互转 2022-12-08
- 跟我读CVPR 2022论文:基于场景文字知识挖掘的细粒度图像识别算法 2022-04-24
- 0基础都能看懂的算法图解 2021-07-19
- 带你读AI论文丨LaneNet基于实体分割的端到端车道线检测 2021-08-27
- 基于 Agora SDK 实现 iOS 端的多人视频互动 2022-05-11
- 说一说Web端侧AI 2021-10-08