在Vue中使用JSX,很easy的
摘要:JSX 是一种 Javascript 的语法扩展,JSX = Javascript + XML,即在 Javascript 里面写 XML,因为 JSX 的这个特性,所以他即具备了 Javascript 的灵活性,同时又兼具 html 的语义化和直观性。
本文分享自华为云社区《在 Vue 中如何使用 JSX,就这么简单!【建议收藏】》,作者:纸飞机 。
JSX是什么
JSX 是一种 Javascript 的语法扩展,JSX = Javascript + XML,即在 Javascript 里面写 XML,因为 JSX 的这个特性,所以他即具备了 Javascript 的灵活性,同时又兼具 html 的语义化和直观性。(个人建议灵活度强的部分组件可以用JSX来代替,整个项目JSX属实没必要)
XML学习地址(学与不学可随意,了解就ok):https://www.w3school.com.cn/xml/index.asp
用template的弊端:https://www.mk2048.com/blog/blog_h1c2c22ihihaa.html
为什么要在 Vue 中使用 JSX
有时候,我们使用渲染函数(render function)来抽象组件,渲染函数不是很清楚的参见官方文档, 而渲染函数有时候写起来是非常痛苦的,所以只需要有个了解。
渲染函数:https://cn.vuejs.org/v2/guide/render-function.html#%E5%9F%BA%E7%A1%80
createElement(

 'anchored-heading', {

 props: {

  level: 1

 }

 }, [

 createElement('span', 'Hello'),

 ' world!'

 ]

)
其对应的模板是下面:
<anchored-heading :level="1">

 <span>Hello</span> world!

</anchored-heading>
你看这写起来多费劲,这个时候就派上 JSX 上场了。在 Vue 中使用 JSX,需要使用 Babel 插件,它可以让我们回到更接近于模板的语法上,接下来就让我们一起开始在 Vue 中写 JSX 吧。
创建项目并配置Babel
vue create vue-jsx

# 选择vue2的
安装依赖:
npm install @vue/babel-preset-jsx @vue/babel-helper-vue-jsx-merge-props

# or

yarn add @vue/babel-preset-jsx @vue/babel-helper-vue-jsx-merge-props
配置 .babelrc(babel.config.js) :
module.exports = {

 presets: [

 '@vue/cli-plugin-babel/preset',

 ['@vue/babel-preset-jsx',

  {

  'injectH': false

  }]

 ]

}
配置后我们启动项目:
yarn serve
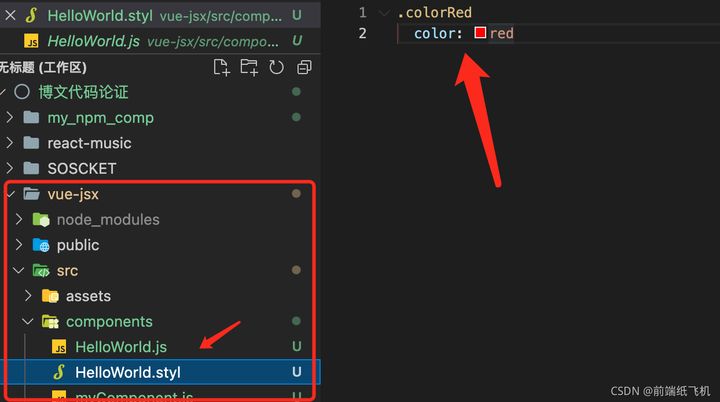
demo结构图:
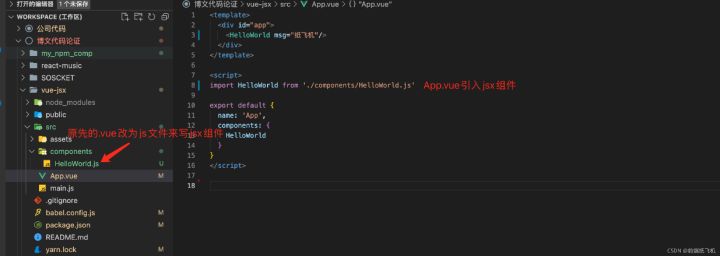
配置了babel.config.js后,我们把App.vue引入的HelloWorld.vue改为HelloWorld.js,并且删除HelloWorld.js中关于template和style,以及script标签。
export default {

  name: 'HelloWorld',

  props: {

    msg: String

  }

}
JSX基础用法
这里展示在 Vue 中书写一些基础内容。
纯文本、动态内容、标签使用、自定义组件、样式和class
import myComponent from './myComponent'
import './HelloWorld.css'
// 创建一个组件button
const ButtonCounter = {
name: "button-counter",
props: ["count"],
methods: {
onClick() {
this.$emit("change", this.count + 1);
}
},
render() {
return (
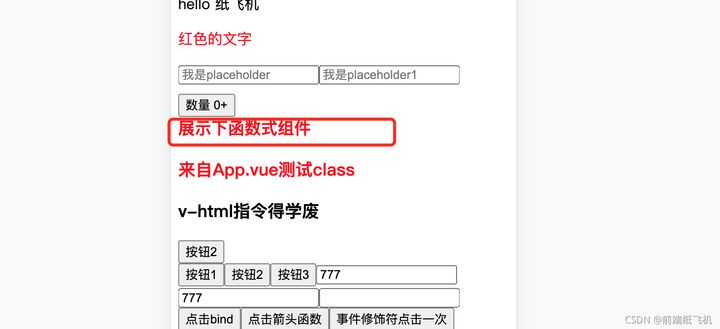
<button onClick={this.onClick}>数量 {this.count}+</button>
);
}
};
export default {
name: 'HelloWorld',
components: {
myComponent
},
data () {
return {
text:'hello 纸没了飞机',
inputText:'我吃了',
count: 0
}
},
props: {
msg: String
},
watch: {},
methods: {
onChange(val) {
this.count = val;
alert(this.count)
}
},
render() {
// const {text,inputText,count} = this //通过解构,下方return片段中就不需要this
return (
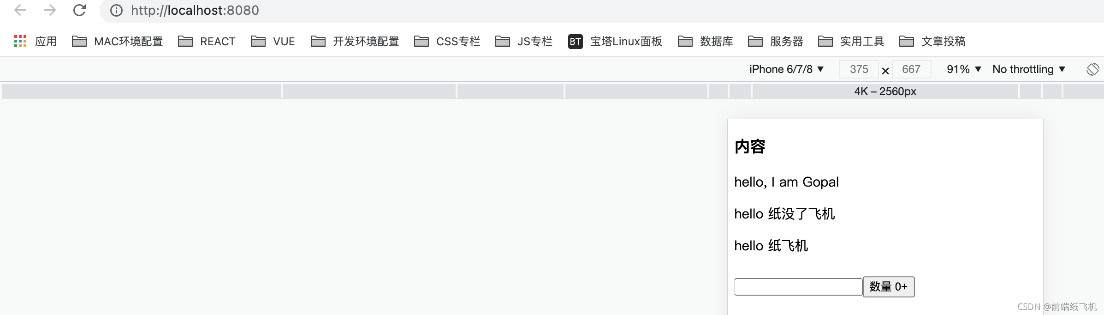
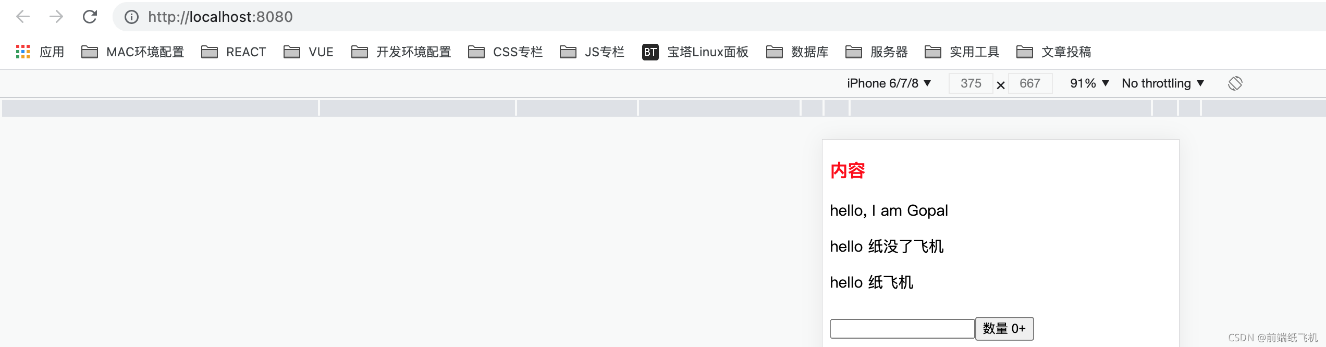
<div>
<h3>内容</h3>
{/* 纯文本 */}
<p>hello, I am Gopal</p>
{/* 动态内容 */}
<p>{ this.text }</p>
<p>hello { this.msg }</p>
{/* 输入框 */}
<input/>
{/* 自定义组件 */}
<myComponent/>
<ButtonCounter
style={{ marginTop: "10px" }}
count={this.count}
type="button"
onChange={this.onChange}
/>
</div>
);
}
} 题外话:创建组件那里大家可以多学学const 创建的ButtonCounter组件的那种方式。在React中也是经常会这么创建的。
这么看的话和在template里写没有多大区别,标签该是啥还是啥没有变化。那么这么一想的话,style呢,class呢?接下来就是style和class样式的写法(包括动态样式)
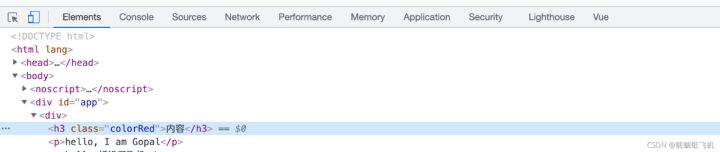
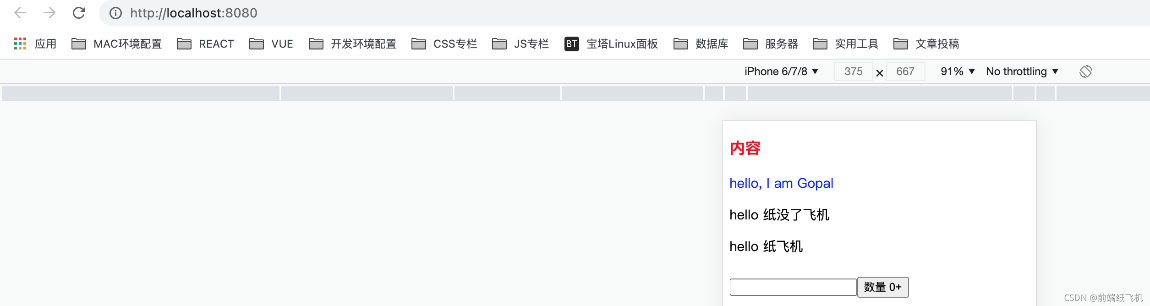
我们先给h3绑定一个class为colorRed:
<h3 class="colorRed">内容</h3>
审查元素发现直接写class绑定是可以的:
那么class的样式怎么写呢?毕竟js文件里写<style></style>貌似是不行的!
1、全局样式
App.vue

<style>

.colorRed{

  color: red;

}

</style>
2、引入一个css文件或者配合style-loader引入一个less、sass、stylus文件
注意:都需要安装配置对应的loader,既然都是JSX了,那我们用stylus来讲解下,相信less、sass大家都会了。stylus是一个省略了{},靠缩紧来识别的css编译器。(不想用stylus可跳过,样式这块可随意)
yarn add global stylus

yarn add --dev stylus stylus-loader
各种style安装见:https://www.cnblogs.com/jimc/p/10265198.html
安装完成后新建HelloWorld.styl,然后引入。
stylus的使用:https://www.jianshu.com/p/5fb15984f22d
stylus官网:https://stylus.zcopy.site/
控制台stylus报错见:https://blog.csdn.net/csdn_zhoushengnan/article/details/109448369
vscode编辑期报错:安装编辑器stylus语法插件,并重启
效果:
行内样式style:
<p style="color:blue">hello, I am Gopal</p>
动态绑定class和style

<p style={this.isGreen?'color:green':''}>{ this.text }</p>

<p class={this.isYellow?'colorYellow':''}>hello { this.msg }</p>

<p style={this.isRed?colorRed:''}>红色的文字</p> 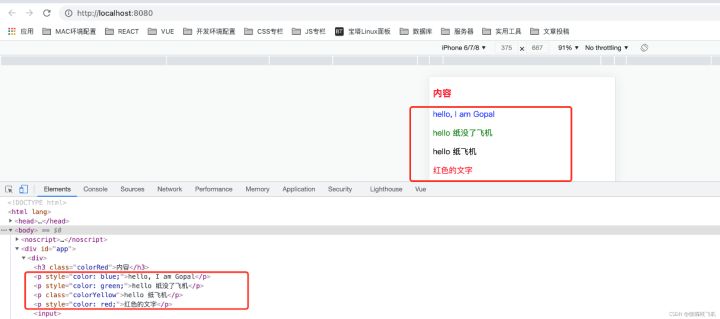
属性绑定和普通HTML一样的
毕竟class和style可都是html的属性,这点相信大家都知道的。
<input placeholder="我是placeholder"  />

<input placeholder={placeholderText}  />

{/* 解构N个属性,要啥放啥 */}

<div {...attrObj} /> 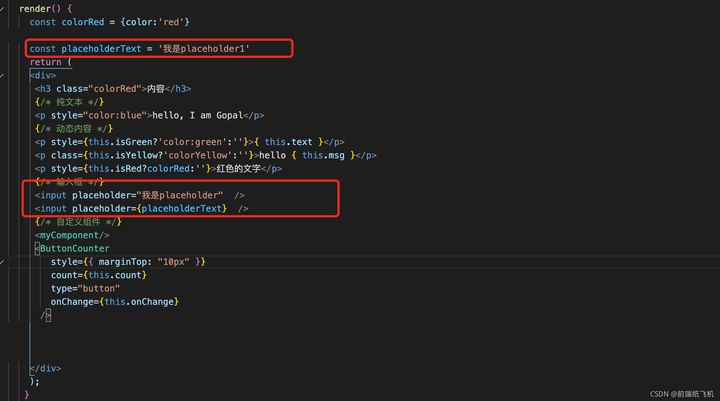
效果:

常用指令
template常用指令:v-html | v-text、v-if、v-for、v-modal等。template的指令在JSX是无法使用的,故需要一些写法,请看下面。
我新建个instructions.js用来示范指令这块。在App.vue中引入。
v-html | v-text
在 JSX 里面,如果要设置 dom 元素的 innerHTML,就用到 domProps。
render() {

    const { htmlCode } = this

    return (

        <div>

            <div domPropsInnerHTML={htmlCode}></div>

        </div>

    );

   }
虽然v-text有domPropsInnerText,但没有用的必要。
v-if
分简单的和复杂的。
简单:
render() {

    let bool = false

    return (

        <div>

            { bool ? <button>按钮1</button> : <button>按钮2</button>}

        </div>

    );

   }
复杂:
render() {

  let num = 3

  if(num === 1){ return( <button>按钮1</button> ) }

  if(num === 2){ return( <button>按钮2</button> ) }

  if(num === 3){ return( <button>按钮3</button> ) }

}
v-for
就使用 map 方法来实现,在react中也是如此。
render(h) {
var list = [1,2,3]
return(
<div>
{ list.map(item => <button>按钮{item}</button>) }
</div>
)
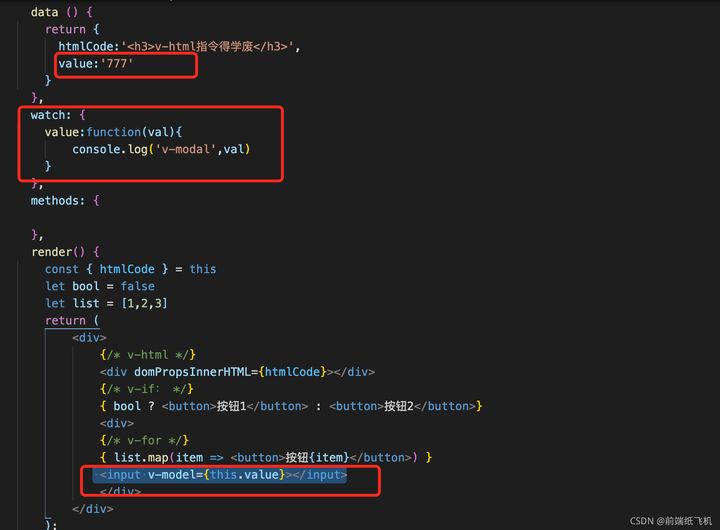
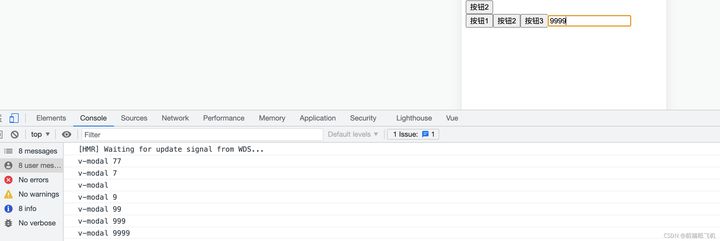
} v-modal
注意:新版 vue-cli4 中,已经默认集成了 JSX 语法对 v-model 的支持,可以直接使用
<input v-model={this.value}>
如果你的项目比较老,也可以安装插件 babel-plugin-jsx-v-model 来进行支持
我可是cli4,我来验证下:
验证结果:(通过)
当然以上两种方式你都不想搞,你也可以手动支持,这就涉及到监听事件了,请向下看。
监听事件及事件修饰符
监听事件想到用 onChange, onClick等。
需要注意的是,传参数不能使用 onClick={this.removePhone(params)},这样子会每次 render 的时候都会自动执行一次方法
应该使用 bind,或者箭头函数来传参
methods: {

    handleClick(val){

        alert(val)

    }

  },

<button type="button" onClick={this.handleClick.bind(this, 11)}>点击bind</button>

<button type="button" onClick={() => this.handleClick(11)}>点击箭头函数</button>
上面提到的用过监听事件来实现v-modal
<input type="text" value={this.text} onInput={this.input}/>

methods: {

    input(e){

        this.text = e.target.value

    }

  },
除此之外,还可以使用对象的方式去监听事件:
render() {

  return (

    <input

      value={this.content}

      on={{

        focus: this.$_handleFocus,

        input: this.$_handleInput

      }}

      nativeOn={{

        click: this.$_handleClick

      }}

    ></input>

  )

}
其他事件的使用同理都是加on。
事件修饰符
和指令一样,除了个别的之外,大部分的事件修饰符都无法在JSX中使用,这时候你肯定已经习惯了,肯定有替代方案的。
.stop : 阻止事件冒泡,在JSX中使用event.stopPropagation()来代替
.prevent:阻止默认行为,在JSX中使用event.preventDefault() 来代替
.self:只当事件是从侦听器绑定的元素本身触发时才触发回调,使用下面的条件判断进行代替
if (event.target !== event.currentTarget){

  return

}
.enter与keyCode: 在特定键触发时才触发回调
if(event.keyCode === 13) {

  // 执行逻辑

}
除了上面这些修饰符之外,尤大大为了照顾我们这群CV仔,还是做了一点优化的,对于.once,.capture,.passive,.capture.once,尤大大提供了前缀语法帮助我们简化代码
 render() {

    return (

      <div

        on={{

          // 相当于 :click.capture

          '!click': this.$_handleClick,

          // 相当于 :input.once

          '~input': this.$_handleInput,

          // 相当于 :mousedown.passive

          '&mousedown': this.$_handleMouseDown,

          // 相当于 :mouseup.capture.once

          '~!mouseup': this.$_handleMouseUp

        }}

      ></div>

    )

  }
如果有参数传递给方法,不能直接(参数),会在页面中立即触发,需要我在下面这种写法:
clickOnce(val) {

  alert(val);

},

<button

    type="button"

    on={{

       '~click': ()=>this.clickOnce('只能点一次'),

    }}

   >

    事件修饰符点击一次

</button>
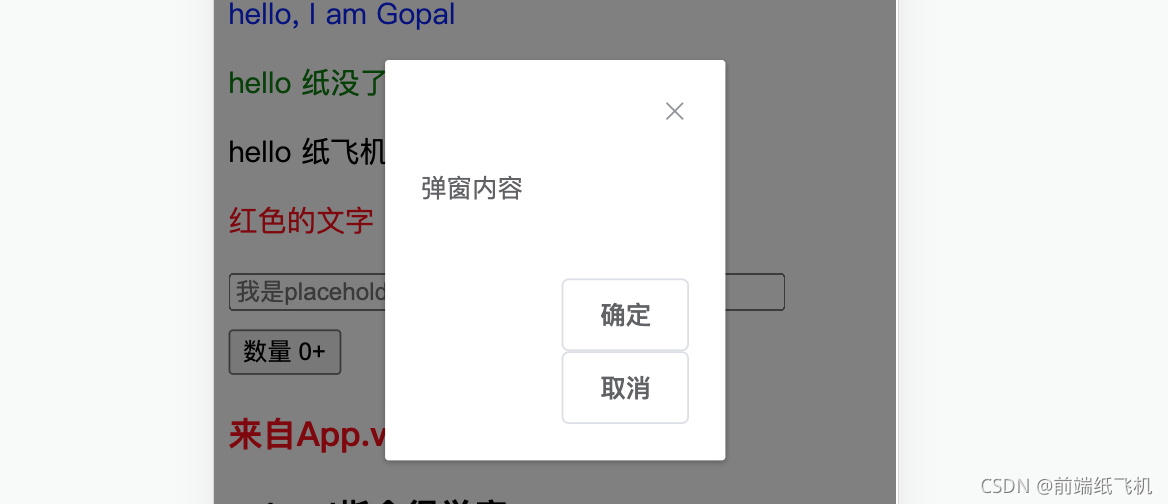
使用范围(结合第三方ui组件)
不仅仅在 render 函数里面使用 JSX,而且还可以在 methods 里面返回 JSX,然后在 render 函数里面调用这个方法。并且也可以直接使用例如elementui等ui组件。
JSX 还可以直接赋值给变量、例如使用elementui的el-dialog。(您在测试该案例时记得安装elemnt)
methods: {

    $_renderFooter() {

      return (

        <div>

          <el-button>确定</el-button>

          <el-button onClick={ () =>this.closeDialog() }>取消</el-button>

        </div>

      );

    },

    openDialog(){

        this.visible = true

    },

    closeDialog(){

        this.visible = false

    }

  },

render() {

    const buttons = this.$_renderFooter();

    return (

      <div>

        <Button onClick={ () =>this.openDialog() }>打开Dialog</Button>

        <el-dialog visible={this.visible}>

          <div>弹窗内容</div>

          <template slot="footer">{buttons}</template>

        </el-dialog>

      </div>

    );

} 
插槽
插槽就是子组件中提供给父组件使用的一个占位符,插槽分为默认插槽,具名插槽和作用域插槽,下面我依次为您带来每种在JSX中的用法与如何去定义插槽。
默认插槽
使用默认插槽
使用element-ui的Dialog时,弹框内容就使用了默认插槽,在JSX中使用默认插槽的用法与普通插槽的用法基本是一致的,如下代码所示:
render() {

    return (

      <ElDialog title="弹框标题" visible={true}>

        {/*这里就是默认插槽*/}

        <div>这里是弹框内容</div>

      </ElDialog>

    )

  }
自定义默认插槽
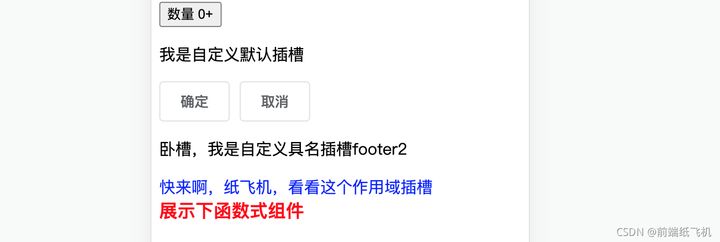
在Vue的实例this上面有一个属性slots,这个上面就挂载了一个这个组件内部的所有插槽,使用this.slots,这个上面就挂载了一个这个组件内部的所有插槽,使用this.slots.default就可以将默认插槽加入到组件内部。
export default {

  props: {

    visible: {

      type: Boolean,

      default: false

    }

  },

  render() {

    return (

      <div class="custom-dialog" vShow={this.visible}>

        {/**通过this.$slots.default定义默认插槽*/}

        {this.$slots.default}

      </div>

    )

  }

}
使用:
<myComponent visible={true} slot>我是自定义默认插槽</myComponent> 另vShow相当于 v-show,不代表别的也可以这样!
具名插槽
使用具名插槽
有时候我们一个组件需要多个插槽,这时候就需要为每一个插槽起一个名字,比如element-ui的弹框可以定义底部按钮区的内容,就是用了名字为footer的插槽。
render() {

    return (

      <ElDialog title="弹框标题" visible={true}>

        <div>这里是弹框内容</div>

        {/** 具名插槽 */}

        <template slot="footer">

          <ElButton>确定</ElButton>

          <ElButton>取消</ElButton>

        </template>

      </ElDialog>

    )

  }
自定义具名插槽
在上节自定义默认插槽时提到了slots,对于默认插槽使用this.slots,对于默认插槽使用this.slots.default,而对于具名插槽,可以使用this.$slots.footer进行自定义。
render() {

    return (

      <div class="custom-dialog" vShow={this.visible}>

        {this.$slots.default}

        {/**自定义具名插槽*/}

        <div class="custom-dialog__foolter">{this.$slots.footer}</div>

      </div>

    )

  }
使用:
<myComponent visible={true}>

      <template slot="footer">

            <ElButton>确定</ElButton>

            <ElButton>取消</ElButton>

      </template>

</myComponent>
作用域插槽
使用作用域插槽
有时让插槽内容能够访问子组件中才有的数据是很有用的,这时候就需要用到作用域插槽,在JSX中,因为没有v-slot指令,所以作用域插槽的使用方式就与模板代码里面的方式有所不同了。比如在element-ui中,我们使用el-table的时候可以自定义表格单元格的内容,这时候就需要用到作用域插槽。
<myComponent1

      visible={this.visible}

      {...{

         scopedSlots: {

           test: ({ user }) => {

           // 这个user就是子组件传递来的数据,同理可这样拿到el-table的row,不过test得是default,不过案例还是我这样

              <div style="color:blue;">快来啊,{user.name},看看这个作用域插槽</div>

          },

         },

     }}

></myComponent1>
自定义作用域插槽
子组件中通过 {this.$scopedSlots.test({ user: {name:‘纸飞机’}})} 指定插槽的名称是 test,并将 user 传递给父组件。父组件在书写子组件标签的时候,通过 scopedSlots 值指定插入的位置是 test,并在回调函数获取到子组件传入的 user 值
注意:作用域插槽是写在子组件标签中的,类似属性。而不是像具名插槽放在标签内部
新建个作用域插槽.js
// 一个为jsx的子组件(玩玩插槽)


export default {

    name: "myComponent",

    data() {

      return {

      };

    },

    props: {

      visible: {

        type: Boolean,

        default: false,

      },

      listData: {

        type: Array,

        default: function() {

          return [];

        },

      },

    },

    render() {

      return (

        <div vShow={this.visible}>

          {/**自定义作用域插槽*/}

          <div class="item">

           {this.$scopedSlots.test({

                user: {name:'纸飞机'}

            })}

          </div>

        </div>

      );

    },

  };
效果:
函数式组件
函数式组件是一个无状态、无实例的组件,详见官网说明,新建一个 FunctionalComponent.js 文件,内容如下:
// export default ({ props }) => <p>hello {props.message}</p>;


// 或者推荐下方写法


export default {

  functional: true,

  name: "item",

  render(h, context) {

      console.log(context.props)

    return <div style="color:red;font-size:18px;font-weight:bold">{context.props.message}</div>;

  },

};
HelloWorld.js中使用:
<funComponent message="展示下函数式组件"></funComponent>
效果:
代码地址
https://codechina.csdn.net/qq_32442973/vue2-jsx-demo.git
后记
无论你是要用vue2的jsx还是vue3的jsx都没有本质区别,毕竟vue3是向下兼容vue2的;倘若你真的要学vue3的JSX,我建议你学完vue2的再去学;另我不推荐在vue中所有的组件和页面都用JSX,两者需要权衡利弊;同时也不必担心JSX和template的相互嵌套,两者是可以互相嵌套的。
参考:
https://www.cnblogs.com/ainyi/p/13324222.html
https://www.jb51.net/article/205764.htm
https://cn.vuejs.org/v2/guide/render-function.html#事件-amp-按键修饰符
https://www.cnblogs.com/htoooth/p/6973238.html
https://www.jianshu.com/p/84b708c80598
https://cloud.tencent.com/developer/article/1704608
|


- 上一条: JS的深浅复制,原来如此! 2021-10-13
- 下一条: 前端需要写自动化测试吗?那又该怎么写呢?【建议收藏】 2021-10-15
- 在 Vue 中如何使用 JSX,就这么简单!【建议收藏】 2021-10-11
- Vue3核心Typescript类解析 2021-09-09
- 使用 Chrome 调试 Vue3 的 TypeScript 源码 2021-09-28
- @vue/composition-api 解析 2021-08-12
- Vue3异步数据加载组件:suspense 2021-08-04