 作者:小傅哥 | 博客:https://bugstack.cn
>沉淀、分享、成长,让自己和他人都能有所收获!😄
一、前言
Mybatis 最核心的原理也是它最便于使用的体现,为什么这说?
因为我们在使用 Mybatis 的时候,只需要定义一个不需要写实现类的接口,就能通过注解或者配置SQL语句的方式,对数据库进行 CRUD 操作。
那么这是怎么做到的呢,其中有一点非常重要,就是在 Spring 中可以把你的代理对象交给 Spring 容器,这个代理对象就是可以当做是 DAO 接口的具体实现类,而这个被代理的实现类就可以完成对数据库的一个操作,也就是这个封装过程被称为 ORM 框架。
说了基本的流程,我们来做点测试,让大家可以动手操作起来!学知识,一定是上手,才能得到!你可以通过以下源码仓库进行练习
源码:https://github.com/fuzhengwei/CodeGuide/wiki
二、把Bean塞到Spring容器,分几步
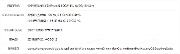
- 关于Bean注册的技术场景,在我们日常用到的技术框架中,MyBatis 是最为常见的。通过在使用 MyBatis 时都只是定义一个接口不需要写实现类,但是这个接口却可以和配置的 SQL 语句关联,执行相应的数据库操作时可以返回对应的结果。那么这个接口与数据库的操作就用到的 Bean 的代理和注册。
- 我们都知道类的调用是不能直接调用没有实现的接口的,所以需要通过代理的方式给接口生成对应的实现类。接下来再通过把代理类放到 Spring 的 FactoryBean 的实现中,最后再把这个 FactoryBean 实现类注册到 Spring 容器。那么现在你的代理类就已经被注册到 Spring 容器了,接下来就可以通过注解的方式注入到属性中。
按照这个实现方式,我们来操作一下,看看一个 Bean 的注册过程在代码中是如何实现的。
1. 定义接口
public interface IUserDao {


    String queryUserInfo();


} - 先定义一个类似 DAO 的接口,基本这样的接口在使用 MyBatis 时还是非常常见的。后面我们会对这个接口做代理和注册。
2. 类代理实现
ClassLoader classLoader = Thread.currentThread().getContextClassLoader();
Class<!--?-->[] classes = {IUserDao.class};
InvocationHandler handler = (proxy, method, args) -> "你被代理了 " + method.getName();
IUserDao userDao = (IUserDao) Proxy.newProxyInstance(classLoader, classes, handler);
String res = userDao.queryUserInfo();
logger.info("测试结果:{}", res); - Java 本身的代理方式使用起来还是比较简单的,用法也很固定。
- InvocationHandler 是个接口类,它对应的实现内容就是代理对象的具体实现。
- 最后就是把代理交给 Proxy 创建代理对象,
Proxy.newProxyInstance。
3. 实现Bean工厂
public class ProxyBeanFactory implements FactoryBean {


    @Override

    public Object getObject() throws Exception {


        ClassLoader classLoader = Thread.currentThread().getContextClassLoader();

        Class[] classes = {IUserDao.class};

        InvocationHandler handler = (proxy, method, args) -> "你被代理了 " + method.getName();


        return Proxy.newProxyInstance(classLoader, classes, handler);

    }


    @Override

    public Class<!--?--> getObjectType() {

        return IUserDao.class;

    }


} - FactoryBean 在 spring 起到着二当家的地位,它将近有70多个小弟(实现它的接口定义),那么它有三个方法;
- T getObject() throws Exception; 返回bean实例对象
- Class<!--?--> getObjectType(); 返回实例类类型
- boolean isSingleton(); 判断是否单例,单例会放到Spring容器中单实例缓存池中
- 在这里我们把上面使用Java代理的对象放到了 getObject() 方法中,那么现在再从 Spring 中获取到的对象,就是我们的代理对象了。
4. Bean 注册
public class RegisterBeanFactory implements BeanDefinitionRegistryPostProcessor {


    @Override

    public void postProcessBeanDefinitionRegistry(BeanDefinitionRegistry registry) throws BeansException {


        GenericBeanDefinition beanDefinition = new GenericBeanDefinition();

        beanDefinition.setBeanClass(ProxyBeanFactory.class);


        BeanDefinitionHolder definitionHolder = new BeanDefinitionHolder(beanDefinition, "userDao");

        BeanDefinitionReaderUtils.registerBeanDefinition(definitionHolder, registry);

    }


}
在 Spring 的 Bean 管理中,所有的 Bean 最终都会被注册到类 DefaultListableBeanFactory 中,以上这部分代码主要的内容包括:
- 实现 BeanDefinitionRegistryPostProcessor.postProcessBeanDefinitionRegistry方法,获取 Bean 注册对象。
- 定义 Bean,GenericBeanDefinition,这里主要设置了我们的代理类工厂。
- 创建 Bean 定义处理类,BeanDefinitionHolder,这里需要的主要参数;定义 Bean 和名称
setBeanClass(ProxyBeanFactory.class)。 - 最后将我们自己的bean注册到spring容器中去,registry.registerBeanDefinition()
5. 测试验证
在上面我们已经把自定义代理的 Bean 注册到了 Spring 容器中,接下来我们来测试下这个代理的 Bean 被如何调用。
1. 定义 spring-config.xml
<bean id="userDao" class="org.itstack.interview.bean.RegisterBeanFactory" />
- 这里我们把 RegisterBeanFactory 配置到 spring 的 xml 配置中,便于启动时加载。
2. 单元测试
@Test

public void test_IUserDao() {

    BeanFactory beanFactory = new ClassPathXmlApplicationContext("spring-config.xml");

    IUserDao userDao = beanFactory.getBean("userDao", IUserDao.class);

    String res = userDao.queryUserInfo();

    logger.info("测试结果:{}", res);

}
测试结果
22:53:14.759 [main] DEBUG o.s.c.e.PropertySourcesPropertyResolver - Could not find key 'spring.liveBeansView.mbeanDomain' in any property source

22:53:14.760 [main] DEBUG o.s.b.f.s.DefaultListableBeanFactory - Returning cached instance of singleton bean 'userDao'

22:53:14.796 [main] INFO  org.itstack.interview.test.ApiTest - 测试结果:你被代理了 queryUserInfo


Process finished with exit code 0
- 从测试结果可以看到,我们已经可以通过注入到Spring的代理Bean对象,实现我们的预期结果。
- 其实这个过程也是很多框架中用到的方式,尤其是在一些中间件开发,类似的 ORM 框架都需要使用到。
三、手写个Mybatis
扩展上一篇源码分析工程;itstack-demo-mybatis,增加 like 包,模仿 Mybatis 工程。完整规程下载 https://github.com/fuzhengwei/CodeGuide/wiki
itstack-demo-mybatis

└── src

    ├── main

    │   ├── java

    │   │   └── org.itstack.demo

    │   │       ├── dao

    │   │       │	├── ISchool.java

    │   │       │	└── IUserDao.java

    │   │       ├── like

    │   │       │	├── Configuration.java

    │   │       │	├── DefaultSqlSession.java

    │   │       │	├── DefaultSqlSessionFactory.java

    │   │       │	├── Resources.java

    │   │       │	├── SqlSession.java

    │   │       │	├── SqlSessionFactory.java

    │   │       │	├── SqlSessionFactoryBuilder.java

    │   │       │	└── SqlSessionFactoryBuilder.java

    │   │       └── interfaces

    │   │         	├── School.java

    │   │        	└── User.java

    │   ├── resources

    │   │   ├── mapper

    │   │   │   ├── School_Mapper.xml

    │   │   │   └── User_Mapper.xml

    │   │   ├── props

    │   │   │   └── jdbc.properties

    │   │   ├── spring

    │   │   │   ├── mybatis-config-datasource.xml

    │   │   │   └── spring-config-datasource.xml

    │   │   ├── logback.xml

    │   │   ├── mybatis-config.xml

    │   │   └── spring-config.xml

    │   └── webapp

    │       └── WEB-INF

    └── test

         └── java

             └── org.itstack.demo.test

                 ├── ApiLikeTest.java

                 ├── MybatisApiTest.java

                 └── SpringApiTest.java
关于整个 Demo 版本,并不是把所有 Mybatis 全部实现一遍,而是拨丝抽茧将最核心的内容展示给你,从使用上你会感受一模一样,但是实现类已经全部被替换,核心类包括;
- Configuration
- DefaultSqlSession
- DefaultSqlSessionFactory
- Resources
- SqlSession
- SqlSessionFactory
- SqlSessionFactoryBuilder
- XNode
1. 先测试下整个DemoJdbc框架
>ApiLikeTest.test_queryUserInfoById()
@Test

public void test_queryUserInfoById() {

    String resource = "spring/mybatis-config-datasource.xml";

    Reader reader;

    try {

        reader = Resources.getResourceAsReader(resource);

        SqlSessionFactory sqlMapper = new SqlSessionFactoryBuilder().build(reader);

        SqlSession session = sqlMapper.openSession();


        try {

            User user = session.selectOne("org.itstack.demo.dao.IUserDao.queryUserInfoById", 1L);

            System.out.println(JSON.toJSONString(user));

        } finally {

            session.close();

            reader.close();

        }

    } catch (Exception e) {

        e.printStackTrace();

    }

}
一切顺利结果如下(新人往往会遇到各种问题);
{"age":18,"createTime":1576944000000,"id":1,"name":"水水","updateTime":1576944000000}


Process finished with exit code 0
可能乍一看这测试类完全和 MybatisApiTest.java 测试的代码一模一样呀,也看不出区别。其实他们的引入的包是不一样;
>MybatisApiTest.java 里面引入的包
import org.apache.ibatis.io.Resources;

import org.apache.ibatis.session.SqlSession;

import org.apache.ibatis.session.SqlSessionFactory;

import org.apache.ibatis.session.SqlSessionFactoryBuilder;
>ApiLikeTest.java 里面引入的包
import org.itstack.demo.like.Resources;

import org.itstack.demo.like.SqlSession;

import org.itstack.demo.like.SqlSessionFactory;

import org.itstack.demo.like.SqlSessionFactoryBuilder;
好!接下来我们开始分析这部分核心代码。
2. 加载XML配置文件
这里我们采用 mybatis 的配置文件结构进行解析,在不破坏原有结构的情况下,最大可能的贴近源码。mybatis 单独使用的使用的时候使用了两个配置文件;数据源配置、Mapper 映射配置,如下;
>mybatis-config-datasource.xml & 数据源配置
<!--?xml version="1.0" encoding="UTF-8"?-->


<configuration>

    <environments default="development">

        <environment id="development">

            <transactionmanager type="JDBC" />

            <datasource type="POOLED">

                <property name="driver" value="com.mysql.jdbc.Driver" />

                <property name="url" value="jdbc:mysql://127.0.0.1:3306/itstack?useUnicode=true" />

                <property name="username" value="root" />

                <property name="password" value="123456" />

            </datasource>

        </environment>

    </environments>


    <mappers>

        <mapper resource="mapper/User_Mapper.xml" />

        <mapper resource="mapper/School_Mapper.xml" />

    </mappers>


</configuration>
>User_Mapper.xml & Mapper 映射配置
<!--?xml version="1.0" encoding="UTF-8"?-->


<mapper namespace="org.itstack.demo.dao.IUserDao">


    <select id="queryUserInfoById" parametertype="java.lang.Long" resulttype="org.itstack.demo.po.User">

        SELECT id, name, age, createTime, updateTime

        FROM user

        where id = #{id}

    </select>


    <select id="queryUserList" parametertype="org.itstack.demo.po.User" resulttype="org.itstack.demo.po.User">

        SELECT id, name, age, createTime, updateTime

        FROM user

        where age = #{age}

    </select>


</mapper>
这里的加载过程与 mybaits 不同,我们采用 dom4j 方式。在案例中会看到最开始获取资源,如下;
>ApiLikeTest.test_queryUserInfoById() & 部分截取
String resource = "spring/mybatis-config-datasource.xml";

	Reader reader;

	try {

		reader = Resources.getResourceAsReader(resource);

	...
从上可以看到这是通过配置文件地址获取到了读取流的过程,从而为后面解析做基础。首先我们先看 Resources 类,整个是我们的资源类。
>Resources.java & 资源类
/**

 * 博 客 | https://bugstack.cn

 * Create by 小傅哥 @2020

 */

public class Resources {


    public static Reader getResourceAsReader(String resource) throws IOException {

        return new InputStreamReader(getResourceAsStream(resource));

    }


    private static InputStream getResourceAsStream(String resource) throws IOException {

        ClassLoader[] classLoaders = getClassLoaders();

        for (ClassLoader classLoader : classLoaders) {

            InputStream inputStream = classLoader.getResourceAsStream(resource);

            if (null != inputStream) {

                return inputStream;

            }

        }

        throw new IOException("Could not find resource " + resource);

    }


    private static ClassLoader[] getClassLoaders() {

        return new ClassLoader[]{

                ClassLoader.getSystemClassLoader(),

                Thread.currentThread().getContextClassLoader()};

    }


}
这段代码方法的入口是getResourceAsReader,直到往下以此做了;
- 获取 ClassLoader 集合,最大限度搜索配置文件
- 通过 classLoader.getResourceAsStream 读取配置资源,找到后立即返回,否则抛出异常
3. 解析XML配置文件
配置文件加载后开始进行解析操作,这里我们也仿照 mybatis 但进行简化,如下;
SqlSessionFactory sqlMapper = new SqlSessionFactoryBuilder().build(reader);
>SqlSessionFactoryBuilder.build() & 入口构建类
public DefaultSqlSessionFactory build(Reader reader) {

    SAXReader saxReader = new SAXReader();

    try {

        Document document = saxReader.read(new InputSource(reader));

        Configuration configuration = parseConfiguration(document.getRootElement());

        return new DefaultSqlSessionFactory(configuration);

    } catch (DocumentException e) {

        e.printStackTrace();

    }

    return null;

} - 通过读取流创建 xml 解析的 Document 类
- parseConfiguration 进行解析 xml 文件,并将结果设置到配置类中,包括;连接池、数据源、mapper关系
>SqlSessionFactoryBuilder.parseConfiguration() & 解析过程
private Configuration parseConfiguration(Element root) {

    Configuration configuration = new Configuration();

    configuration.setDataSource(dataSource(root.selectNodes("//dataSource")));

    configuration.setConnection(connection(configuration.dataSource));

    configuration.setMapperElement(mapperElement(root.selectNodes("mappers")));

    return configuration;

} - 在前面的 xml 内容中可以看到,我们需要解析出数据库连接池信息 datasource,还有数据库语句映射关系 mappers
>SqlSessionFactoryBuilder.dataSource() & 解析出数据源
private Map<string, string> dataSource(List<element> list) {
Map<string, string> dataSource = new HashMap<>(4);
Element element = list.get(0);
List content = element.content();
for (Object o : content) {
Element e = (Element) o;
String name = e.attributeValue("name");
String value = e.attributeValue("value");
dataSource.put(name, value);
}
return dataSource;
} - 这个过程比较简单,只需要将数据源信息获取即可
>SqlSessionFactoryBuilder.connection() & 获取数据库连接
private Connection connection(Map<string, string> dataSource) {

    try {

        Class.forName(dataSource.get("driver"));

        return DriverManager.getConnection(dataSource.get("url"), dataSource.get("username"), dataSource.get("password"));

    } catch (ClassNotFoundException | SQLException e) {

        e.printStackTrace();

    }

    return null;

} - 这个就是jdbc最原始的代码,获取了数据库连接池
>SqlSessionFactoryBuilder.mapperElement() & 解析SQL语句
private Map<string, xnode> mapperElement(List<element> list) {
Map<string, xnode> map = new HashMap<>();
Element element = list.get(0);
List content = element.content();
for (Object o : content) {
Element e = (Element) o;
String resource = e.attributeValue("resource");
try {
Reader reader = Resources.getResourceAsReader(resource);
SAXReader saxReader = new SAXReader();
Document document = saxReader.read(new InputSource(reader));
Element root = document.getRootElement();
//命名空间
String namespace = root.attributeValue("namespace");
// SELECT
List<element> selectNodes = root.selectNodes("select");
for (Element node : selectNodes) {
String id = node.attributeValue("id");
String parameterType = node.attributeValue("parameterType");
String resultType = node.attributeValue("resultType");
String sql = node.getText();
// ? 匹配
Map<integer, string> parameter = new HashMap<>();
Pattern pattern = Pattern.compile("(#\\{(.*?)})");
Matcher matcher = pattern.matcher(sql);
for (int i = 1; matcher.find(); i++) {
String g1 = matcher.group(1);
String g2 = matcher.group(2);
parameter.put(i, g2);
sql = sql.replace(g1, "?");
}
XNode xNode = new XNode();
xNode.setNamespace(namespace);
xNode.setId(id);
xNode.setParameterType(parameterType);
xNode.setResultType(resultType);
xNode.setSql(sql);
xNode.setParameter(parameter);
map.put(namespace + "." + id, xNode);
}
} catch (Exception ex) {
ex.printStackTrace();
}
}
return map;
} - 这个过程首先包括是解析所有的sql语句,目前为了测试只解析 select 相关
- 所有的 sql 语句为了确认唯一,都是使用;namespace + select中的id进行拼接,作为 key,之后与sql一起存放到 map 中。
- 在 mybaits 的 sql 语句配置中,都有占位符,用于传参。where id = #{id} 所以我们需要将占位符设置为问号,另外需要将占位符的顺序信息与名称存放到 map 结构,方便后续设置查询时候的入参。
4. 创建DefaultSqlSessionFactory
最后将初始化后的配置类 Configuration,作为参数进行创建 DefaultSqlSessionFactory,如下;
public DefaultSqlSessionFactory build(Reader reader) {

    SAXReader saxReader = new SAXReader();

    try {

        Document document = saxReader.read(new InputSource(reader));

        Configuration configuration = parseConfiguration(document.getRootElement());

        return new DefaultSqlSessionFactory(configuration);

    } catch (DocumentException e) {

        e.printStackTrace();

    }

    return null;

}
>DefaultSqlSessionFactory.java & SqlSessionFactory的实现类
public class DefaultSqlSessionFactory implements SqlSessionFactory {


	private final Configuration configuration;


	public DefaultSqlSessionFactory(Configuration configuration) {

        this.configuration = configuration;

    }


    @Override

    public SqlSession openSession() {

        return new DefaultSqlSession(configuration.connection, configuration.mapperElement);

    }


} - 这个过程比较简单,构造函数只提供了配置类入参
- 实现 SqlSessionFactory 的 openSession(),用于创建 DefaultSqlSession,也就可以执行 sql 操作
5. 开启SqlSession
SqlSession session = sqlMapper.openSession();
上面这一步就是创建了DefaultSqlSession,比较简单。如下;
@Override

public SqlSession openSession() {

    return new DefaultSqlSession(configuration.connection, configuration.mapperElement);

}
6. 执行SQL语句
User user = session.selectOne("org.itstack.demo.dao.IUserDao.queryUserInfoById", 1L); 在 DefaultSqlSession 中通过实现 SqlSession,提供数据库语句查询和关闭连接池,如下;
>SqlSession.java & 定义
public interface SqlSession {


    <t> T selectOne(String statement);


    <t> T selectOne(String statement, Object parameter);


    <t> List<t> selectList(String statement);


    <t> List<t> selectList(String statement, Object parameter);


    void close();

}
接下来看具体的执行过程,session.selectOne
>DefaultSqlSession.selectOne() & 执行查询
public <t> T selectOne(String statement, Object parameter) {

    XNode xNode = mapperElement.get(statement);

    Map<integer, string> parameterMap = xNode.getParameter();

    try {

        PreparedStatement preparedStatement = connection.prepareStatement(xNode.getSql());

        buildParameter(preparedStatement, parameter, parameterMap);

        ResultSet resultSet = preparedStatement.executeQuery();

        List<t> objects = resultSet2Obj(resultSet, Class.forName(xNode.getResultType()));

        return objects.get(0);

    } catch (Exception e) {

        e.printStackTrace();

    }

    return null;

}
selectOne 就objects.get(0);,selectList 就全部返回
通过 statement 获取最初解析 xml 时候的存储的 select 标签信息;
<select id="queryUserInfoById" parametertype="java.lang.Long" resulttype="org.itstack.demo.po.User">

	SELECT id, name, age, createTime, updateTime

	FROM user

	where id = #{id}

</select>
获取 sql 语句后交给 jdbc 的 PreparedStatement 类进行执行
这里还需要设置入参,我们将入参设置进行抽取,如下;
private void buildParameter(PreparedStatement preparedStatement, Object parameter, Map<integer, string> parameterMap) throws SQLException, IllegalAccessException { int size = parameterMap.size(); // 单个参数 if (parameter instanceof Long) { for (int i = 1; i <= size; i++) { preparedStatement.setLong(i, Long.parseLong(parameter.toString())); } return; } if (parameter instanceof Integer) { for (int i = 1; i <= size; i++) { preparedStatement.setInt(i, Integer.parseInt(parameter.toString())); } return; } if (parameter instanceof String) { for (int i = 1; i <= size; i++) { preparedStatement.setString(i, parameter.toString()); } return; } Map<string, object> fieldMap = new HashMap<>(); // 对象参数 Field[] declaredFields = parameter.getClass().getDeclaredFields(); for (Field field : declaredFields) { String name = field.getName(); field.setAccessible(true); Object obj = field.get(parameter); field.setAccessible(false); fieldMap.put(name, obj); } for (int i = 1; i <= size; i++) { String parameterDefine = parameterMap.get(i); Object obj = fieldMap.get(parameterDefine); if (obj instanceof Short) { preparedStatement.setShort(i, Short.parseShort(obj.toString())); continue; } if (obj instanceof Integer) { preparedStatement.setInt(i, Integer.parseInt(obj.toString())); continue; } if (obj instanceof Long) { preparedStatement.setLong(i, Long.parseLong(obj.toString())); continue; } if (obj instanceof String) { preparedStatement.setString(i, obj.toString()); continue; } if (obj instanceof Date) { preparedStatement.setDate(i, (java.sql.Date) obj); } } }- 单个参数比较简单直接设置值即可,Long、Integer、String ...
- 如果是一个类对象,需要通过获取 Field 属性,与参数 Map 进行匹配设置
设置参数后执行查询 preparedStatement.executeQuery()
接下来需要将查询结果转换为我们的类(主要是反射类的操作),resultSet2Obj(resultSet, Class.forName(xNode.getResultType()));
private <t> List<t> resultSet2Obj(ResultSet resultSet, Class<!--?--> clazz) { List<t> list = new ArrayList<>(); try { ResultSetMetaData metaData = resultSet.getMetaData(); int columnCount = metaData.getColumnCount(); // 每次遍历行值 while (resultSet.next()) { T obj = (T) clazz.newInstance(); for (int i = 1; i <= columnCount; i++) { Object value = resultSet.getObject(i); String columnName = metaData.getColumnName(i); String setMethod = "set" + columnName.substring(0, 1).toUpperCase() + columnName.substring(1); Method method; if (value instanceof Timestamp) { method = clazz.getMethod(setMethod, Date.class); } else { method = clazz.getMethod(setMethod, value.getClass()); } method.invoke(obj, value); } list.add(obj); } } catch (Exception e) { e.printStackTrace(); } return list; }- 主要通过反射生成我们的类对象,这个类的类型定义在 sql 标签上
- 时间类型需要判断后处理,Timestamp,与 java 不是一个类型
7. Sql查询补充说明
sql 查询有入参、有不需要入参、有查询一个、有查询集合,只需要合理包装即可,例如下面的查询集合,入参是对象类型;
>ApiLikeTest.test_queryUserList()
@Test

public void test_queryUserList() {

    String resource = "spring/mybatis-config-datasource.xml";

    Reader reader;

    try {

        reader = Resources.getResourceAsReader(resource);

        SqlSessionFactory sqlMapper = new SqlSessionFactoryBuilder().build(reader);

        SqlSession session = sqlMapper.openSession();


		try {

            User req = new User();

            req.setAge(18);

            List<user> userList = session.selectList("org.itstack.demo.dao.IUserDao.queryUserList", req);

            System.out.println(JSON.toJSONString(userList));

        } finally {

            session.close();

            reader.close();

        }

    } catch (Exception e) {

        e.printStackTrace();

    }


} **测试结果:
[{"age":18,"createTime":1576944000000,"id":1,"name":"水水","updateTime":1576944000000},{"age":18,"createTime":1576944000000,"id":2,"name":"豆豆","updateTime":1576944000000}]


Process finished with exit code 0
四、源码分析(mybatis)
<dependency>

    <groupid>org.mybatis</groupid>

    <artifactid>mybatis</artifactid>

    <version>3.4.6</version>

</dependency>
Mybatis的整个源码还是很大的,以下主要将部分核心内容进行整理分析,以便于后续分析Mybatis与Spring整合的源码部分。简要包括;容器初始化、配置文件解析、Mapper加载与动态代理。
1. 从一个简单的案例开始
要学习Mybatis源码,最好的方式一定是从一个简单的点进入,而不是从Spring整合开始分析。SqlSessionFactory是整个Mybatis的核心实例对象,SqlSessionFactory对象的实例又通过SqlSessionFactoryBuilder对象来获得。SqlSessionFactoryBuilder对象可以从XML配置文件加载配置信息,然后创建SqlSessionFactory。如下例子:
>MybatisApiTest.java
public class MybatisApiTest {


    @Test

    public void test_queryUserInfoById() {

        String resource = "spring/mybatis-config-datasource.xml";

        Reader reader;

        try {

            reader = Resources.getResourceAsReader(resource);

            SqlSessionFactory sqlMapper = new SqlSessionFactoryBuilder().build(reader);


            SqlSession session = sqlMapper.openSession();

            try {

                User user = session.selectOne("org.itstack.demo.dao.IUserDao.queryUserInfoById", 1L);

                System.out.println(JSON.toJSONString(user));

            } finally {

                session.close();

                reader.close();

            }

        } catch (IOException e) {

            e.printStackTrace();

        }

    }


}
>dao/IUserDao.java
public interface IUserDao {


     User queryUserInfoById(Long id);


}
>spring/mybatis-config-datasource.xml
<!--?xml version="1.0" encoding="UTF-8"?-->


<configuration>

    <environments default="development">

        <environment id="development">

            <transactionmanager type="JDBC" />

            <datasource type="POOLED">

                <property name="driver" value="com.mysql.jdbc.Driver" />

                <property name="url" value="jdbc:mysql://127.0.0.1:3306/itstack?useUnicode=true" />

                <property name="username" value="root" />

                <property name="password" value="123456" />

            </datasource>

        </environment>

    </environments>


    <mappers>

        <mapper resource="mapper/User_Mapper.xml" />

    </mappers>


</configuration>
如果一切顺利,那么会有如下结果:
{"age":18,"createTime":1571376957000,"id":1,"name":"花花","updateTime":1571376957000} 从上面的代码块可以看到,核心代码;SqlSessionFactoryBuilder().build(reader),负责Mybatis配置文件的加载、解析、构建等职责,直到最终可以通过SqlSession来执行并返回结果。
2. 容器初始化
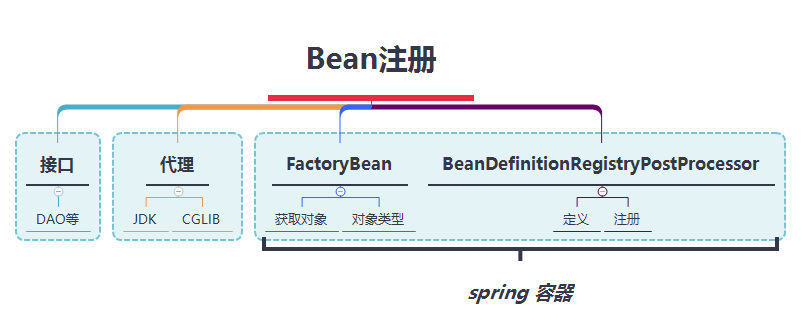
从上面代码可以看到,SqlSessionFactory是通过SqlSessionFactoryBuilder工厂类创建的,而不是直接使用构造器。容器的配置文件加载和初始化流程如下:
- 流程核心类
- SqlSessionFactoryBuilder
- XMLConfigBuilder
- XPathParser
- Configuration
>SqlSessionFactoryBuilder.java
public class SqlSessionFactoryBuilder {


  public SqlSessionFactory build(Reader reader) {

    return build(reader, null, null);

  }


  public SqlSessionFactory build(Reader reader, String environment) {

    return build(reader, environment, null);

  }


  public SqlSessionFactory build(Reader reader, Properties properties) {

    return build(reader, null, properties);

  }


  public SqlSessionFactory build(Reader reader, String environment, Properties properties) {

    try {

      XMLConfigBuilder parser = new XMLConfigBuilder(reader, environment, properties);

      return build(parser.parse());

    } catch (Exception e) {

      throw ExceptionFactory.wrapException("Error building SqlSession.", e);

    } finally {

      ErrorContext.instance().reset();

      try {

        reader.close();

      } catch (IOException e) {

        // Intentionally ignore. Prefer previous error.

      }

    }

  }


  public SqlSessionFactory build(InputStream inputStream) {

    return build(inputStream, null, null);

  }


  public SqlSessionFactory build(InputStream inputStream, String environment) {

    return build(inputStream, environment, null);

  }


  public SqlSessionFactory build(InputStream inputStream, Properties properties) {

    return build(inputStream, null, properties);

  }


  public SqlSessionFactory build(InputStream inputStream, String environment, Properties properties) {

    try {

      XMLConfigBuilder parser = new XMLConfigBuilder(inputStream, environment, properties);

      return build(parser.parse());

    } catch (Exception e) {

      throw ExceptionFactory.wrapException("Error building SqlSession.", e);

    } finally {

      ErrorContext.instance().reset();

      try {

        inputStream.close();

      } catch (IOException e) {

        // Intentionally ignore. Prefer previous error.

      }

    }

  }


  public SqlSessionFactory build(Configuration config) {

    return new DefaultSqlSessionFactory(config);

  }


}
从上面的源码可以看到,SqlSessionFactory提供三种方式build构建对象;
- 字节流:java.io.InputStream
- 字符流:java.io.Reader
- 配置类:org.apache.ibatis.session.Configuration
那么,字节流、字符流都会创建配置文件解析类:XMLConfigBuilder,并通过parser.parse()生成Configuration,最后调用配置类构建方法生成SqlSessionFactory。
>XMLConfigBuilder.java
public class XMLConfigBuilder extends BaseBuilder {


  private boolean parsed;

  private final XPathParser parser;

  private String environment;

  private final ReflectorFactory localReflectorFactory = new DefaultReflectorFactory();


  ...

  public XMLConfigBuilder(Reader reader, String environment, Properties props) {

    this(new XPathParser(reader, true, props, new XMLMapperEntityResolver()), environment, props);

  }

  ...

} - XMLConfigBuilder对于XML文件的加载和解析都委托于XPathParser,最终使用JDK自带的javax.xml进行XML解析(XPath)
- XPathParser(Reader reader, boolean validation, Properties variables, EntityResolver entityResolver)
- reader:使用字符流创建新的输入源,用于对XML文件的读取
- validation:是否进行DTD校验
- variables:属性配置信息
- entityResolver:Mybatis硬编码了new XMLMapperEntityResolver()提供XML默认解析器
>XMLMapperEntityResolver.java
public class XMLMapperEntityResolver implements EntityResolver {


  private static final String IBATIS_CONFIG_SYSTEM = "ibatis-3-config.dtd";

  private static final String IBATIS_MAPPER_SYSTEM = "ibatis-3-mapper.dtd";

  private static final String MYBATIS_CONFIG_SYSTEM = "mybatis-3-config.dtd";

  private static final String MYBATIS_MAPPER_SYSTEM = "mybatis-3-mapper.dtd";


  private static final String MYBATIS_CONFIG_DTD = "org/apache/ibatis/builder/xml/mybatis-3-config.dtd";

  private static final String MYBATIS_MAPPER_DTD = "org/apache/ibatis/builder/xml/mybatis-3-mapper.dtd";


  /*

   * Converts a public DTD into a local one

   *

   * @param publicId The public id that is what comes after "PUBLIC"

   * @param systemId The system id that is what comes after the public id.

   * @return The InputSource for the DTD

   *

   * @throws org.xml.sax.SAXException If anything goes wrong

   */

  @Override

  public InputSource resolveEntity(String publicId, String systemId) throws SAXException {

    try {

      if (systemId != null) {

        String lowerCaseSystemId = systemId.toLowerCase(Locale.ENGLISH);

        if (lowerCaseSystemId.contains(MYBATIS_CONFIG_SYSTEM) || lowerCaseSystemId.contains(IBATIS_CONFIG_SYSTEM)) {

          return getInputSource(MYBATIS_CONFIG_DTD, publicId, systemId);

        } else if (lowerCaseSystemId.contains(MYBATIS_MAPPER_SYSTEM) || lowerCaseSystemId.contains(IBATIS_MAPPER_SYSTEM)) {

          return getInputSource(MYBATIS_MAPPER_DTD, publicId, systemId);

        }

      }

      return null;

    } catch (Exception e) {

      throw new SAXException(e.toString());

    }

  }


  private InputSource getInputSource(String path, String publicId, String systemId) {

    InputSource source = null;

    if (path != null) {

      try {

        InputStream in = Resources.getResourceAsStream(path);

        source = new InputSource(in);

        source.setPublicId(publicId);

        source.setSystemId(systemId);

      } catch (IOException e) {

        // ignore, null is ok

      }

    }

    return source;

  }


} - Mybatis依赖于dtd文件进行进行解析,其中的ibatis-3-config.dtd主要是用于兼容用途
- getInputSource(String path, String publicId, String systemId)的调用里面有两个参数publicId(公共标识符)和systemId(系统标示符)
>XPathParser.java
public XPathParser(Reader reader, boolean validation, Properties variables, EntityResolver entityResolver) {

  commonConstructor(validation, variables, entityResolver);

  this.document = createDocument(new InputSource(reader));

}


private void commonConstructor(boolean validation, Properties variables, EntityResolver entityResolver) {

  this.validation = validation;

  this.entityResolver = entityResolver;

  this.variables = variables;

  XPathFactory factory = XPathFactory.newInstance();

  this.xpath = factory.newXPath();

}


private Document createDocument(InputSource inputSource) {

  // important: this must only be called AFTER common constructor

  try {

    DocumentBuilderFactory factory = DocumentBuilderFactory.newInstance();

    factory.setValidating(validation);

    factory.setNamespaceAware(false);

    factory.setIgnoringComments(true);

    factory.setIgnoringElementContentWhitespace(false);

    factory.setCoalescing(false);

    factory.setExpandEntityReferences(true);

    DocumentBuilder builder = factory.newDocumentBuilder();

    builder.setEntityResolver(entityResolver);

    builder.setErrorHandler(new ErrorHandler() {

      @Override

      public void error(SAXParseException exception) throws SAXException {

        throw exception;

      }

      @Override

      public void fatalError(SAXParseException exception) throws SAXException {

        throw exception;

      }

      @Override

      public void warning(SAXParseException exception) throws SAXException {

      }

    });

    return builder.parse(inputSource);

  } catch (Exception e) {

    throw new BuilderException("Error creating document instance.  Cause: " + e, e);

  }


}
从上到下可以看到主要是为了创建一个Mybatis的文档解析器,最后根据builder.parse(inputSource)返回Document
得到XPathParser实例后,接下来在调用方法:this(new XPathParser(reader, true, props, new XMLMapperEntityResolver()), environment, props);
 XMLConfigBuilder.this(new XPathParser(reader, true, props, new XMLMapperEntityResolver()), environment, props);


 private XMLConfigBuilder(XPathParser parser, String environment, Properties props) {

   super(new Configuration());

   ErrorContext.instance().resource("SQL Mapper Configuration");

   this.configuration.setVariables(props);

   this.parsed = false;

   this.environment = environment;

   this.parser = parser;

 }
其中调用了父类的构造函数
public abstract class BaseBuilder {

  protected final Configuration configuration;

  protected final TypeAliasRegistry typeAliasRegistry;

  protected final TypeHandlerRegistry typeHandlerRegistry;


  public BaseBuilder(Configuration configuration) {

    this.configuration = configuration;

    this.typeAliasRegistry = this.configuration.getTypeAliasRegistry();

    this.typeHandlerRegistry = this.configuration.getTypeHandlerRegistry();

  }

}
XMLConfigBuilder创建完成后,sqlSessionFactoryBuild调用parser.parse()创建Configuration
public class XMLConfigBuilder extends BaseBuilder {

     public Configuration parse() {

       if (parsed) {

         throw new BuilderException("Each XMLConfigBuilder can only be used once.");

       }

       parsed = true;

       parseConfiguration(parser.evalNode("/configuration"));

       return configuration;

     }

}
3. 配置文件解析
这一部分是整个XML文件解析和装载的核心内容,其中包括;
- 属性解析propertiesElement
- 加载settings节点settingsAsProperties
- 载自定义VFS loadCustomVfs
- 解析类型别名typeAliasesElement
- 加载插件pluginElement
- 加载对象工厂objectFactoryElement
- 创建对象包装器工厂objectWrapperFactoryElement
- 加载反射工厂reflectorFactoryElement
- 元素设置settingsElement
- 加载环境配置environmentsElement
- 数据库厂商标识加载databaseIdProviderElement
- 加载类型处理器typeHandlerElement
- (核心)加载mapper文件mapperElement
parseConfiguration(parser.evalNode("/configuration"));


private void parseConfiguration(XNode root) {

    try {

      //issue #117 read properties first

      //属性解析propertiesElement

      propertiesElement(root.evalNode("properties"));

      //加载settings节点settingsAsProperties

      Properties settings = settingsAsProperties(root.evalNode("settings"));

      //加载自定义VFS loadCustomVfs

      loadCustomVfs(settings);

      //解析类型别名typeAliasesElement

      typeAliasesElement(root.evalNode("typeAliases"));

      //加载插件pluginElement

      pluginElement(root.evalNode("plugins"));

      //加载对象工厂objectFactoryElement

      objectFactoryElement(root.evalNode("objectFactory"));

      //创建对象包装器工厂objectWrapperFactoryElement

      objectWrapperFactoryElement(root.evalNode("objectWrapperFactory"));

      //加载反射工厂reflectorFactoryElement

      reflectorFactoryElement(root.evalNode("reflectorFactory"));

      //元素设置

      settingsElement(settings);

      // read it after objectFactory and objectWrapperFactory issue #631

      //加载环境配置environmentsElement

      environmentsElement(root.evalNode("environments"));

      //数据库厂商标识加载databaseIdProviderElement

      databaseIdProviderElement(root.evalNode("databaseIdProvider"));

      //加载类型处理器typeHandlerElement

      typeHandlerElement(root.evalNode("typeHandlers"));

      //加载mapper文件mapperElement

      mapperElement(root.evalNode("mappers"));

    } catch (Exception e) {

      throw new BuilderException("Error parsing SQL Mapper Configuration. Cause: " + e, e);

    }

}
所有的root.evalNode()底层都是调用XML DOM方法:Object evaluate(String expression, Object item, QName returnType),表达式参数expression,通过XObject resultObject = eval( expression, item )返回最终节点内容,可以参考http://mybatis.org/dtd/mybatis-3-config.dtd,如下;
<!--ELEMENT configuration (properties?, settings?, typeAliases?, typeHandlers?, objectFactory?, objectWrapperFactory?, reflectorFactory?, plugins?, environments?, databaseIdProvider?, mappers?)-->


<!--ELEMENT databaseIdProvider (property*)-->

<!--ATTLIST databaseIdProvider

type CDATA #REQUIRED

-->


<!--ELEMENT properties (property*)-->

<!--ATTLIST properties

resource CDATA #IMPLIED

url CDATA #IMPLIED

-->


<!--ELEMENT property EMPTY-->

<!--ATTLIST property

name CDATA #REQUIRED

value CDATA #REQUIRED

-->


<!--ELEMENT settings (setting+)-->


<!--ELEMENT setting EMPTY-->

<!--ATTLIST setting

name CDATA #REQUIRED

value CDATA #REQUIRED

-->


<!--ELEMENT typeAliases (typeAlias*,package*)-->


<!--ELEMENT typeAlias EMPTY-->

<!--ATTLIST typeAlias

type CDATA #REQUIRED

alias CDATA #IMPLIED

-->


<!--ELEMENT typeHandlers (typeHandler*,package*)-->


<!--ELEMENT typeHandler EMPTY-->

<!--ATTLIST typeHandler

javaType CDATA #IMPLIED

jdbcType CDATA #IMPLIED

handler CDATA #REQUIRED

-->


<!--ELEMENT objectFactory (property*)-->

<!--ATTLIST objectFactory

type CDATA #REQUIRED

-->


<!--ELEMENT objectWrapperFactory EMPTY-->

<!--ATTLIST objectWrapperFactory

type CDATA #REQUIRED

-->


<!--ELEMENT reflectorFactory EMPTY-->

<!--ATTLIST reflectorFactory

type CDATA #REQUIRED

-->


<!--ELEMENT plugins (plugin+)-->


<!--ELEMENT plugin (property*)-->

<!--ATTLIST plugin

interceptor CDATA #REQUIRED

-->


<!--ELEMENT environments (environment+)-->

<!--ATTLIST environments

default CDATA #REQUIRED

-->


<!--ELEMENT environment (transactionManager,dataSource)-->

<!--ATTLIST environment

id CDATA #REQUIRED

-->


<!--ELEMENT transactionManager (property*)-->

<!--ATTLIST transactionManager

type CDATA #REQUIRED

-->


<!--ELEMENT dataSource (property*)-->

<!--ATTLIST dataSource

type CDATA #REQUIRED

-->


<!--ELEMENT mappers (mapper*,package*)-->


<!--ELEMENT mapper EMPTY-->

<!--ATTLIST mapper

resource CDATA #IMPLIED

url CDATA #IMPLIED

class CDATA #IMPLIED

-->


<!--ELEMENT package EMPTY-->

<!--ATTLIST package

name CDATA #REQUIRED

-->
mybatis-3-config.dtd 定义文件中有11个配置文件,如下;
- properties?,
- settings?,
- typeAliases?,
- typeHandlers?,
- objectFactory?,
- objectWrapperFactory?,
- reflectorFactory?,
- plugins?,
- environments?,
- databaseIdProvider?,
- mappers?
以上每个配置都是可选。最终配置内容会保存到org.apache.ibatis.session.Configuration,如下;
public class Configuration {


  protected Environment environment;

  // 允许在嵌套语句中使用分页(RowBounds)。如果允许使用则设置为false。默认为false

  protected boolean safeRowBoundsEnabled;

  // 允许在嵌套语句中使用分页(ResultHandler)。如果允许使用则设置为false。

  protected boolean safeResultHandlerEnabled = true;

  // 是否开启自动驼峰命名规则(camel case)映射,即从经典数据库列名 A_COLUMN 到经典 Java 属性名 aColumn 的类似映射。默认false

  protected boolean mapUnderscoreToCamelCase;

  // 当开启时,任何方法的调用都会加载该对象的所有属性。否则,每个属性会按需加载。默认值false (true in ≤3.4.1)

  protected boolean aggressiveLazyLoading;

  // 是否允许单一语句返回多结果集(需要兼容驱动)。

  protected boolean multipleResultSetsEnabled = true;

  // 允许 JDBC 支持自动生成主键,需要驱动兼容。这就是insert时获取mysql自增主键/oracle sequence的开关。注:一般来说,这是希望的结果,应该默认值为true比较合适。

  protected boolean useGeneratedKeys;

  // 使用列标签代替列名,一般来说,这是希望的结果

  protected boolean useColumnLabel = true;

  // 是否启用缓存 {默认是开启的,可能这也是你的面试题}

  protected boolean cacheEnabled = true;

  // 指定当结果集中值为 null 的时候是否调用映射对象的 setter(map 对象时为 put)方法,这对于有 Map.keySet() 依赖或 null 值初始化的时候是有用的。

  protected boolean callSettersOnNulls;

  // 允许使用方法签名中的名称作为语句参数名称。 为了使用该特性,你的工程必须采用Java 8编译,并且加上-parameters选项。(从3.4.1开始)

  protected boolean useActualParamName = true;

  //当返回行的所有列都是空时,MyBatis默认返回null。 当开启这个设置时,MyBatis会返回一个空实例。 请注意,它也适用于嵌套的结果集 (i.e. collectioin and association)。(从3.4.2开始) 注:这里应该拆分为两个参数比较合适, 一个用于结果集,一个用于单记录。通常来说,我们会希望结果集不是null,单记录仍然是null

  protected boolean returnInstanceForEmptyRow;

  // 指定 MyBatis 增加到日志名称的前缀。

  protected String logPrefix;

  // 指定 MyBatis 所用日志的具体实现,未指定时将自动查找。一般建议指定为slf4j或log4j

  protected Class <!--? extends Log--> logImpl;

   // 指定VFS的实现, VFS是mybatis提供的用于访问AS内资源的一个简便接口

  protected Class <!--? extends VFS--> vfsImpl;

  // MyBatis 利用本地缓存机制(Local Cache)防止循环引用(circular references)和加速重复嵌套查询。 默认值为 SESSION,这种情况下会缓存一个会话中执行的所有查询。 若设置值为 STATEMENT,本地会话仅用在语句执行上,对相同 SqlSession 的不同调用将不会共享数据。

  protected LocalCacheScope localCacheScope = LocalCacheScope.SESSION;

  // 当没有为参数提供特定的 JDBC 类型时,为空值指定 JDBC 类型。 某些驱动需要指定列的 JDBC 类型,多数情况直接用一般类型即可,比如 NULL、VARCHAR 或 OTHER。

  protected JdbcType jdbcTypeForNull = JdbcType.OTHER;

  // 指定对象的哪个方法触发一次延迟加载。

  protected Set<string> lazyLoadTriggerMethods = new HashSet<string>(Arrays.asList(new String[] { "equals", "clone", "hashCode", "toString" }));

  // 设置超时时间,它决定驱动等待数据库响应的秒数。默认不超时

  protected Integer defaultStatementTimeout;

  // 为驱动的结果集设置默认获取数量。

  protected Integer defaultFetchSize;

  // SIMPLE 就是普通的执行器;REUSE 执行器会重用预处理语句(prepared statements); BATCH 执行器将重用语句并执行批量更新。

  protected ExecutorType defaultExecutorType = ExecutorType.SIMPLE;

  // 指定 MyBatis 应如何自动映射列到字段或属性。 NONE 表示取消自动映射;PARTIAL 只会自动映射没有定义嵌套结果集映射的结果集。 FULL 会自动映射任意复杂的结果集(无论是否嵌套)。

  protected AutoMappingBehavior autoMappingBehavior = AutoMappingBehavior.PARTIAL;

  // 指定发现自动映射目标未知列(或者未知属性类型)的行为。这个值应该设置为WARNING比较合适

  protected AutoMappingUnknownColumnBehavior autoMappingUnknownColumnBehavior = AutoMappingUnknownColumnBehavior.NONE;

  // settings下的properties属性

  protected Properties variables = new Properties();

  // 默认的反射器工厂,用于操作属性、构造器方便

  protected ReflectorFactory reflectorFactory = new DefaultReflectorFactory();

  // 对象工厂, 所有的类resultMap类都需要依赖于对象工厂来实例化

  protected ObjectFactory objectFactory = new DefaultObjectFactory();

  // 对象包装器工厂,主要用来在创建非原生对象,比如增加了某些监控或者特殊属性的代理类

  protected ObjectWrapperFactory objectWrapperFactory = new DefaultObjectWrapperFactory();

  // 延迟加载的全局开关。当开启时,所有关联对象都会延迟加载。特定关联关系中可通过设置fetchType属性来覆盖该项的开关状态。

  protected boolean lazyLoadingEnabled = false;

  // 指定 Mybatis 创建具有延迟加载能力的对象所用到的代理工具。MyBatis 3.3+使用JAVASSIST

  protected ProxyFactory proxyFactory = new JavassistProxyFactory(); // #224 Using internal Javassist instead of OGNL

  // MyBatis 可以根据不同的数据库厂商执行不同的语句,这种多厂商的支持是基于映射语句中的 databaseId 属性。

  protected String databaseId;

  ...

}
以上可以看到,Mybatis把所有的配置;resultMap、Sql语句、插件、缓存等都维护在Configuration中。这里还有一个小技巧,在Configuration还有一个StrictMap内部类,它继承于HashMap完善了put时防重、get时取不到值的异常处理,如下;
protected static class StrictMap<v> extends HashMap<string, v> {


    private static final long serialVersionUID = -4950446264854982944L;

    private final String name;


    public StrictMap(String name, int initialCapacity, float loadFactor) {

      super(initialCapacity, loadFactor);

      this.name = name;

    }


    public StrictMap(String name, int initialCapacity) {

      super(initialCapacity);

      this.name = name;

    }


    public StrictMap(String name) {

      super();

      this.name = name;

    }


    public StrictMap(String name, Map<string, ? extends v> m) {

      super(m);

      this.name = name;

    }

}
(核心)加载mapper文件mapperElement
Mapper文件处理是Mybatis框架的核心服务,所有的SQL语句都编写在Mapper中,这块也是我们分析的重点,其他模块可以后续讲解。
>XMLConfigBuilder.parseConfiguration()->mapperElement(root.evalNode("mappers"));
private void mapperElement(XNode parent) throws Exception {

   if (parent != null) {

     for (XNode child : parent.getChildren()) {

       // 如果要同时使用package自动扫描和通过mapper明确指定要加载的mapper,一定要确保package自动扫描的范围不包含明确指定的mapper,否则在通过package扫描的interface的时候,尝试加载对应xml文件的loadXmlResource()的逻辑中出现判重出错,报org.apache.ibatis.binding.BindingException异常,即使xml文件中包含的内容和mapper接口中包含的语句不重复也会出错,包括加载mapper接口时自动加载的xml mapper也一样会出错。

       if ("package".equals(child.getName())) {

         String mapperPackage = child.getStringAttribute("name");

         configuration.addMappers(mapperPackage);

       } else {

         String resource = child.getStringAttribute("resource");

         String url = child.getStringAttribute("url");

         String mapperClass = child.getStringAttribute("class");

         if (resource != null && url == null && mapperClass == null) {

           ErrorContext.instance().resource(resource);

           InputStream inputStream = Resources.getResourceAsStream(resource);

           XMLMapperBuilder mapperParser = new XMLMapperBuilder(inputStream, configuration, resource, configuration.getSqlFragments());

           mapperParser.parse();

         } else if (resource == null && url != null && mapperClass == null) {

           ErrorContext.instance().resource(url);

           InputStream inputStream = Resources.getUrlAsStream(url);

           XMLMapperBuilder mapperParser = new XMLMapperBuilder(inputStream, configuration, url, configuration.getSqlFragments());

           mapperParser.parse();

         } else if (resource == null && url == null && mapperClass != null) {

           Class<!--?--> mapperInterface = Resources.classForName(mapperClass);

           configuration.addMapper(mapperInterface);

         } else {

           throw new BuilderException("A mapper element may only specify a url, resource or class, but not more than one.");

         }

       }

     }

   }

}
Mybatis提供了两类配置Mapper的方法,第一类是使用package自动搜索的模式,这样指定package下所有接口都会被注册为mapper,也是在Spring中比较常用的方式,例如:
<mappers>

  <package name="org.itstack.demo" />

</mappers>
另外一类是明确指定Mapper,这又可以通过resource、url或者class进行细分,例如;
<mappers>

    <mapper resource="mapper/User_Mapper.xml" />

    <mapper class="" />

    <mapper url="" />

</mappers>
4. Mapper加载与动态代理
通过package方式自动搜索加载,生成对应的mapper代理类,代码块和流程,如下;
private void mapperElement(XNode parent) throws Exception {

  if (parent != null) {

    for (XNode child : parent.getChildren()) {

      if ("package".equals(child.getName())) {

        String mapperPackage = child.getStringAttribute("name");

        configuration.addMappers(mapperPackage);

      } else {

        ...

      }

    }

  }

} 
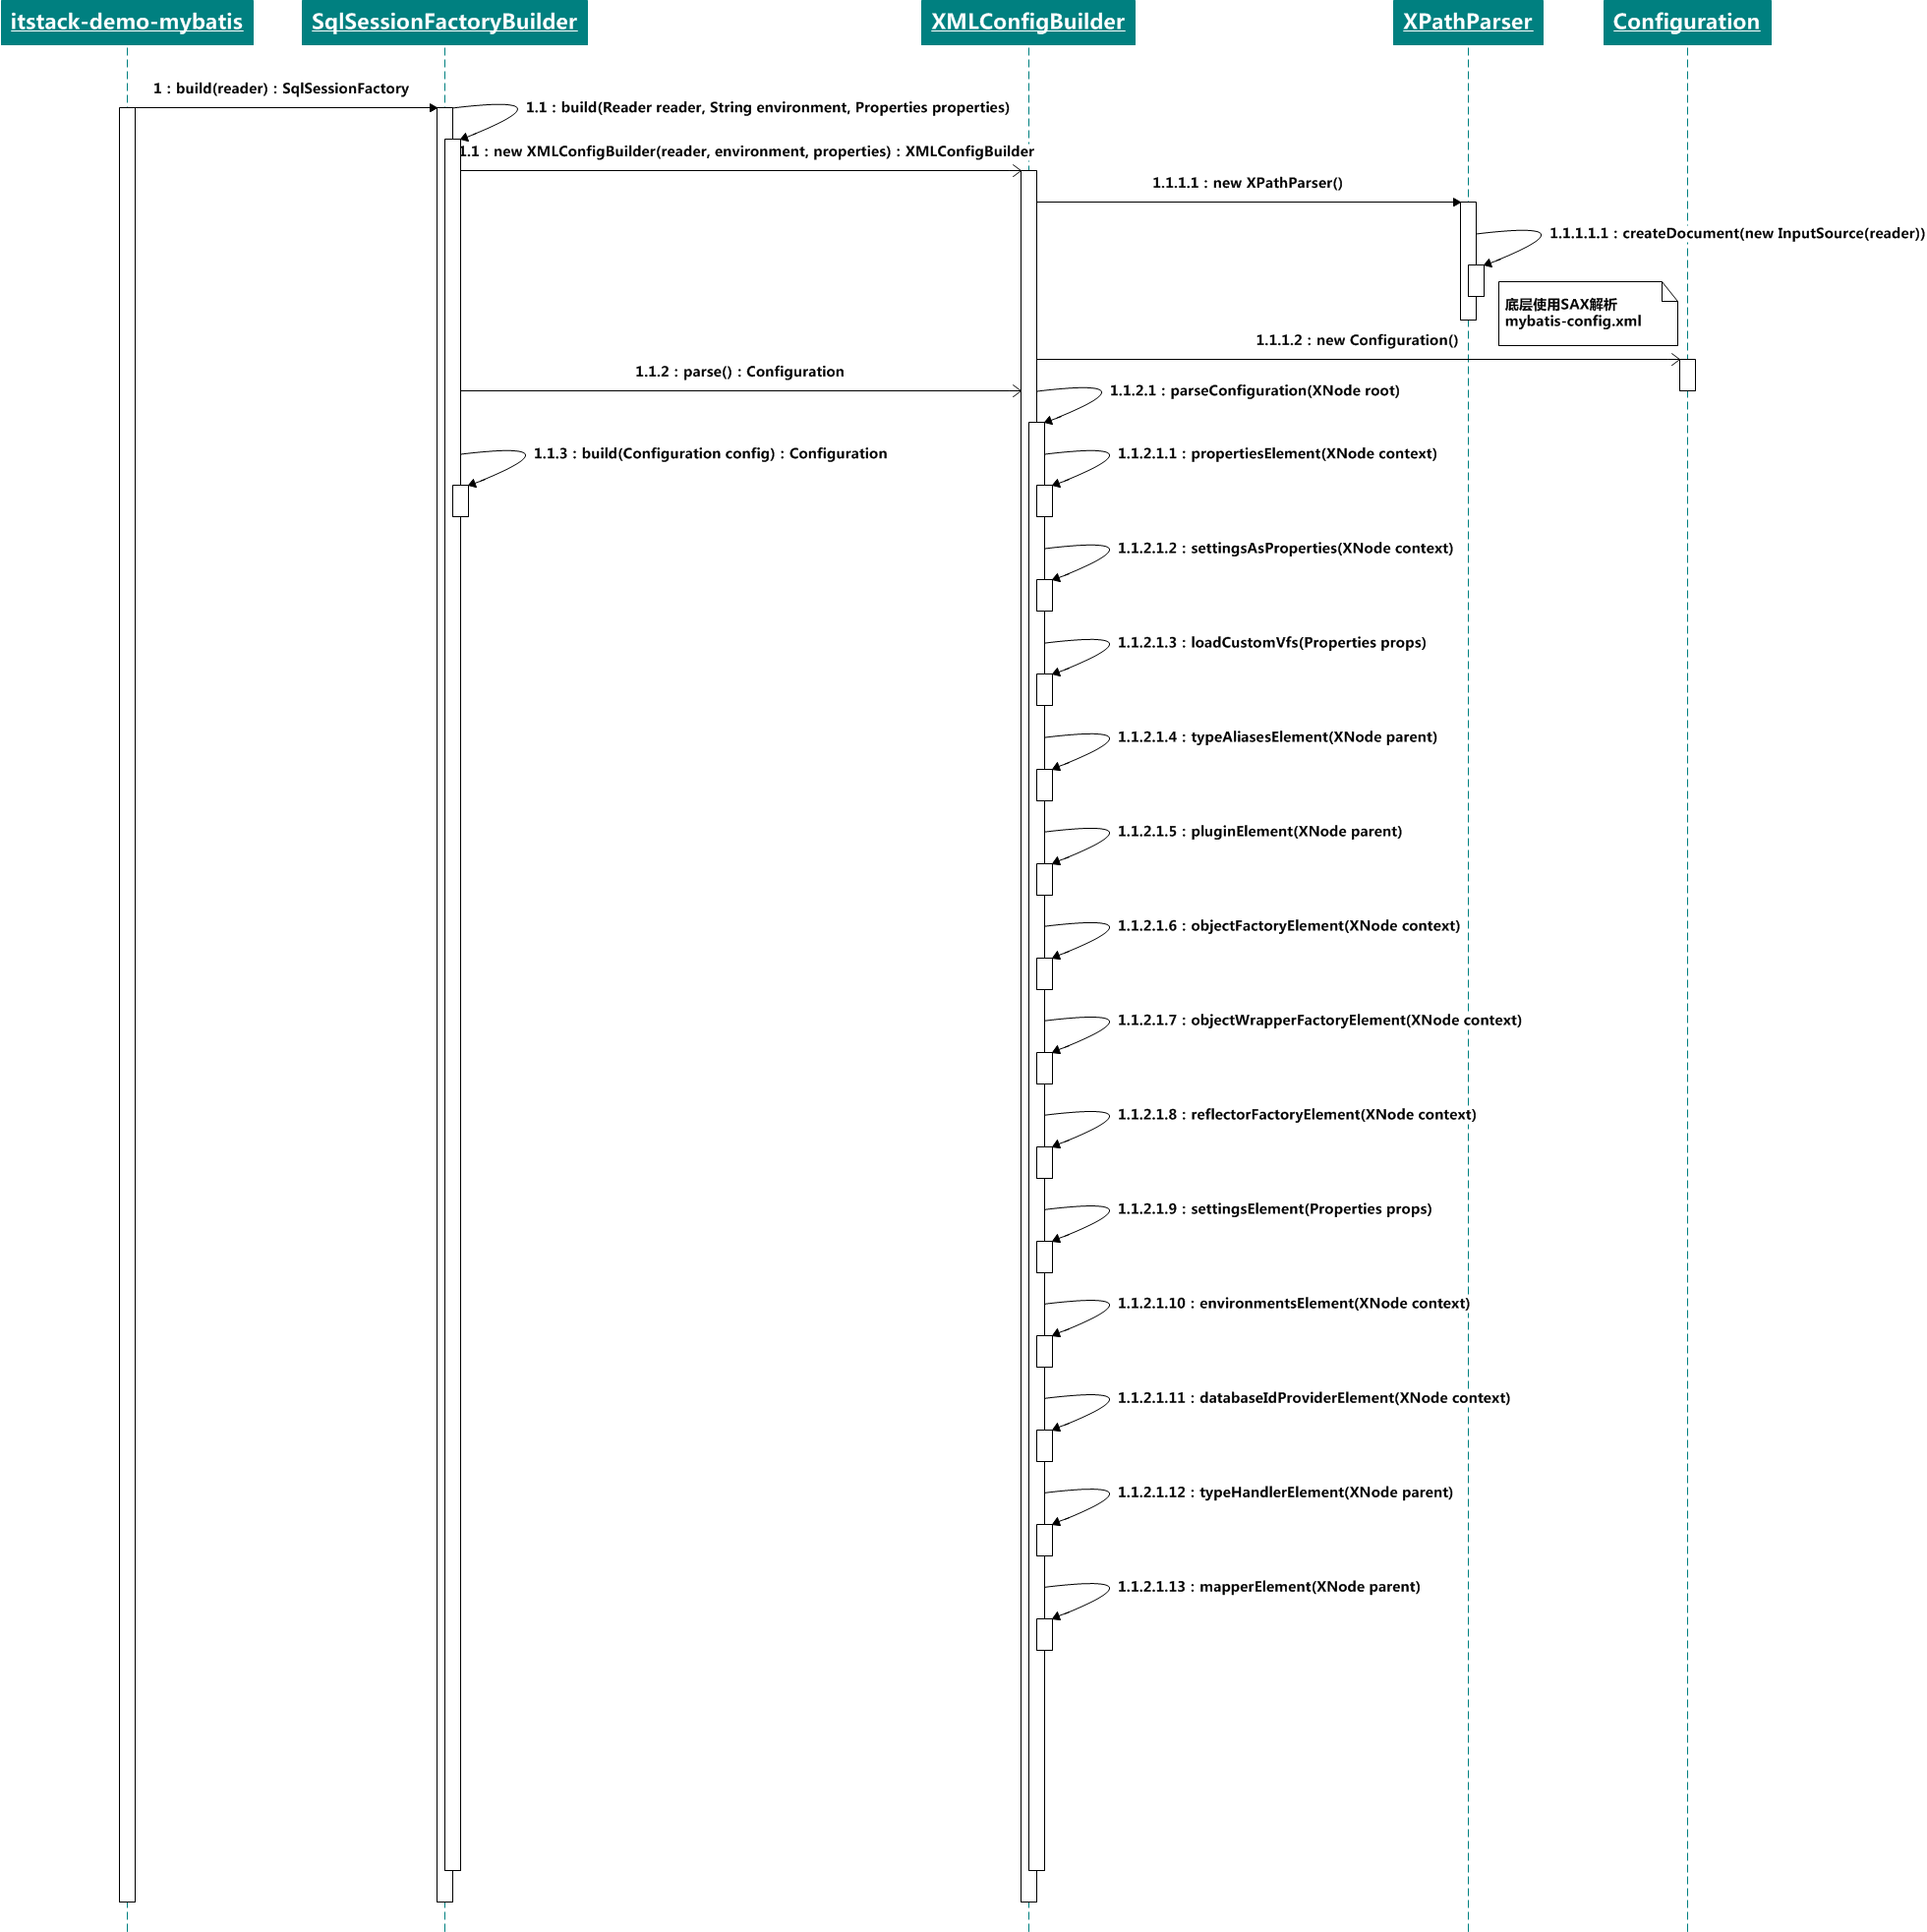
Mapper加载到生成代理对象的流程中,主要的核心类包括;
- XMLConfigBuilder
- Configuration
- MapperRegistry
- MapperAnnotationBuilder
- MapperProxyFactory
>MapperRegistry.java
解析加载Mapper
public void addMappers(String packageName, Class<!--?--> superType) {
// mybatis框架提供的搜索classpath下指定package以及子package中符合条件(注解或者继承于某个类/接口)的类,默认使用Thread.currentThread().getContextClassLoader()返回的加载器,和spring的工具类殊途同归。
ResolverUtil<class<?>> resolverUtil = new ResolverUtil<class<?>>();
// 无条件的加载所有的类,因为调用方传递了Object.class作为父类,这也给以后的指定mapper接口预留了余地
resolverUtil.find(new ResolverUtil.IsA(superType), packageName);
// 所有匹配的calss都被存储在ResolverUtil.matches字段中
Set<class<? extends class<?>>> mapperSet = resolverUtil.getClasses();
for (Class<!--?--> mapperClass : mapperSet) {
//调用addMapper方法进行具体的mapper类/接口解析
addMapper(mapperClass);
}
} 生成代理类:MapperProxyFactory
public <t> void addMapper(Class<t> type) {

  // 对于mybatis mapper接口文件,必须是interface,不能是class

  if (type.isInterface()) {

    if (hasMapper(type)) {

      throw new BindingException("Type " + type + " is already known to the MapperRegistry.");

    }

    boolean loadCompleted = false;

    try {

      // 为mapper接口创建一个MapperProxyFactory代理

      knownMappers.put(type, new MapperProxyFactory<t>(type));

      // It's important that the type is added before the parser is run

      // otherwise the binding may automatically be attempted by the

      // mapper parser. If the type is already known, it won't try.

      MapperAnnotationBuilder parser = new MapperAnnotationBuilder(config, type);

      parser.parse();

      loadCompleted = true;

    } finally {

      if (!loadCompleted) {

        knownMappers.remove(type);

      }

    }

  }

}
在MapperRegistry中维护了接口类与代理工程的映射关系,knownMappers;
private final Map<class<?>, MapperProxyFactory<!--?-->> knownMappers = new HashMap<class<?>, MapperProxyFactory<!--?-->>();
>MapperProxyFactory.java
public class MapperProxyFactory<t> {

  private final Class<t> mapperInterface;

  private final Map<method, mappermethod> methodCache = new ConcurrentHashMap<method, mappermethod>();

  public MapperProxyFactory(Class<t> mapperInterface) {

    this.mapperInterface = mapperInterface;

  }

  public Class<t> getMapperInterface() {

    return mapperInterface;

  }

  public Map<method, mappermethod> getMethodCache() {

    return methodCache;

  }

  @SuppressWarnings("unchecked")

  protected T newInstance(MapperProxy<t> mapperProxy) {

    return (T) Proxy.newProxyInstance(mapperInterface.getClassLoader(), new Class[] { mapperInterface }, mapperProxy);

  }

  public T newInstance(SqlSession sqlSession) {

    final MapperProxy<t> mapperProxy = new MapperProxy<t>(sqlSession, mapperInterface, methodCache);

    return newInstance(mapperProxy);

  }

}
如上是Mapper的代理类工程,构造函数中的mapperInterface就是对应的接口类,当实例化时候会获得具体的MapperProxy代理,里面主要包含了SqlSession。
五、源码分析(mybatis-spring)
<dependency>

    <groupid>org.mybatis</groupid>

    <artifactid>mybatis-spring</artifactid>

    <version>1.3.2</version>

</dependency>
作为一款好用的ORM框架,一定是萝莉脸(单纯)、御姐心(强大),铺的了床(屏蔽与JDBC直接打交道)、暖的了房(速度性能好)!鉴于这些优点几乎在国内互联网大部分开发框架都会使用到Mybatis,尤其在一些需要高性能的场景下需要优化sql那么一定需要手写sql在xml中。那么,准备好了吗!开始分析分析它的源码;
1. 从一个简单的案例开始
与分析mybatis源码一样,先做一个简单的案例;定义dao、编写配置文件、junit单元测试;
>SpringApiTest.java
@RunWith(SpringJUnit4ClassRunner.class)

@ContextConfiguration("classpath:spring-config.xml")

public class SpringApiTest {


    private Logger logger = LoggerFactory.getLogger(SpringApiTest.class);


    @Resource

    private ISchoolDao schoolDao;

    @Resource

    private IUserDao userDao;


    @Test

    public void test_queryRuleTreeByTreeId(){

        School ruleTree = schoolDao.querySchoolInfoById(1L);

        logger.info(JSON.toJSONString(ruleTree));


        User user = userDao.queryUserInfoById(1L);

        logger.info(JSON.toJSONString(user));

    }


}
>spring-config-datasource.xml
<!--?xml version="1.0" encoding="UTF-8"?-->

<beans xmlns="http://www.springframework.org/schema/beans" xmlns:xsi="http://www.w3.org/2001/XMLSchema-instance" xsi:schemalocation="http://www.springframework.org/schema/beans

        http://www.springframework.org/schema/beans/spring-beans.xsd">


    <!-- 1.数据库连接池: DriverManagerDataSource 也可以使用DBCP2-->

    <bean id="dataSource" class="org.springframework.jdbc.datasource.DriverManagerDataSource">

        <property name="driverClassName" value="${db.jdbc.driverClassName}" />

        <property name="url" value="${db.jdbc.url}" />

        <property name="username" value="${db.jdbc.username}" />

        <property name="password" value="${db.jdbc.password}" />

    </bean>


    <!-- 2.配置SqlSessionFactory对象 -->

    <bean id="sqlSessionFactory" class="org.mybatis.spring.SqlSessionFactoryBean">

        <!-- 注入数据库连接池 -->

        <property name="dataSource" ref="dataSource" />

        <!-- 配置MyBaties全局配置文件:mybatis-config.xml -->

        <property name="configLocation" value="classpath:mybatis-config.xml" />

        <!-- 扫描entity包 使用别名 -->

        <property name="typeAliasesPackage" value="org.itstack.demo.po" />

        <!-- 扫描sql配置文件:mapper需要的xml文件 -->

        <property name="mapperLocations" value="classpath:mapper/*.xml" />

    </bean>


    <!-- 3.配置扫描Dao接口包,动态实现Dao接口,注入到spring容器中 -->

    <bean class="org.mybatis.spring.mapper.MapperScannerConfigurer">

        <!-- 注入sqlSessionFactory -->

        <property name="sqlSessionFactoryBeanName" value="sqlSessionFactory" />

        <!-- 给出需要扫描Dao接口包,多个逗号隔开 -->

        <property name="basePackage" value="org.itstack.demo.dao" />

    </bean>


</beans>
如果一切顺利,那么会有如下结果:
{"address":"北京市海淀区颐和园路5号","createTime":1571376957000,"id":1,"name":"北京大学","updateTime":1571376957000}

{"age":18,"createTime":1571376957000,"id":1,"name":"花花","updateTime":1571376957000}
从上面单元测试的代码可以看到,两个没有方法体的注解就这么神奇的执行了我们的xml中的配置语句并输出了结果。其实主要得益于以下两个类;
- org.mybatis.spring.SqlSessionFactoryBean
- org.mybatis.spring.mapper.MapperScannerConfigurer
2. 扫描装配注册(MapperScannerConfigurer)
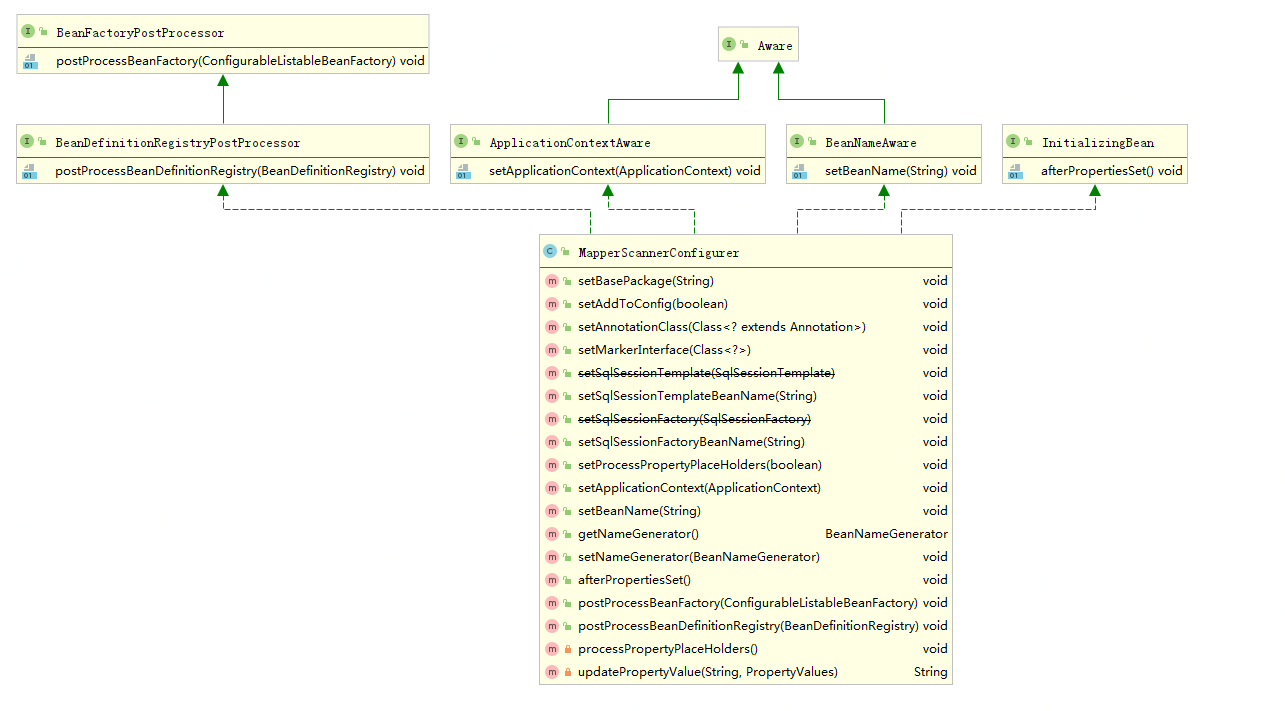
MapperScannerConfigurer为整个Dao接口层生成动态代理类注册,启动到了核心作用。这个类实现了如下接口,用来对扫描的Mapper进行处理:
- BeanDefinitionRegistryPostProcessor
- InitializingBean
- ApplicationContextAware
- BeanNameAware
整体类图如下;
执行流程如下;
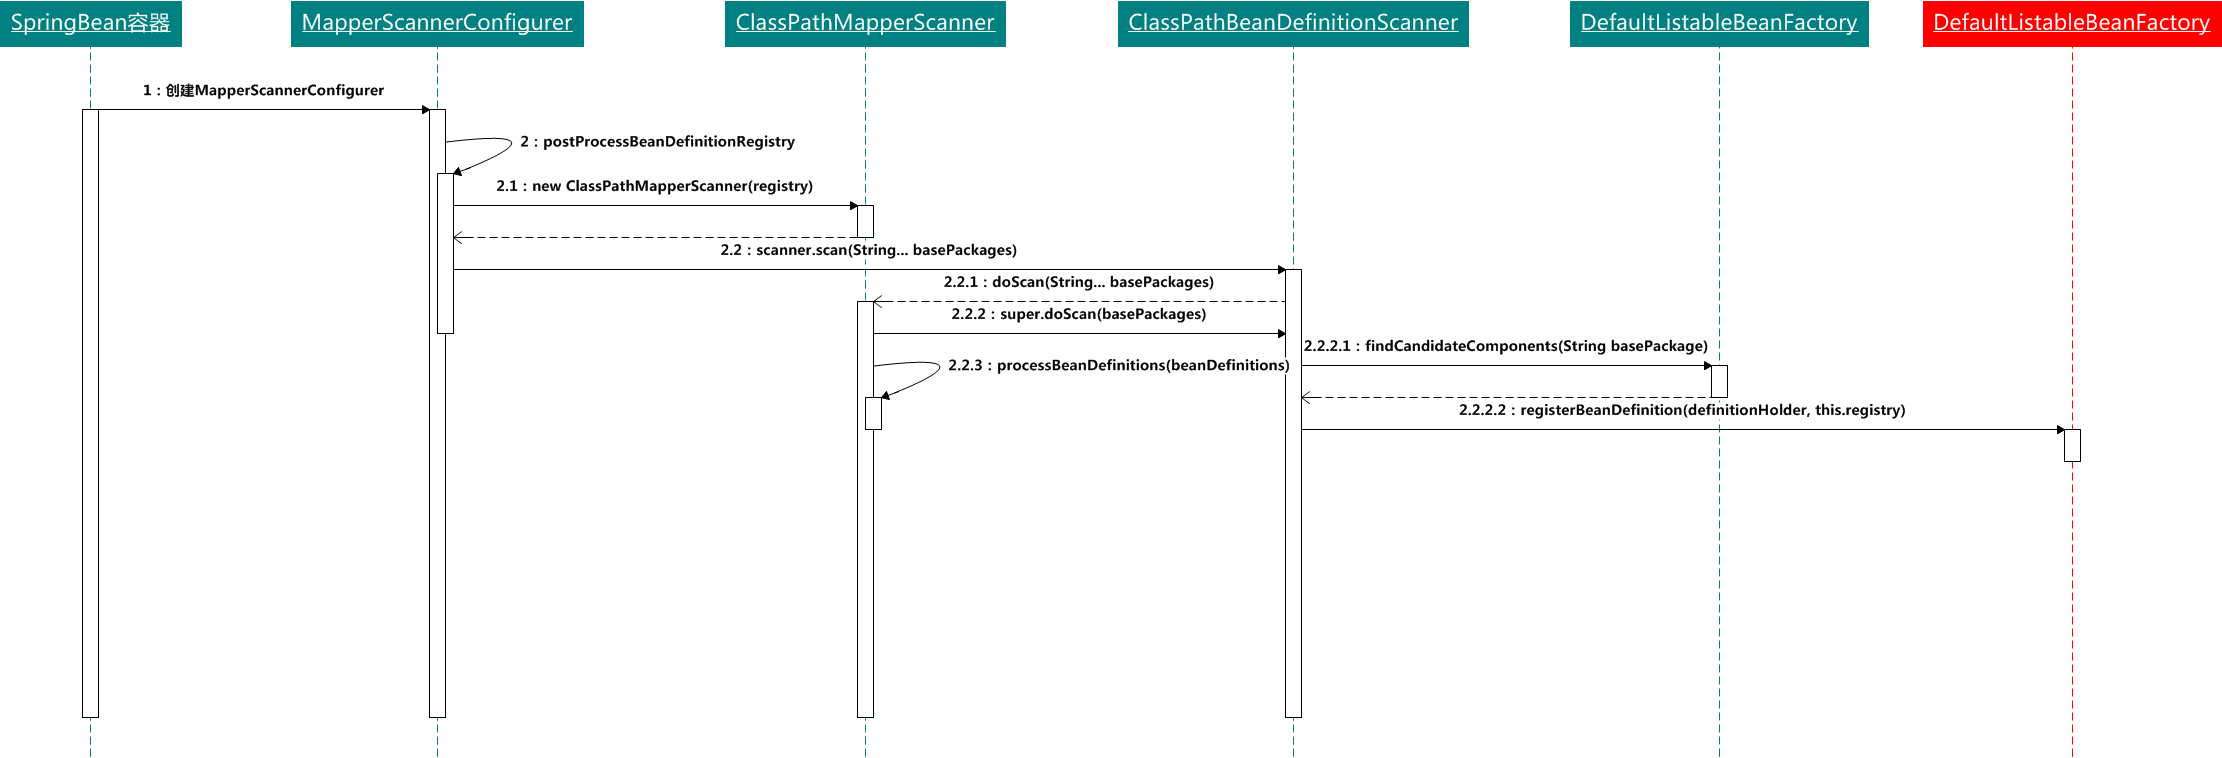
上面的类图+流程图,其实已经很清楚的描述了MapperScannerConfigurer初始化过程,但对于头一次看的新人来说依旧是我太难了,好继续!
>MapperScannerConfigurer.java & 部分截取
@Override

public void postProcessBeanDefinitionRegistry(BeanDefinitionRegistry registry) {

  if (this.processPropertyPlaceHolders) {

    processPropertyPlaceHolders();

  }

  ClassPathMapperScanner scanner = new ClassPathMapperScanner(registry);

  scanner.setAddToConfig(this.addToConfig);

  scanner.setAnnotationClass(this.annotationClass);

  scanner.setMarkerInterface(this.markerInterface);

  scanner.setSqlSessionFactory(this.sqlSessionFactory);

  scanner.setSqlSessionTemplate(this.sqlSessionTemplate);

  scanner.setSqlSessionFactoryBeanName(this.sqlSessionFactoryBeanName);

  scanner.setSqlSessionTemplateBeanName(this.sqlSessionTemplateBeanName);

  scanner.setResourceLoader(this.applicationContext);

  scanner.setBeanNameGenerator(this.nameGenerator);

  scanner.registerFilters();

  scanner.scan(StringUtils.tokenizeToStringArray(this.basePackage, ConfigurableApplicationContext.CONFIG_LOCATION_DELIMITERS));

} - 实现了BeanDefinitionRegistryPostProcessor.postProcessBeanDefinitionRegistry用于注册Bean到Spring容器中
- 306行:new ClassPathMapperScanner(registry); 硬编码类路径扫描器,用于解析Mybatis的Mapper文件
- 317行:scanner.scan 对Mapper进行扫描。这里包含了一个继承类实现关系的调用,也就是本文开头的测试题。
>ClassPathMapperScanner.java & 部分截取
@Override

public Set<beandefinitionholder> doScan(String... basePackages) {

  Set<beandefinitionholder> beanDefinitions = super.doScan(basePackages);

  if (beanDefinitions.isEmpty()) {

    logger.warn("No MyBatis mapper was found in '" + Arrays.toString(basePackages) + "' package. Please check your configuration.");

  } else {

    processBeanDefinitions(beanDefinitions);

  }

  return beanDefinitions;

} - 优先调用父类的super.doScan(basePackages);进行注册Bean信息
>ClassPathBeanDefinitionScanner.java & 部分截取
protected Set<beandefinitionholder> doScan(String... basePackages) {

	Assert.notEmpty(basePackages, "At least one base package must be specified");

	Set<beandefinitionholder> beanDefinitions = new LinkedHashSet<beandefinitionholder>();

	for (String basePackage : basePackages) {

		Set<beandefinition> candidates = findCandidateComponents(basePackage);

		for (BeanDefinition candidate : candidates) {

			ScopeMetadata scopeMetadata = this.scopeMetadataResolver.resolveScopeMetadata(candidate);

			candidate.setScope(scopeMetadata.getScopeName());

			String beanName = this.beanNameGenerator.generateBeanName(candidate, this.registry);

			if (candidate instanceof AbstractBeanDefinition) {

				postProcessBeanDefinition((AbstractBeanDefinition) candidate, beanName);

			}

			if (candidate instanceof AnnotatedBeanDefinition) {

				AnnotationConfigUtils.processCommonDefinitionAnnotations((AnnotatedBeanDefinition) candidate)

			}

			if (checkCandidate(beanName, candidate)) {

				BeanDefinitionHolder definitionHolder = new BeanDefinitionHolder(candidate, beanName);

				definitionHolder =

						AnnotationConfigUtils.applyScopedProxyMode(scopeMetadata, definitionHolder, this.regi

				beanDefinitions.add(definitionHolder);

				registerBeanDefinition(definitionHolder, this.registry);

			}

		}

	}

	return beanDefinitions;

} - 优先调用了父类的doScan方法,用于Mapper扫描和Bean的定义以及注册到DefaultListableBeanFactory。{DefaultListableBeanFactory是Spring中IOC容器的始祖,所有需要实例化的类都需要注册进来,之后在初始化}
- 272行:findCandidateComponents(basePackage),扫描package包路径,对于注解类的有另外的方式,大同小异
- 288行:registerBeanDefinition(definitionHolder, this.registry);注册Bean信息的过程,最终会调用到:org.springframework.beans.factory.support.DefaultListableBeanFactory
>ClassPathMapperScanner.java & 部分截取
**processBeanDefinitions(beanDefinitions);**


private void processBeanDefinitions(Set<beandefinitionholder> beanDefinitions) {

  GenericBeanDefinition definition;

  for (BeanDefinitionHolder holder : beanDefinitions) {

    definition = (GenericBeanDefinition) holder.getBeanDefinition();

    if (logger.isDebugEnabled()) {

      logger.debug("Creating MapperFactoryBean with name '" + holder.getBeanName()

        + "' and '" + definition.getBeanClassName() + "' mapperInterface");

    }

    // the mapper interface is the original class of the bean

    // but, the actual class of the bean is MapperFactoryBean

    definition.getConstructorArgumentValues().addGenericArgumentValue(definition.getBeanClassName()); // issue #59

    definition.setBeanClass(this.mapperFactoryBean.getClass());

    definition.getPropertyValues().add("addToConfig", this.addToConfig);

    boolean explicitFactoryUsed = false;

    if (StringUtils.hasText(this.sqlSessionFactoryBeanName)) {

      definition.getPropertyValues().add("sqlSessionFactory", new RuntimeBeanReference(this.sqlSessionFactoryBeanName));

      explicitFactoryUsed = true;

    } else if (this.sqlSessionFactory != null) {

      definition.getPropertyValues().add("sqlSessionFactory", this.sqlSessionFactory);

      explicitFactoryUsed = true;

    }

    if (StringUtils.hasText(this.sqlSessionTemplateBeanName)) {

      if (explicitFactoryUsed) {

        logger.warn("Cannot use both: sqlSessionTemplate and sqlSessionFactory together. sqlSessionFactory is ignored.");

      }

      definition.getPropertyValues().add("sqlSessionTemplate", new RuntimeBeanReference(this.sqlSessionTemplateBeanName));

      explicitFactoryUsed = true;

    } else if (this.sqlSessionTemplate != null) {

      if (explicitFactoryUsed) {

        logger.warn("Cannot use both: sqlSessionTemplate and sqlSessionFactory together. sqlSessionFactory is ignored.");

      }

      definition.getPropertyValues().add("sqlSessionTemplate", this.sqlSessionTemplate);

      explicitFactoryUsed = true;

    }

    if (!explicitFactoryUsed) {

      if (logger.isDebugEnabled()) {

        logger.debug("Enabling autowire by type for MapperFactoryBean with name '" + holder.getBeanName() + "'.");

      }

      definition.setAutowireMode(AbstractBeanDefinition.AUTOWIRE_BY_TYPE);

    }

  }

} - 163行:super.doScan(basePackages);,调用完父类方法后开始执行内部方法:processBeanDefinitions(beanDefinitions)
- 186行:definition.getConstructorArgumentValues().addGenericArgumentValue(definition.getBeanClassName()); 设置BeanName参数,也就是我们的:ISchoolDao、IUserDao
- 187行:definition.setBeanClass(this.mapperFactoryBean.getClass());,设置BeanClass,接口本身是没有类的,那么这里将MapperFactoryBean类设置进来,最终所有的dao层接口类都是这个MapperFactoryBean
>MapperFactoryBean.java & 部分截取
这个类有继承也有接口实现,最好先了解下整体类图,如下;
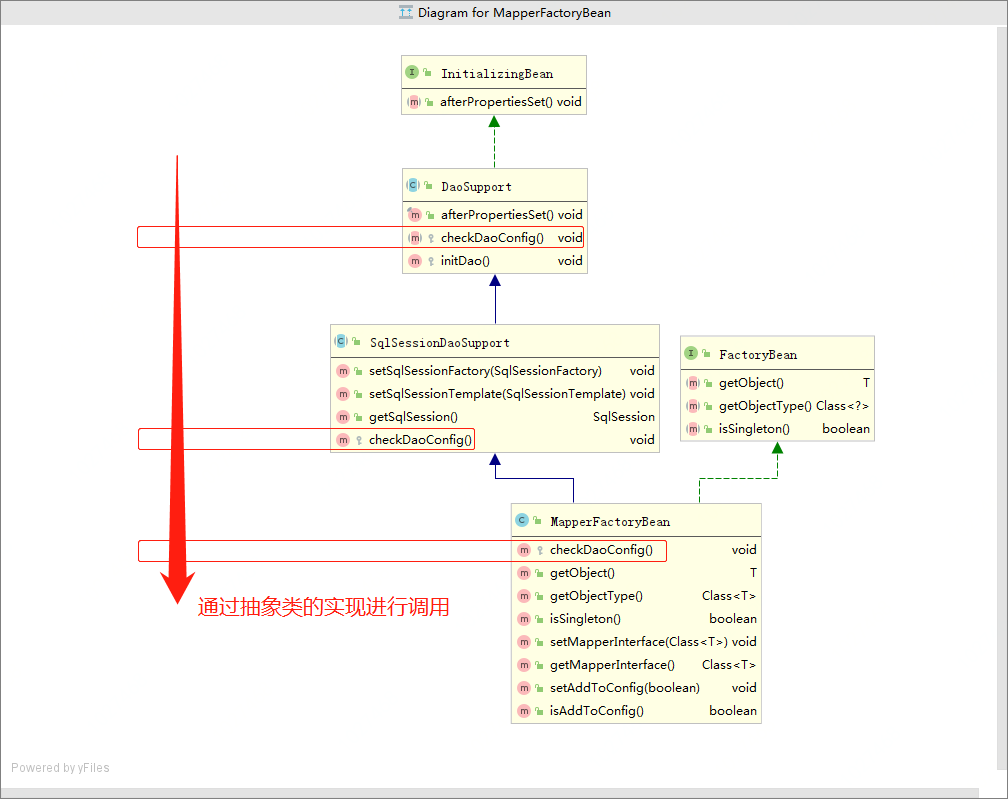
这个类就非常重要了,最终所有的sql信息执行都会通过这个类获取getObject(),也就是SqlSession获取mapper的代理类:MapperProxyFactory->MapperProxy
public class MapperFactoryBean<t> extends SqlSessionDaoSupport implements FactoryBean<t> {
private Class<t> mapperInterface;
private boolean addToConfig = true;
public MapperFactoryBean() {
//intentionally empty
}
public MapperFactoryBean(Class<t> mapperInterface) {
this.mapperInterface = mapperInterface;
}
/**
* 当SpringBean容器初始化时候会调用到checkDaoConfig(),他是继承类中的抽象方法
* {@inheritDoc}
*/
@Override
protected void checkDaoConfig() {
super.checkDaoConfig();
notNull(this.mapperInterface, "Property 'mapperInterface' is required");
Configuration configuration = getSqlSession().getConfiguration();
if (this.addToConfig && !configuration.hasMapper(this.mapperInterface)) {
try {
configuration.addMapper(this.mapperInterface);
} catch (Exception e) {
logger.error("Error while adding the mapper '" + this.mapperInterface + "' to configuration.", e);
throw new IllegalArgumentException(e);
} finally {
ErrorContext.instance().reset();
}
}
}
/**
* {@inheritDoc}
*/
@Override
public T getObject() throws Exception {
return getSqlSession().getMapper(this.mapperInterface);
}
...
} 72行:checkDaoConfig(),当SpringBean容器初始化时候会调用到checkDaoConfig(),他是继承类中的抽象方法
95行:getSqlSession().getMapper(this.mapperInterface);,通过接口获取Mapper(代理类),调用过程如下;
DefaultSqlSession.getMapper(Class<t> type),获取Mapper
Configuration.getMapper(Class<t> type, SqlSession sqlSession),从配置中获取
MapperRegistry.getMapper(Class<t> type, SqlSession sqlSession),从注册中心获取到实例化生成
public <t> T getMapper(Class<t> type, SqlSession sqlSession) {

  final MapperProxyFactory<t> mapperProxyFactory = (MapperProxyFactory<t>) knownMappers.get(type);

  if (mapperProxyFactory == null) {

    throw new BindingException("Type " + type + " is not known to the MapperRegistry.");

  }

  try {

    return mapperProxyFactory.newInstance(sqlSession);

  } catch (Exception e) {

    throw new BindingException("Error getting mapper instance. Cause: " + e, e);

  }

}
mapperProxyFactory.newInstance(sqlSession);,通过反射工程生成MapperProxy
@SuppressWarnings("unchecked")

protected T newInstance(MapperProxy<t> mapperProxy) {

  return (T) Proxy.newProxyInstance(mapperInterface.getClassLoader(), new Class[] { mapperInterface }, mapperProxy);

}

public T newInstance(SqlSession sqlSession) {

  final MapperProxy<t> mapperProxy = new MapperProxy<t>(sqlSession, mapperInterface, methodCache);

  return newInstance(mapperProxy);

}
>MapperProxy.java & 部分截取
public class MapperProxy<t> implements InvocationHandler, Serializable {


  private static final long serialVersionUID = -6424540398559729838L;

  private final SqlSession sqlSession;

  private final Class<t> mapperInterface;

  private final Map<method, mappermethod> methodCache;


  public MapperProxy(SqlSession sqlSession, Class<t> mapperInterface, Map<method, mappermethod> methodCache) {

    this.sqlSession = sqlSession;

    this.mapperInterface = mapperInterface;

    this.methodCache = methodCache;

  }


  @Override

  public Object invoke(Object proxy, Method method, Object[] args) throws Throwable {

    try {

      if (Object.class.equals(method.getDeclaringClass())) {

        return method.invoke(this, args);

      } else if (isDefaultMethod(method)) {

        return invokeDefaultMethod(proxy, method, args);

      }

    } catch (Throwable t) {

      throw ExceptionUtil.unwrapThrowable(t);

    }

    final MapperMethod mapperMethod = cachedMapperMethod(method);

    return mapperMethod.execute(sqlSession, args);

  }


  private MapperMethod cachedMapperMethod(Method method) {

    MapperMethod mapperMethod = methodCache.get(method);

    if (mapperMethod == null) {

      mapperMethod = new MapperMethod(mapperInterface, method, sqlSession.getConfiguration());

      methodCache.put(method, mapperMethod);

    }

    return mapperMethod;

  }


  @UsesJava7

  private Object invokeDefaultMethod(Object proxy, Method method, Object[] args)

      throws Throwable {

    final Constructor<methodhandles.lookup> constructor = MethodHandles.Lookup.class

        .getDeclaredConstructor(Class.class, int.class);

    if (!constructor.isAccessible()) {

      constructor.setAccessible(true);

    }

    final Class<!--?--> declaringClass = method.getDeclaringClass();

    return constructor

        .newInstance(declaringClass,

            MethodHandles.Lookup.PRIVATE | MethodHandles.Lookup.PROTECTED

                | MethodHandles.Lookup.PACKAGE | MethodHandles.Lookup.PUBLIC)

        .unreflectSpecial(method, declaringClass).bindTo(proxy).invokeWithArguments(args);

  }


  ...

} 58行:final MapperMethod mapperMethod = cachedMapperMethod(method);,从缓存中获取MapperMethod
59行:mapperMethod.execute(sqlSession, args);,执行SQL语句,并返回结果(到这关于查询获取结果就到骨头(干)层了);INSERT、UPDATE、DELETE、SELECT
public Object execute(SqlSession sqlSession, Object[] args) {

  Object result;

  switch (command.getType()) {

    case INSERT: {

    Object param = method.convertArgsToSqlCommandParam(args);

      result = rowCountResult(sqlSession.insert(command.getName(), param));

      break;

    }

    case UPDATE: {

      Object param = method.convertArgsToSqlCommandParam(args);

      result = rowCountResult(sqlSession.update(command.getName(), param));

      break;

    }

    case DELETE: {

      Object param = method.convertArgsToSqlCommandParam(args);

      result = rowCountResult(sqlSession.delete(command.getName(), param));

      break;

    }

    case SELECT:

      if (method.returnsVoid() && method.hasResultHandler()) {

        executeWithResultHandler(sqlSession, args);

        result = null;

      } else if (method.returnsMany()) {

        result = executeForMany(sqlSession, args);

      } else if (method.returnsMap()) {

        result = executeForMap(sqlSession, args);

      } else if (method.returnsCursor()) {

        result = executeForCursor(sqlSession, args);

      } else {

        Object param = method.convertArgsToSqlCommandParam(args);

        result = sqlSession.selectOne(command.getName(), param);

      }

      break;

    case FLUSH:

      result = sqlSession.flushStatements();

      break;

    default:

      throw new BindingException("Unknown execution method for: " + command.getName());

  }

  if (result == null && method.getReturnType().isPrimitive() && !method.returnsVoid()) {

    throw new BindingException("Mapper method '" + command.getName()

        + " attempted to return null from a method with a primitive return type (" + method.getReturnType() + ").");

  }

  return result;

}
以上对于MapperScannerConfigurer这一层就分析完了,从扫描定义注入到为Spring容器准备Bean的信息,代理、反射、SQL执行,基本就包括全部核心内容了,接下来在分析下SqlSessionFactoryBean
3. SqlSession容器工厂初始化(SqlSessionFactoryBean)
SqlSessionFactoryBean初始化过程中需要对一些自身内容进行处理,因此也需要实现如下接口;
- FactoryBean<sqlsessionfactory>
- InitializingBean -> void afterPropertiesSet() throws Exception
- ApplicationListener<applicationevent>

以上的流程其实已经很清晰的描述整个核心流程,但同样对于新手上路会有障碍,那么!好,继续!
>SqlSessionFactoryBean.java & 部分截取
public void afterPropertiesSet() throws Exception {

  notNull(dataSource, "Property 'dataSource' is required");

  notNull(sqlSessionFactoryBuilder, "Property 'sqlSessionFactoryBuilder' is required");

  state((configuration == null && configLocation == null) || !(configuration != null && configLocation != null),

            "Property 'configuration' and 'configLocation' can not specified with together");

  this.sqlSessionFactory = buildSqlSessionFactory();

} - afterPropertiesSet(),InitializingBean接口为bean提供了初始化方法的方式,它只包括afterPropertiesSet方法,凡是继承该接口的类,在初始化bean的时候都会执行该方法。
- 380行:buildSqlSessionFactory();内部方法构建,核心功能继续往下看。
>SqlSessionFactoryBean.java & 部分截取
protected SqlSessionFactory buildSqlSessionFactory() throws IOException {

  Configuration configuration;

  XMLConfigBuilder xmlConfigBuilder = null;


  ...


  if (!isEmpty(this.mapperLocations)) {

    for (Resource mapperLocation : this.mapperLocations) {

      if (mapperLocation == null) {

        continue;

      }

      try {

        XMLMapperBuilder xmlMapperBuilder = new XMLMapperBuilder(mapperLocation.getInputStream(),

            configuration, mapperLocation.toString(), configuration.getSqlFragments());

        xmlMapperBuilder.parse();

      } catch (Exception e) {

        throw new NestedIOException("Failed to parse mapping resource: '" + mapperLocation + "'", e);

      } finally {

        ErrorContext.instance().reset();

      }

      if (LOGGER.isDebugEnabled()) {

        LOGGER.debug("Parsed mapper file: '" + mapperLocation + "'");

      }

    }

  } else {

    if (LOGGER.isDebugEnabled()) {

      LOGGER.debug("Property 'mapperLocations' was not specified or no matching resources found");

    }

  }

  return this.sqlSessionFactoryBuilder.build(configuration);

} - 513行:for (Resource mapperLocation : this.mapperLocations) 循环解析Mapper内容
- 519行:XMLMapperBuilder xmlMapperBuilder = new XMLMapperBuilder(...) 解析XMLMapperBuilder
- 521行:xmlMapperBuilder.parse() 执行解析,具体如下;
>XMLMapperBuilder.java & 部分截取
public class XMLMapperBuilder extends BaseBuilder {

   private final XPathParser parser;

   private final MapperBuilderAssistant builderAssistant;

   private final Map<string, xnode> sqlFragments;

   private final String resource;


   private void bindMapperForNamespace() {

     String namespace = builderAssistant.getCurrentNamespace();

     if (namespace != null) {

       Class<!--?--> boundType = null;

       try {

         boundType = Resources.classForName(namespace);

       } catch (ClassNotFoundException e) {

         //ignore, bound type is not required

       }

       if (boundType != null) {

         if (!configuration.hasMapper(boundType)) {

           // Spring may not know the real resource name so we set a flag

           // to prevent loading again this resource from the mapper interface

           // look at MapperAnnotationBuilder#loadXmlResource

           configuration.addLoadedResource("namespace:" + namespace);

           configuration.addMapper(boundType);

         }

       }

     }

   }

} - 这里413行非常重要,configuration.addMapper(boundType);,真正到了添加Mapper到配置中心
>MapperRegistry.java & 部分截取
public class MapperRegistry {


  public <t> void addMapper(Class<t> type) {

    if (type.isInterface()) {

      if (hasMapper(type)) {

        throw new BindingException("Type " + type + " is already known to the MapperRegistry.");

      }

      boolean loadCompleted = false;

      try {

        knownMappers.put(type, new MapperProxyFactory<t>(type));

        // It's important that the type is added before the parser is run

        // otherwise the binding may automatically be attempted by the

        // mapper parser. If the type is already known, it won't try.

        MapperAnnotationBuilder parser = new MapperAnnotationBuilder(config, type);

        parser.parse();

        loadCompleted = true;

      } finally {

        if (!loadCompleted) {

          knownMappers.remove(type);

        }

      }

    }

  }


} - 67行:创建代理工程knownMappers.put(type, new MapperProxyFactory<t>(type));
截至到这,MapperScannerConfigurer、SqlSessionFactoryBean,两个类干的事情就相融合了;
第一个用于扫描Dao接口设置代理类注册到IOC中,用于后续生成Bean实体类,MapperFactoryBean,并可以通过mapperInterface从Configuration获取Mapper
另一个用于生成SqlSession工厂初始化,解析Mapper里的XML配置进行动态代理MapperProxyFactory->MapperProxy注入到Configuration的Mapper
最终在注解类的帮助下进行方法注入,等执行操作时候即可获得动态代理对象,从而执行相应的CRUD操作
@Resource

private ISchoolDao schoolDao;


schoolDao.querySchoolInfoById(1L);
六、综上总结
- 分析过程较长篇幅也很大,不一定一天就能看懂整个流程,但当耐下心来一点点研究,还是可以获得很多的收获的。以后在遇到这类的异常就可以迎刃而解了,同时也有助于面试、招聘!
- 之所以分析Mybatis最开始是想在Dao上加自定义注解,发现切面拦截不到。想到这是被动态代理的类,之后层层往往下扒直到MapperProxy.invoke!当然,Mybatis提供了自定义插件开发。
- 以上的源码分析只是对部分核心内容进行分析,如果希望了解全部可以参考资料;MyBatis 3源码深度解析,并调试代码。IDEA中还是很方便看源码的,包括可以查看类图、调用顺序等。
- mybatis、mybatis-spring中其实最重要的是将Mapper配置文件解析与接口类组装成代理类进行映射,以此来方便对数据库的CRUD操作。从源码分析后,可以获得更多的编程经验(套路)。
- Mybatis相关链接;