小熊派:用OpenHarmory3.0点亮LED

摘要:作为一个代表性的完整的开发,本案例可以分成3大部分:代码文件的规划,LED灯的驱动开发,点亮LED的业务开发。
本文分享自华为云社区《在小熊派Micro上用OpenHarmory3.0点亮LED(1)LED驱动开发》,作者:神龙居市。
项目总览
作为一个代表性的完整的开发,本案例可以分成3大部分:代码文件的规划,LED灯的驱动开发,点亮LED的业务开发。
一、LED驱动开发
1.1.确定目录结构
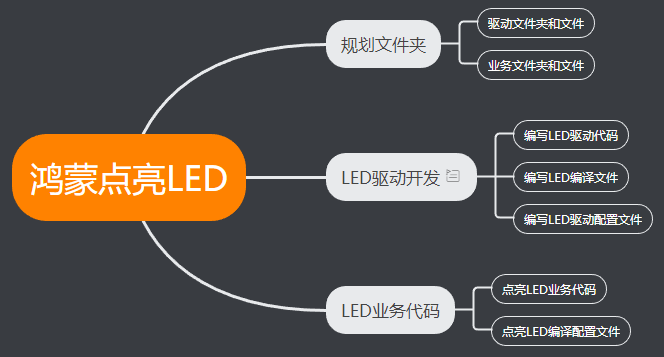
1.1.1.根据HDF框架以组件化的驱动模型作为核心设计思路,HDF框架将一类设备驱动放在同一个host里面,开发者也可以将驱动功能分层独立开发和部署,支持一个驱动多个node,HDF驱动模型如下图
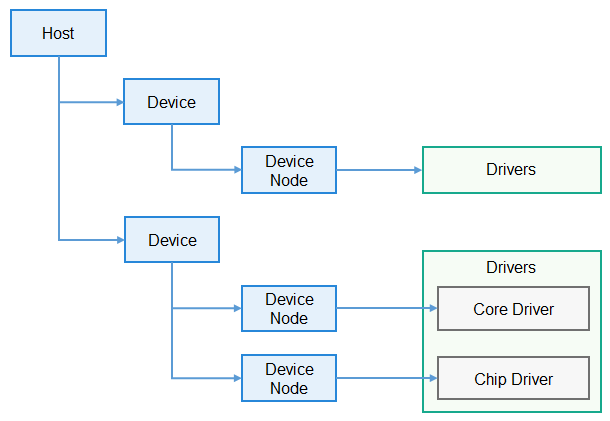
1.1.2.本案例目录
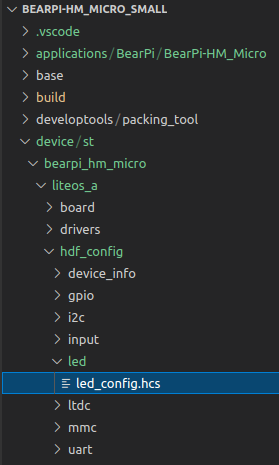
在./device/st/drivers路径下新建一个led的目录,用来存放驱动源码文件。
在./device/st/bearpi_hm_micro/liteos_a/hdf_config路径下新建led文件夹,并创建驱动配置文件led_config.hcs
1.2.LED驱动实现
1.2.1.驱动实现包含驱动业务代码和驱动入口注册,在led.c文件中添加以下代码
#include "hdf_device_desc.h"

#include "hdf_log.h"

#include "device_resource_if.h"

#include "osal_io.h"

#include "osal.h"

#include "osal_mem.h"

#include "gpio_if.h"


#define HDF_LOG_TAG led_driver // 打印日志所包含的标签,如果不定义则用默认定义的HDF_TAG标签

#define LED_WRITE_READ 1       // 读写操作码1


enum LedOps {

    LED_OFF,

    LED_ON,

    LED_TOGGLE,

};


struct Stm32Mp1ILed {

    uint32_t gpioNum;

};

static struct Stm32Mp1ILed g_Stm32Mp1ILed;

uint8_t status = 0;

// Dispatch是用来处理用户态发下来的消息

int32_t LedDriverDispatch(struct HdfDeviceIoClient *client, int cmdCode, struct HdfSBuf *data, struct HdfSBuf *reply)

{

    uint8_t contrl;

    HDF_LOGE("Led driver dispatch");

    if (client == NULL || client->device == NULL)

    {

        HDF_LOGE("Led driver device is NULL");

        return HDF_ERR_INVALID_OBJECT;

    }


    switch (cmdCode)

    {

    /* 接收到用户态发来的LED_WRITE_READ命令 */

    case LED_WRITE_READ:

        /* 读取data里的数据,赋值给contrl */

        HdfSbufReadUint8(data,&contrl);

        switch (contrl)

        {

        /* 开灯 */

        case LED_ON:

            GpioWrite(g_Stm32Mp1ILed.gpioNum, GPIO_VAL_LOW);

            status = 1;

            break;

        /* 关灯 */

        case LED_OFF:

            GpioWrite(g_Stm32Mp1ILed.gpioNum, GPIO_VAL_HIGH);

            status = 0;

            break;

        /* 状态翻转 */

        case LED_TOGGLE:

            if(status == 0)

            {

                GpioWrite(g_Stm32Mp1ILed.gpioNum, GPIO_VAL_LOW);

                status = 1;

            }

            else

            {

                GpioWrite(g_Stm32Mp1ILed.gpioNum, GPIO_VAL_HIGH);

                status = 0;

            }

            break;

        default:

            break;

        }

        /* 把LED的状态值写入reply, 可被带至用户程序 */

        if (!HdfSbufWriteInt32(reply, status))

        {

            HDF_LOGE("replay is fail");

            return HDF_FAILURE;

        }

        break;

    default:

        break;

    }

    return HDF_SUCCESS;

}


// 读取驱动私有配置

static int32_t Stm32LedReadDrs(struct Stm32Mp1ILed *led, const struct DeviceResourceNode *node)

{

    int32_t ret;

    struct DeviceResourceIface *drsOps = NULL;


    drsOps = DeviceResourceGetIfaceInstance(HDF_CONFIG_SOURCE);

    if (drsOps == NULL || drsOps->GetUint32 == NULL) {

        HDF_LOGE("%s: invalid drs ops!", __func__);

        return HDF_FAILURE;

    }

    /* 读取led.hcs里面led_gpio_num的值 */

    ret = drsOps->GetUint32(node, "led_gpio_num", &led->gpioNum, 0);

    if (ret != HDF_SUCCESS) {

        HDF_LOGE("%s: read led gpio num fail!", __func__);

        return ret;

    }

    return HDF_SUCCESS;

}


//驱动对外提供的服务能力,将相关的服务接口绑定到HDF框架

int32_t HdfLedDriverBind(struct HdfDeviceObject *deviceObject)

{

    if (deviceObject == NULL)

    {

        HDF_LOGE("Led driver bind failed!");

        return HDF_ERR_INVALID_OBJECT;

    }

    static struct IDeviceIoService ledDriver = {

        .Dispatch = LedDriverDispatch,

    };

    deviceObject->service = (struct IDeviceIoService *)(&ledDriver);

    HDF_LOGD("Led driver bind success");

    return HDF_SUCCESS;

}


// 驱动自身业务初始的接口

int32_t HdfLedDriverInit(struct HdfDeviceObject *device)

{

    struct Stm32Mp1ILed *led = &g_Stm32Mp1ILed;

    int32_t ret;


    if (device == NULL || device->property == NULL) {

        HDF_LOGE("%s: device or property NULL!", __func__);

        return HDF_ERR_INVALID_OBJECT;

    }

    /* 读取hcs私有属性值 */

    ret = Stm32LedReadDrs(led, device->property);

    if (ret != HDF_SUCCESS) {

        HDF_LOGE("%s: get led device resource fail:%d", __func__, ret);

        return ret;

    }

    /* 将GPIO管脚配置为输出 */

    ret = GpioSetDir(led->gpioNum, GPIO_DIR_OUT);

    if (ret != 0)

    {

        HDF_LOGE("GpioSerDir: failed, ret %d\n", ret);

        return ret;

    }

    HDF_LOGD("Led driver Init success");

    return HDF_SUCCESS;

}


// 驱动资源释放的接口

void HdfLedDriverRelease(struct HdfDeviceObject *deviceObject)

{

    if (deviceObject == NULL)

    {

        HDF_LOGE("Led driver release failed!");

        return;

    }

    HDF_LOGD("Led driver release success");

    return;

}


// 定义驱动入口的对象,必须为HdfDriverEntry(在hdf_device_desc.h中定义)类型的全局变量

struct HdfDriverEntry g_ledDriverEntry = {

    .moduleVersion = 1,

    .moduleName = "HDF_LED",

    .Bind = HdfLedDriverBind,

    .Init = HdfLedDriverInit,

    .Release = HdfLedDriverRelease,

};


// 调用HDF_INIT将驱动入口注册到HDF框架中

HDF_INIT(g_ledDriverEntry);
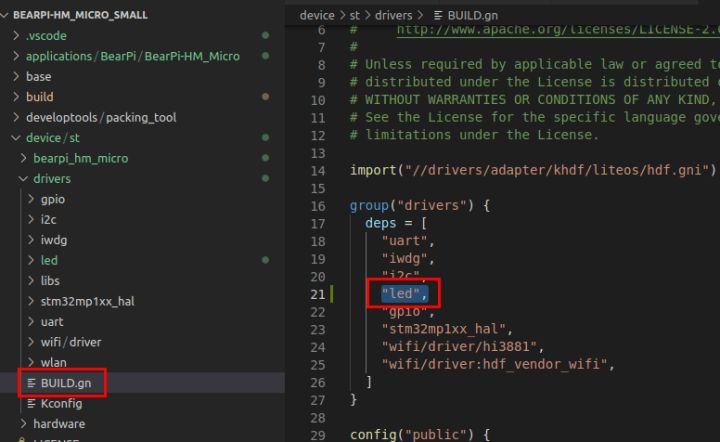
1.2.2.编译脚本文件
在led/BUILD.gn文件中添加以下代码,将led.c编译成hdf_led
import("//drivers/adapter/khdf/liteos/hdf.gni")

hdf_driver("hdf_led") {

    sources = [

    "led.c",

    ]

}
在/device/st/drivers/BUILD.gn文件中添加以下代码,将hdf_led编译进内核,"led"是新增内容
1.3.驱动配置
HDF使用HCS作为配置描述源码,驱动配置包含两部分,HDF框架定义的驱动设备描述和驱动的私有配置信息。
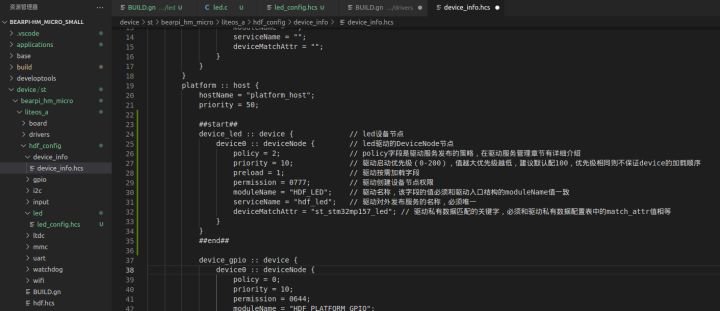
HDF框架加载驱动所需要的信息来源于HDF框架定义的驱动设备描述,因此基于HDF框架开发的驱动必须要在HDF框架定义的device_info.hcs配置文件中添加对应的设备描述,所以我们需要在device\st\bearpi_hm_micro\liteos_a\hdf_config\device_info\device_info.hcs中添加LED设备描述
device_led :: device {             // led设备节点

    device0 :: deviceNode {        // led驱动的DeviceNode节点

        policy = 2;                // policy字段是驱动服务发布的策略,在驱动服务管理章节有详细介绍

        priority = 10;             // 驱动启动优先级(0-200),值越大优先级越低,建议默认配100,优先级相同则不保证device的加载顺序

        preload = 1;               // 驱动按需加载字段

        permission = 0777;         // 驱动创建设备节点权限

        moduleName = "HDF_LED";    // 驱动名称,该字段的值必须和驱动入口结构的moduleName值一致

        serviceName = "hdf_led";   // 驱动对外发布服务的名称,必须唯一

        deviceMatchAttr = "st_stm32mp157_led"; // 驱动私有数据匹配的关键字,必须和驱动私有数据配置表中的match_attr值相等

    }

} 
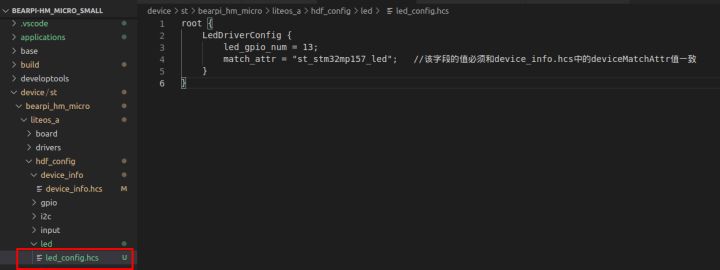
1.4.私有驱动信息配置
如果驱动有私有配置,则可以添加一个驱动的配置文件,用来填写一些驱动的默认配置信息,HDF框架在加载驱动的时候,会将对应的配置信息获取并保存在HdfDeviceObject 中的property里面,通过Bind和Init传递给驱动,所以我们需要在device\st\bearpi_hm_micro\liteos_a\hdf_config\led\led_config.hcs中添加LED私有配置描述。
root {

    LedDriverConfig {

        led_gpio_num = 13;

        match_attr = "st_stm32mp157_led";   //该字段的值必须和device_info.hcs中的deviceMatchAttr值一致

    }

} 
1.5.板级配置入口文件
配置信息定义之后,需要将该配置文件添加到板级配置入口文件device\st\bearpi_hm_micro\liteos_a\hdf_config\hdf.hcs
#include "device_info/device_info.hcs"

#include "led/led_config.hcs"
二、点亮LED业务代码
2.1.创建目录
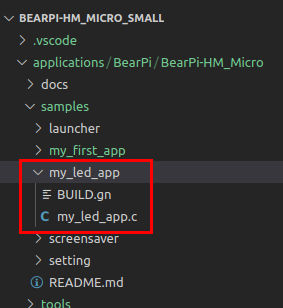
编写业务时,务必先在./applications/BearPi/BearPi-HM_Micro/samples路径下新建一个目录(或一套目录结构),用于存放业务源码文件.
在samples文件夹下增加my_led_app文件夹,并新建BUILD.gn和my_led_app.c两个文件
2.2.编写业务代码
在my_led_app.c中添加以下业务代码
#include <fcntl.h>

#include <sys/stat.h>

#include <sys/ioctl.h>

#include <unistd.h>

#include <stdio.h>

#include "hdf_sbuf.h"

#include "hdf_io_service_if.h"


#define LED_WRITE_READ 1

#define LED_SERVICE "hdf_led"


static int SendEvent(struct HdfIoService *serv, uint8_t eventData)

{

    int ret = 0;

    struct HdfSBuf *data = HdfSBufObtainDefaultSize();

    if (data == NULL)

    {

        printf("fail to obtain sbuf data!\r\n");

        return 1;

    }


    struct HdfSBuf *reply = HdfSBufObtainDefaultSize();

    if (reply == NULL)

    {

        printf("fail to obtain sbuf reply!\r\n");

        ret = HDF_DEV_ERR_NO_MEMORY;

        goto out;

    }

    /* 写入数据 */

    if (!HdfSbufWriteUint8(data, eventData))

    {

        printf("fail to write sbuf!\r\n");

        ret = HDF_FAILURE;

        goto out;

    }

    /* 通过Dispatch发送到驱动 */

    ret = serv->dispatcher->Dispatch(&serv->object, LED_WRITE_READ, data, reply);

    if (ret != HDF_SUCCESS)

    {

        printf("fail to send service call!\r\n");

        goto out;

    }


    int replyData = 0;

    /* 读取驱动的回复数据 */

    if (!HdfSbufReadInt32(reply, &replyData))

    {

        printf("fail to get service call reply!\r\n");

        ret = HDF_ERR_INVALID_OBJECT;

        goto out;

    }

    printf("\r\nGet reply is: %d\r\n", replyData);

out:

    HdfSBufRecycle(data);

    HdfSBufRecycle(reply);

    return ret;

}


int main(int argc, char **argv)

{

    int i;


    /* 获取服务 */

    struct HdfIoService *serv = HdfIoServiceBind(LED_SERVICE);

    if (serv == NULL)

    {

        printf("fail to get service %s!\r\n", LED_SERVICE);

        return HDF_FAILURE;

    }


    for (i=0; i < argc; i++)

    {

        printf("\r\nArgument %d is %s.\r\n", i, argv[i]);

    }


    SendEvent(serv, atoi(argv[1]));


    HdfIoServiceRecycle(serv);

    printf("exit");


    return HDF_SUCCESS;

}
2.3.编写将构建业务代码的BUILD.gn文件
BUILD.gn文件由三部分内容(目标、源文件、头文件路径)构成,需由开发者完成填写。以my_led_app为例,需要创建./applications/BearPi/BearPi-HM_Micro/samples/my_led_app/BUILD.gn,并完如下配置
import("//build/lite/config/component/lite_component.gni")


HDF_FRAMEWORKS = "//drivers/framework"


executable("led_lib") {

    output_name = "my_led"

    sources = [

        "my_led_app.c",

    ]


    include_dirs = [

    "$HDF_FRAMEWORKS/ability/sbuf/include",

    "$HDF_FRAMEWORKS/core/shared/include",

    "$HDF_FRAMEWORKS/core/host/include",

    "$HDF_FRAMEWORKS/core/master/include",

    "$HDF_FRAMEWORKS/include/core",

    "$HDF_FRAMEWORKS/include/utils",

    "$HDF_FRAMEWORKS/utils/include",

    "$HDF_FRAMEWORKS/include/osal",

    "//drivers/adapter/uhdf/posix/include",

    "//third_party/bounds_checking_function/include",

    "//base/hiviewdfx/hilog_lite/interfaces/native/innerkits",

    ]


    deps = [

        "//base/hiviewdfx/hilog_lite/frameworks/featured:hilog_shared",

        "//drivers/adapter/uhdf/manager:hdf_core",

        "//drivers/adapter/uhdf/posix:hdf_posix_osal",

    ]

}


lite_component("my_led_app") {

    features = [

        ":led_lib",

    ]

} - 首先导入 gni 组件,将源码my_led_app.c编译成led_lib库文件
- 输出的可执行文件名称由 output_name 定义为my_led
- include_dirs 里面加入my_led_app.c里面需要用到的.h的头文件路径
- deps 里面加入所依赖的库。
- 然后将led_lib打包成 lite_component,命名为my_led_app组件。
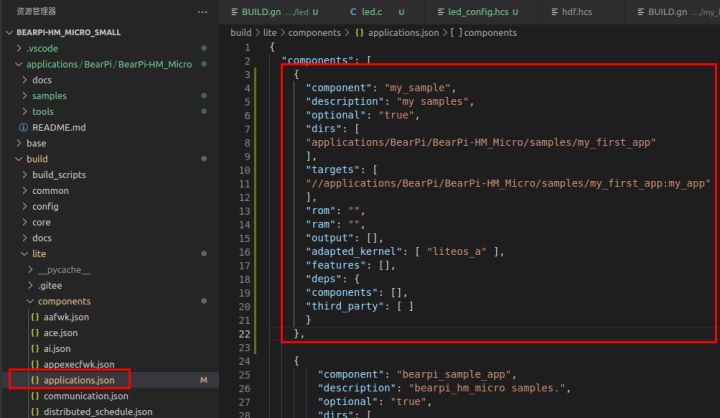
2.4.添加新组件
修改文件build/lite/components/applications.json,添加组件my_sample的配置
{

        "component": "my_sample",

        "description": "my samples",

        "optional": "true",

        "dirs": [

            "applications/BearPi/BearPi-HM_Micro/samples/my_first_app",

            "applications/BearPi/BearPi-HM_Micro/samples/my_led_app"

        ],

        "targets": [

            "//applications/BearPi/BearPi-HM_Micro/samples/my_first_app:my_app",

            "//applications/BearPi/BearPi-HM_Micro/samples/my_led_app:my_led_app"

        ],

        "rom": "",

        "ram": "",

        "output": [],

        "adapted_kernel": [ "liteos_a" ],

        "features": [],

        "deps": {

        "components": [],

        "third_party": [ ]

        }

}, 
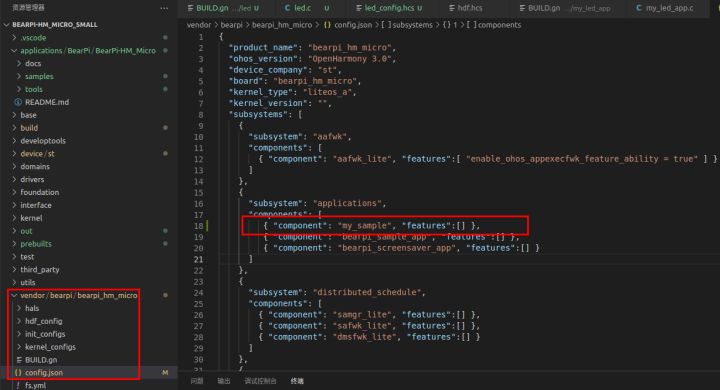
2.5.修改单板配置文件
修改文件vendor/bearpi/bearpi_hm_micro/config.json,新增my_sample组件的条目
{

      "subsystem": "applications",

      "components": [

         { "component": "my_sample", "features":[] },

         { "component": "bearpi_sample_app", "features":[] },

         { "component": "bearpi_screensaver_app", "features":[] }

      ]

}, 
三、编译
在项目根目录下执行hb set 设置开发板,只有一个,回车即可

执行编译命令
hb build -t notest --tee -f
等待编译完成后,屏幕出现:build success字样,说明编译成功。
当编译完后,可以直接查看到最终编译的固件,具体路径在: \project\bearpi-hm_micro_small\out\bearpi-hm_micro\bearpi-hm_micro
文件夹结构说明
- OHOS_Image.stm32:系统镜像文件
- rootfs_vfat.img:根文件系统
- userfs_vfat.img:用户文件系统
执行以下三条指令将以上三个文件复制到applications/BearPi/BearPi-HM_Micro/tools/download_img/kernel/下,以便后续烧录系统使用
cp out/bearpi_hm_micro/bearpi_hm_micro/OHOS_Image.stm32 applications/BearPi/BearPi-HM_Micro/tools/download_img/kernel/

cp out/bearpi_hm_micro/bearpi_hm_micro/rootfs_vfat.img applications/BearPi/BearPi-HM_Micro/tools/download_img/kernel/

cp out/bearpi_hm_micro/bearpi_hm_micro/userfs_vfat.img applications/BearPi/BearPi-HM_Micro/tools/download_img/kernel/
四、总结
至此,完整的项目工程就开发好了,下一步就是烧录和运行了。
更多学习内容,请关注IoT物联网社区 ,添加华为云IoT小助手微信号(hwc-iot),回复“阅读”获取更多资讯。
|


- 上一条: v80.01 鸿蒙内核源码分析(内核态锁篇) | 如何实现快锁Futex(下) | 百篇博客分析OpenHarmony源码 2022-02-18
- 下一条: OpenHarmony移植:如何适配utils子系统之KV存储部件 2022-02-25
- 手把手教你丨小熊派移植华为 LiteOS-M 2022-01-26
- 用100行代码提升10倍的性能 2021-07-05
- GitHub 桌面版 v3.0 新特性「GitHub 热点速览」 2022-05-05
- HarmonyOS3.0尝鲜之关键Js Api--ServiceAbility开发 2022-08-22
- 深入探索 Paging 3.0: 分页加载来自网络和数据库的数据 | MAD Skills 2021-12-17