SpringBoot 集成缓存性能之王 Caffeine
使用缓存的目的就是提高性能,今天码哥带大家实践运用 spring-boot-starter-cache 抽象的缓存组件去集成本地缓存性能之王 Caffeine。
大家需要注意的是:in-memeory 缓存只适合在单体应用,不适合与分布式环境。
分布式环境的情况下需要将缓存修改同步到每个节点,需要一个同步机制保证每个节点缓存数据最终一致。
Spring Cache 是什么
不使用 Spring Cache 抽象的缓存接口,我们需要根据不同的缓存框架去实现缓存,需要在对应的代码里面去对应缓存加载、删除、更新等。
比如查询我们使用旁路缓存策略:先从缓存中查询数据,如果查不到则从数据库查询并写到缓存中。
伪代码如下:
public User getUser(long userId) {
    // 从缓存查询
    User user = cache.get(userId);
    if (user != null) {
        return user;
    }
    // 从数据库加载
    User dbUser = loadDataFromDB(userId);
    if (dbUser != null) {
        // 设置到缓存中
        cache.put(userId, dbUser)
    }
    return dbUser;
}
我们需要写大量的这种繁琐代码,Spring Cache 则对缓存进行了抽象,提供了如下几个注解实现了缓存管理:
- @Cacheable:触发缓存读取操作,用于查询方法上,如果缓存中找到则直接取出缓存并返回,否则执行目标方法并将结果缓存。
- @CachePut:触发缓存更新的方法上,与
Cacheable相比,该注解的方法始终都会被执行,并且使用方法返回的结果去更新缓存,适用于 insert 和 update 行为的方法上。 - @CacheEvict:触发缓存失效,删除缓存项或者清空缓存,适用于 delete 方法上。
除此之外,抽象的 CacheManager 既能集成基于本地内存的单体应用,也能集成 EhCache、Redis 等缓存服务器。
最方便的是通过一些简单配置和注解就能接入不同的缓存框架,无需修改任何代码。
集成 Caffeine
码哥带大家使用注解方式完成缓存操作的方式来集成,完整的代码请访问 github:https://github.com/MageByte-Zero/springboot-parent-pom,在 pom.xml 文件添加如下依赖:
<dependency>
    <groupId>org.springframework.boot</groupId>
    <artifactId>spring-boot-starter-cache</artifactId>
</dependency>

<dependency>
    <groupId>com.github.ben-manes.caffeine</groupId>
    <artifactId>caffeine</artifactId>
</dependency>
使用 JavaConfig 方式配置 CacheManager:
@Slf4j
@EnableCaching
@Configuration
public class CacheConfig {

    @Autowired
    @Qualifier("cacheExecutor")
    private Executor cacheExecutor;

    @Bean
    public Caffeine<Object, Object> caffeineCache() {

        return Caffeine.newBuilder()
                // 设置最后一次写入或访问后经过固定时间过期
                .expireAfterAccess(7, TimeUnit.DAYS)
                // 初始的缓存空间大小
                .initialCapacity(500)
            	// 使用自定义线程池
                .executor(cacheExecutor)
                .removalListener(((key, value, cause) -> log.info("key:{} removed, removalCause:{}.", key, cause.name())))
                // 缓存的最大条数
                .maximumSize(1000);
    }

    @Bean
    public CacheManager cacheManager() {
        CaffeineCacheManager caffeineCacheManager = new CaffeineCacheManager();
        caffeineCacheManager.setCaffeine(caffeineCache());
        // 不缓存空值
        caffeineCacheManager.setAllowNullValues(false);
        return caffeineCacheManager;
    }
}
准备工作搞定,接下来就是如何使用了。
@Slf4j
@Service
public class AddressService {

    public static final String CACHE_NAME = "caffeine:address";

    private static final AtomicLong ID_CREATOR = new AtomicLong(0);

    private Map<Long, AddressDTO> addressMap;

    public AddressService() {
        addressMap = new ConcurrentHashMap<>();

        addressMap.put(ID_CREATOR.incrementAndGet(), AddressDTO.builder().customerId(ID_CREATOR.get()).address("地址1").build());
        addressMap.put(ID_CREATOR.incrementAndGet(), AddressDTO.builder().customerId(ID_CREATOR.get()).address("地址2").build());
        addressMap.put(ID_CREATOR.incrementAndGet(), AddressDTO.builder().customerId(ID_CREATOR.get()).address("地址3").build());
    }

    @Cacheable(cacheNames = {CACHE_NAME}, key = "#customerId")
    public AddressDTO getAddress(long customerId) {
        log.info("customerId:{} 没有走缓存,开始从数据库查询", customerId);
        return addressMap.get(customerId);
    }

    @CachePut(cacheNames = {CACHE_NAME}, key = "#result.customerId")
    public AddressDTO create(String address) {
        long customerId = ID_CREATOR.incrementAndGet();
        AddressDTO addressDTO = AddressDTO.builder().customerId(customerId).address(address).build();

        addressMap.put(customerId, addressDTO);
        return addressDTO;
    }

    @CachePut(cacheNames = {CACHE_NAME}, key = "#result.customerId")
    public AddressDTO update(Long customerId, String address) {

        AddressDTO addressDTO = addressMap.get(customerId);
        if (addressDTO == null) {
            throw new RuntimeException("没有 customerId = " + customerId + "的地址");
        }

        addressDTO.setAddress(address);
        return addressDTO;
    }

    @CacheEvict(cacheNames = {CACHE_NAME}, key = "#customerId")
    public boolean delete(long customerId) {
        log.info("缓存 {} 被删除", customerId);
        return true;
    }
}
使用 CacheName 隔离不同业务场景的缓存,每个 Cache 内部持有一个 map 结构存储数据,key 可用使用 Spring 的 Spel 表达式。
单元测试走起:
@RunWith(SpringRunner.class)
@SpringBootTest(classes = CaffeineApplication.class)
@Slf4j
public class CaffeineApplicationTests {

    @Autowired
    private AddressService addressService;

    @Autowired
    private CacheManager cacheManager;

    @Test
    public void testCache() {
        // 插入缓存 和数据库
        AddressDTO newInsert = addressService.create("南山大道");
        // 要走缓存
        AddressDTO address = addressService.getAddress(newInsert.getCustomerId());
        long customerId = 2;

        // 第一次未命中缓存,打印 customerId:{} 没有走缓存,开始从数据库查询
        AddressDTO address2 = addressService.getAddress(customerId);
        // 命中缓存
        AddressDTO cacheAddress2 = addressService.getAddress(customerId);

        // 更新数据库和缓存
        addressService.update(customerId, "地址 2 被修改");

        // 更新后查询,依然命中缓存
        AddressDTO hitCache2 = addressService.getAddress(customerId);
        Assert.assertEquals(hitCache2.getAddress(), "地址 2 被修改");

        // 删除缓存
        addressService.delete(customerId);

        // 未命中缓存, 从数据库读取
        AddressDTO hit = addressService.getAddress(customerId);
        System.out.println(hit.getCustomerId());
    }

}
大家发现没,只需要在对应的方法上加上注解,就能愉快的使用缓存了。需要注意的是, 设置的 cacheNames 一定要对应,每个业务场景使用对应的 cacheNames。
另外 key 可以使用 spel 表达式,大家重点可以关注 @CachePut(cacheNames = {CACHE_NAME}, key = "#result.customerId"),result 表示接口返回结果,Spring 提供了几个元数据直接使用。
| 名称 | 地点 | 描述 | 例子 |
|---|---|---|---|
methodName | 根对象 | 被调用的方法的名称 | #root.methodName |
method | 根对象 | 被调用的方法 | #root.method.name |
target | 根对象 | 被调用的目标对象 | #root.target |
targetClass | 根对象 | 被调用的目标的类 | #root.targetClass |
args | 根对象 | 用于调用目标的参数(作为数组) | #root.args[0] |
caches | 根对象 | 运行当前方法的缓存集合 | #root.caches[0].name |
| 参数名称 | 评估上下文 | 任何方法参数的名称。如果名称不可用(可能是由于没有调试信息),则参数名称也可在#a<#arg> where#arg代表参数索引(从 开始0)下获得。 | #iban或#a0(您也可以使用#p0或#p<#arg>表示法作为别名)。 |
result | 评估上下文 | 方法调用的结果(要缓存的值)。仅在unless 表达式、cache put表达式(计算key)或cache evict 表达式(when beforeInvocationis false)中可用。对于支持的包装器(例如 Optional),#result指的是实际对象,而不是包装器。 | #result |
核心原理
Java Caching定义了5个核心接口,分别是 CachingProvider, CacheManager, Cache, Entry 和 Expiry。

核心类图:
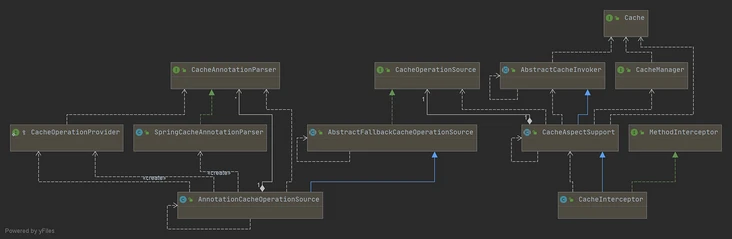
- Cache:抽象了缓存的操作,比如,get()、put();
- CacheManager:管理 Cache,可以理解成 Cache 的集合管理,之所以有多个 Cache,是因为可以根据不同场景使用不同的缓存失效时间和数量限制。
- CacheInterceptor、CacheAspectSupport、AbstractCacheInvoker:CacheInterceptor 是一个AOP 方法拦截器,在方法前后做额外的逻辑,比如查询操作,先查缓存,找不到数据再执行方法,并把方法的结果写入缓存等,它继承了CacheAspectSupport(缓存操作的主体逻辑)、AbstractCacheInvoker(封装了对 Cache 的读写)。
- CacheOperation、AnnotationCacheOperationSource、SpringCacheAnnotationParser:CacheOperation定义了缓存操作的缓存名字、缓存key、缓存条件condition、CacheManager等,AnnotationCacheOperationSource 是一个获取缓存注解对应 CacheOperation 的类,而SpringCacheAnnotationParser 是解析注解的类,解析后会封装成 CacheOperation 集合供AnnotationCacheOperationSource 查找。
CacheAspectSupport:缓存切面支持类,是CacheInterceptor 的父类,封装了所有的缓存操作的主体逻辑。
主要流程如下:
- 通过CacheOperationSource,获取所有的CacheOperation列表
- 如果有@CacheEvict注解、并且标记为在调用前执行,则做删除/清空缓存的操作
- 如果有@Cacheable注解,查询缓存
- 如果缓存未命中(查询结果为null),则新增到cachePutRequests,后续执行原始方法后会写入缓存
- 缓存命中时,使用缓存值作为结果;缓存未命中、或有@CachePut注解时,需要调用原始方法,使用原始方法的返回值作为结果
- 如果有@CachePut注解,则新增到cachePutRequests
- 如果缓存未命中,则把查询结果值写入缓存;如果有@CachePut注解,也把方法执行结果写入缓存
- 如果有@CacheEvict注解、并且标记为在调用后执行,则做删除/清空缓存的操作
今天就到这了,分享一些工作小技巧给大家,后面码哥会分享如何接入 Redis ,并且带大家实现一个基于 Sping Boot 实现一个 Caffeine 作为一级缓存、Redis 作为二级缓存的分布式二级缓存框架。
我们下期见,大家可以在评论区叫我靓仔么?不叫也行,点赞分享也是鼓励。
参考资料
[1]https://segmentfault.com/a/1190000041640222
[2]https://docs.spring.io/spring-framework/docs/current/reference/html/integration.html#cache
|


- 上一条: 剖析 SPI 在 Spring 中的应用 2022-06-22
- 下一条: Java Agent 踩坑之 appendToSystemClassLoaderSearch 问题 2022-06-30
- SpringBoot 如何统一后端返回格式? 2021-07-16
- SpringBoot 2.5 版本功能前瞻 2021-06-19
- 轻松搞懂SpringBoot自动装配和集成监控 2022-04-14
- 不会用SpringBoot连接Redis,那就赶紧看这篇 2022-02-10
- SpringBoot到底是什么? 2022-07-20