轻松搞懂SpringBoot自动装配和集成监控
SpringBoot 是目前很流行的一个脚手架,从名字上可以看出是基于Spring框架做了一些封装。相信大家应该都能说出几点使用它的理由也知道它的一些特性或者一些优点,但是它底层是如何支撑这些特性的呢?今天我们就来了解下它底层是如何做的。首先我们看看官网如何原汁原味地介绍SpringBoot的
- Create stand-alone Spring applications #可以独立创建Spring应用
- Embed Tomcat, Jetty or Undertow directly (no need to deploy WAR files) 内嵌Tomcat,jetty等服务器,不需要部署war打包文件
- Provide opinionated 'starter' dependencies to simplify your build configuration 提供了一些starter依赖来简化应用配置
- Automatically configure Spring and 3rd party libraries whenever possible 自动配置spring和一些依赖
- Provide production-ready features such as metrics, health checks, and externalized configuration 封装了一些功能,比如监控,健康检查等
- Absolutely no code generation and no requirement for XML configuration 不需要XML配置和代码生成就可以配置好项目
此次我为了更好的梳理SpringBoot这几点特性,我准备从SpringBoot的使用和一些源码分析来让大家更加的了解SpringBoot
SpringBoot简单使用
对于SpringBoot的使用是很简单的,只需要引用包和加上注解就完事了,这和他的第一特性吻合,就是无需配置就能独立使用,现在还有多少小伙伴记得配置SpringMVC时要配置Dispatcher,Servlet路径,Service,Listener这些配置呀,在SpringBoot这里统统可以不要,只需要引入包,然后main函数启动或者继承SpringBootServletInitializer,一个完整的MVC项目就初始化好了。具体如何启动我就不讲了,看看官方配置步骤吧https://spring.io/quickstart 相信大家都是一看就会的那种。
关键代码如下:
<dependency>
	<groupId>org.springframework.boot</groupId>
  <artifactId>spring-boot-starter-web</artifactId>
</dependency>
@SpringBootApplication
public class Application {

    public static void main(String[] args) {
        SpringApplication.run(Application.class, args);
    }
}
就是这么简单的配置就可以启动项目。但是在享受SpringBoot给我们带来便捷的同时有没有考虑过是如何实现的呢?今天就带你从原理上 搞懂SpringBoot的这几点特性。
网上有很多帖子介绍SpringBoot应用非常便捷,内置Tomcat容器。但是很少有在讲SpringBoot是如何做这个事的,今天咱们就从这个内嵌容器 特性开始分析下SpringBoot
Spring内嵌容器
其实提到内嵌Tomcat容器就可以从Tomcat开始聊,Tomcat也是Java语言开发的一个满足Servlet规范的容器。为什么Nginx或者Apache不能作为Java EE的容器呢?就是因为他们不是按照Servlet规范来实现的。同样满足Servlet规范的还有Jetty,Undertow等实现,后续可以给大家出一个容器的对比文章。
既然Tomcat是Java编写的,也在Apache基金会发展了很多年了,项目是非常成熟且规范的。那么按照我们的理解应该会抽象出一个服务器类或者接口。比如使用上期望是这样的
Server tomcatServer = new Server(port, path);
好巧不巧,其实Tomcat其实还真是已经这样做了的,读起来理解度也很高。
<dependency>
      <groupId>org.apache.tomcat.embed</groupId>
      <artifactId>tomcat-embed-core</artifactId>
      <version>8.5.55</version>
    </dependency>
    <dependency>
      <groupId>org.apache.tomcat</groupId>
      <artifactId>tomcat-servlet-api</artifactId>
      <version>8.5.55</version>
    </dependency>
    <dependency>
      <groupId>javax.servlet</groupId>
      <artifactId>javax.servlet-api</artifactId>
      <version>3.1.0</version>
      <scope>provided</scope>
    </dependency>
    <dependency>
      <groupId>org.apache.tomcat</groupId>
      <artifactId>tomcat-jasper</artifactId>
      <version>8.5.55</version>
</dependency>
public class Tomcat {
    protected Server server;
    protected int port = 8080;
    protected String hostname = "localhost";
    protected String basedir;
    // 省略部分属性
    public Tomcat() {
        ExceptionUtils.preload();
    }
		// 省略get/set
    public Context addWebapp(String contextPath, String docBase) {
        return this.addWebapp(this.getHost(), contextPath, docBase);
    }
那我们就按照它提供的方法来尝试下我们自己在非SpringBoot 工程里内嵌Tomcat,来模拟SpringBoot的功能
public class SpringApplication {
		// 模拟SpringBoot启动容器
    public static void main(String[] args) throws LifecycleException {
        SpringApplication.run();
    }

    public static void run() throws LifecycleException {
        Tomcat tomcat = new Tomcat();
        tomcat.setPort(1010);
        tomcat.start();

        Context context = tomcat.addContext("/", "/Users/Lee/WorkSpace/zysDemo2/src/main/webapp");
        tomcat.addServlet("/", "dispathcher", new DispatcherServlet());
        //匹配所有访问
        context.addServletMappingDecoded("/*", "dispathcher");
        tomcat.getServer().await();
    }
}
然后再来看看Servlet是如何实现呢
public class DispatcherServlet implements Servlet {
@Override
public void service(ServletRequest req, ServletResponse resp) throws ServletException, IOException {
HttpServletRequest servletRequest = (HttpServletRequest) req;
String requestURI = servletRequest.getRequestURI();
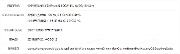
System.out.println("当前请求URI:"+requestURI);
System.out.println("当前请求参数:"+ JSON.toJSONString(servletRequest.getParameterMap()));
}
// 省略一些方法
}
然后我在浏览器上请求了下我的服务器得到如下结果
稍微有些经验的朋友看到这里是不是有一种豁然开朗的感觉,我这里特意把Servlet的名字定义为DispatcherServlet和把URI输出了下给大家留了一些想象的空间,大家可以臆想下能否做些扩展呢?比如初始化的时候URI为key,类作为value存在map里,当请求来了根据URI从map里获取到类,然后使用反射调用方法,这样是不是类似简单的SpringMVC逻辑呢?内嵌Tomcat大致是这个逻辑,Jetty和Undertow也是类似的思路。那么SpringBoot源码是如何实现的呢,我就直接贴代码了,在TomcatServletWebServerFactory中有这样一个方法
 public WebServer getWebServer(ServletContextInitializer... initializers) {
        if (this.disableMBeanRegistry) {
            Registry.disableRegistry();
        }

        Tomcat tomcat = new Tomcat();
        File baseDir = this.baseDirectory != null ? this.baseDirectory : this.createTempDir("tomcat");
        tomcat.setBaseDir(baseDir.getAbsolutePath());
        Connector connector = new Connector(this.protocol);
        connector.setThrowOnFailure(true);
        tomcat.getService().addConnector(connector);
        this.customizeConnector(connector);
        tomcat.setConnector(connector);
        tomcat.getHost().setAutoDeploy(false);
        this.configureEngine(tomcat.getEngine());
        Iterator var5 = this.additionalTomcatConnectors.iterator();

        while(var5.hasNext()) {
            Connector additionalConnector = (Connector)var5.next();
            tomcat.getService().addConnector(additionalConnector);
        }

        this.prepareContext(tomcat.getHost(), initializers);
        return this.getTomcatWebServer(tomcat);
    }
是不是和我模拟的很像呀。
Spring简化配置
提到简化配置应该是SpringBoot最大的亮点了,先提一点什么叫自动化配置:SpringBoot自动化配置就是将各个需要和Spring集成的组件的配置Bean按照标准规范在引入相关Starter包后在SpringBoot启动的时候加载到SpringIOC容器开发人员只需要按照模版配置组件参数就可以达到组件集成的目的。
说到这个简化配置我是深有感触的。我的老东家因为历史原因最开始使用的是webService,一大堆配置比如多个业务主库,多个业务从库,redis,oss,等配置,随着业务发展时不时就会新增一个应用,然后就各种配置参数修改、复制,有些业务需要123配置,有些业务需要456配置,最致命的是线上20多个应用如果数据库挂了需要切换的辛苦,哈哈这么多配置要修改,想想都恐怖,我们遇到过不下于三次因为云厂商数据库挂了修改配置的事故,这中间也有不少次复制错了配置配置错了的问题。后来我们使用SpringBooot脚手架,把配置类的参数全部抽取成快照版本的jar包,只需要按需添加注解就满足功能,就像积木一样的来组装需要的配置就好了,而且有个好处是这种关键的配置对开发是黑盒的,在业务开发中只关注业务,如果遇到了上述数据库临时迁移的情况,我们有搭配配置中心直接调整重启就可以了,具体的效果就如下。
@SpringBootApplication
@EnableAdminDB
@EnableErpDB
@EnableBizDB
@EnableRedis
@EnableOSS
@EnableSlaveDB
public class Application {

    public static void main(String[] args) {
        SpringApplication.run(Application.class, args);
    }
}
接下来就详细的讲讲SpringBoot是如何帮我们简化了配置的呢?要看懂SpirngBoot的原理首先要有Spring的经验,尤其是Spring'的生命周期这块是必不可少的,然后从上面说了这么多首先可能大家会关注@SpringBootApplication注解,关于这个注解面试题就能就很多了比如,这个注解有啥用,SpringBoot是如何使用这个注解的呢?属于Spring哪一个生命周期阶段呢?头大不大,面试官真的会一套又一套的
首先从@SpringBootApplication开始分析,点进这个注解发现它是有多个注解组成的组合注解,由@SpringBootConfiguration,@EnableAutoConfiguration,@ComponentScan 关键代码如下展示
// 省略其他信息
@SpringBootConfiguration
@EnableAutoaConfiguration
@ComponentScan(
    excludeFilters = {@Filter(
    type = FilterType.CUSTOM,
    classes = {TypeExcludeFilter.class}
), @Filter(
    type = FilterType.CUSTOM,
    classes = {AutoConfigurationExcludeFilter.class}
)}
)
public @interface SpringBootApplication {
  // 省略其他信息
关于@ComponentScan就很简单了就是一个组件扫描包配置的组件,不知道大家还记不记得xml里面配置<ComponentScan />的时候吗?在这里是和XML里面配置是一模一样的,细心的小伙伴可能会问:在XML里面配置会指定报名呀,但是SpringBoot没指定呢? 在SpringBoot里,这个组件扫描包注解没指定包就是默认在配置类的当前包以及子包范围扫描注解。
SpringBootConfiguration注解
@SpringBootConfiguration这个组件点进去发现还有个@Configuration表明当前类会被声明为配置类,被Spring当配置类扫描处理
@EnableAutoaConfiguration这个注解是大头戏,里面是由@AutoConfigurationPackage和import了一个AutoConfigurationImportSelector类。简单的介绍下@AutoConfigurationPackage这个注解的功能是扫描带有此注解的类或者是指定包的类,并且如果没有指定包的话默认会扫描注解所在类,好奇的小伙伴肯定会问这个注解和@ComponentScan有啥区别呢?
我以我个人的理解区分下吧
- 两个注解都是可以扫描比如
@Controllere、@Service、@Bean这类注解的对象注入到Spring的IOC容器中 @ComponentScan是Spring提供的注解在Context包里,而@AutoConfigurationPackage是SpringBoot新添加的注解- 扫描的对象有点不同,
@ComponentScan扫描的是指定的包或者指定Class,如果没指定那么从带有此注解类的所在包和子包开始扫描,而@AutoConfigurationPackage指定包或者指定Class,如果没有指定那么从带有此注解类开始扫描,不能扫描子包的类
AutoConfigurationImportSelector类
这个类是SpringBoot自动化配置最核心的类,是由@EnableAutoConfiguration注解Import进来的类。不知道大家Spring源码功力咋样,看到Import敏不敏感呢?这里很深入可能你要忍一下🤪,不过我在章节后面会画一个流程图图让大家更清晰的了解SpringBoot是如何自动化配置的。
Import组件是Spring框架提供的一个组件,我觉得算是一个扩展口,可以在注解里填入一个Class数组,并将这个Class作为Bean注入IOC容器里,使用场景大致有三种引入普通常规类,ImportSelector和ImportBeanDefinitionRegistrar的实现类。我在上面提到之前我在上家公司做的组件配置分离这块就大量使用到了@Import注解,Import详细的使用和DEMO下次单独讲解,本次不做过多讲解简单过下注释就好了然后将下引入ImportSelector实现类的方式吧,因为SpringBoot使用到了这种方式。
 * <p>Provides functionality equivalent to the {@code <import/>} element in Spring XML.
 * Allows for importing {@code @Configuration} classes, {@link ImportSelector} and
 * {@link ImportBeanDefinitionRegistrar} implementations, as well as regular component
 * classes (as of 4.2; analogous to {@link AnnotationConfigApplicationContext#register}).
 *
// 关键是这段注释,意思是Import注解提供了一个等价于XML的<import />的功能。允许引入@Configuration, ImportSelector、   //ImportBeanDefinitionRegistrar接口,还可以当常规的组件使用,这个注解的功能类似于
//AnnotationConfigApplicationContext#register。这段注释告诉我们Import使用方式方式,大致就是可以引用普通类,ImportSelector
//的实现类,ImportBeanDefinitionRegistrar的实现类
// 省略部分注释
@Target(ElementType.TYPE)
@Retention(RetentionPolicy.RUNTIME)
@Documented
public @interface Import {

	/**
	 * {@link Configuration @Configuration}, {@link ImportSelector},
	 * {@link ImportBeanDefinitionRegistrar}, or regular component classes to import.
	 */
	Class<?>[] value();

}
SpringBoot在这个Import使用上有点黑盒,先看定义吧
public interface ImportSelector {
    String[] selectImports(AnnotationMetadata var1);

    @Nullable
    default Predicate<String> getExclusionFilter() {
        return null;
    }
}
光一个ImportSelector接口看起来还简单的一个接口两个方法,不至于黑盒吧,但springBoot使用的是DeferredImportSelector接口,是ImportSelector的子接口,这个接口有个逻辑是Spring是调用的时候会根据你是否实现Group接口来调用,如果你没有实现Group那正常的时候ImportSelector无异,spring会调用getExclusionFilter()再调用selectImports()方法。但是如果实现了Group接口后spring会调用Group接口的process和selectImports() 具体运行步骤可能没办法一一贴图,我贴点关键的图。然后在最后画下整理流程图
public void process(AnnotationMetadata annotationMetadata, DeferredImportSelector deferredImportSelector) {

  AutoConfigurationImportSelector.AutoConfigurationEntry autoConfigurationEntry = ((AutoConfigurationImportSelector)deferredImportSelector).getAutoConfigurationEntry(annotationMetadata);
  this.autoConfigurationEntries.add(autoConfigurationEntry);
  Iterator var4 = autoConfigurationEntry.getConfigurations().iterator();

  while(var4.hasNext()) {
    String importClassName = (String)var4.next();
    this.entries.putIfAbsent(importClassName, annotationMetadata);
  }

}
protected List<String> getCandidateConfigurations(AnnotationMetadata metadata, AnnotationAttributes attributes) {
  List<String> configurations = SpringFactoriesLoader.loadFactoryNames(this.getSpringFactoriesLoaderFactoryClass(), this.getBeanClassLoader());
  Assert.notEmpty(configurations, "No auto configuration classes found in META-INF/spring.factories. If you are using a custom packaging, make sure that file is correct.");
  return configurations;
}
是不是看到META-INF/spring.factories这个配置文件了,很兴奋是吧。再进入loadFactoryNames方法看看究竟吧

看到这点很多小伙伴大致明白了为啥很多博客说SpringBoot自动配置的清单在META-INF/spring.factories文件里了吧!但是,真正读取spring.factories文件的过程并不在此处来读取的,并不是在引入AutoConfigurationImportSelector类的时候第一次读取的。真正读取这个配置文件的地方是org.springframework.boot.SpringApplication#getBootstrapRegistryInitializersFromSpringFactories这个时候Spring都还没开始生命周期呢,读取完成后按照key-value的格式存放在缓存中了,只不过在启动时读取要使用 的并不是自动化配置需要的这部分配置Bean而已,在处理Import注解时从缓存读取的String数组才是用于自动化配置的全类名。
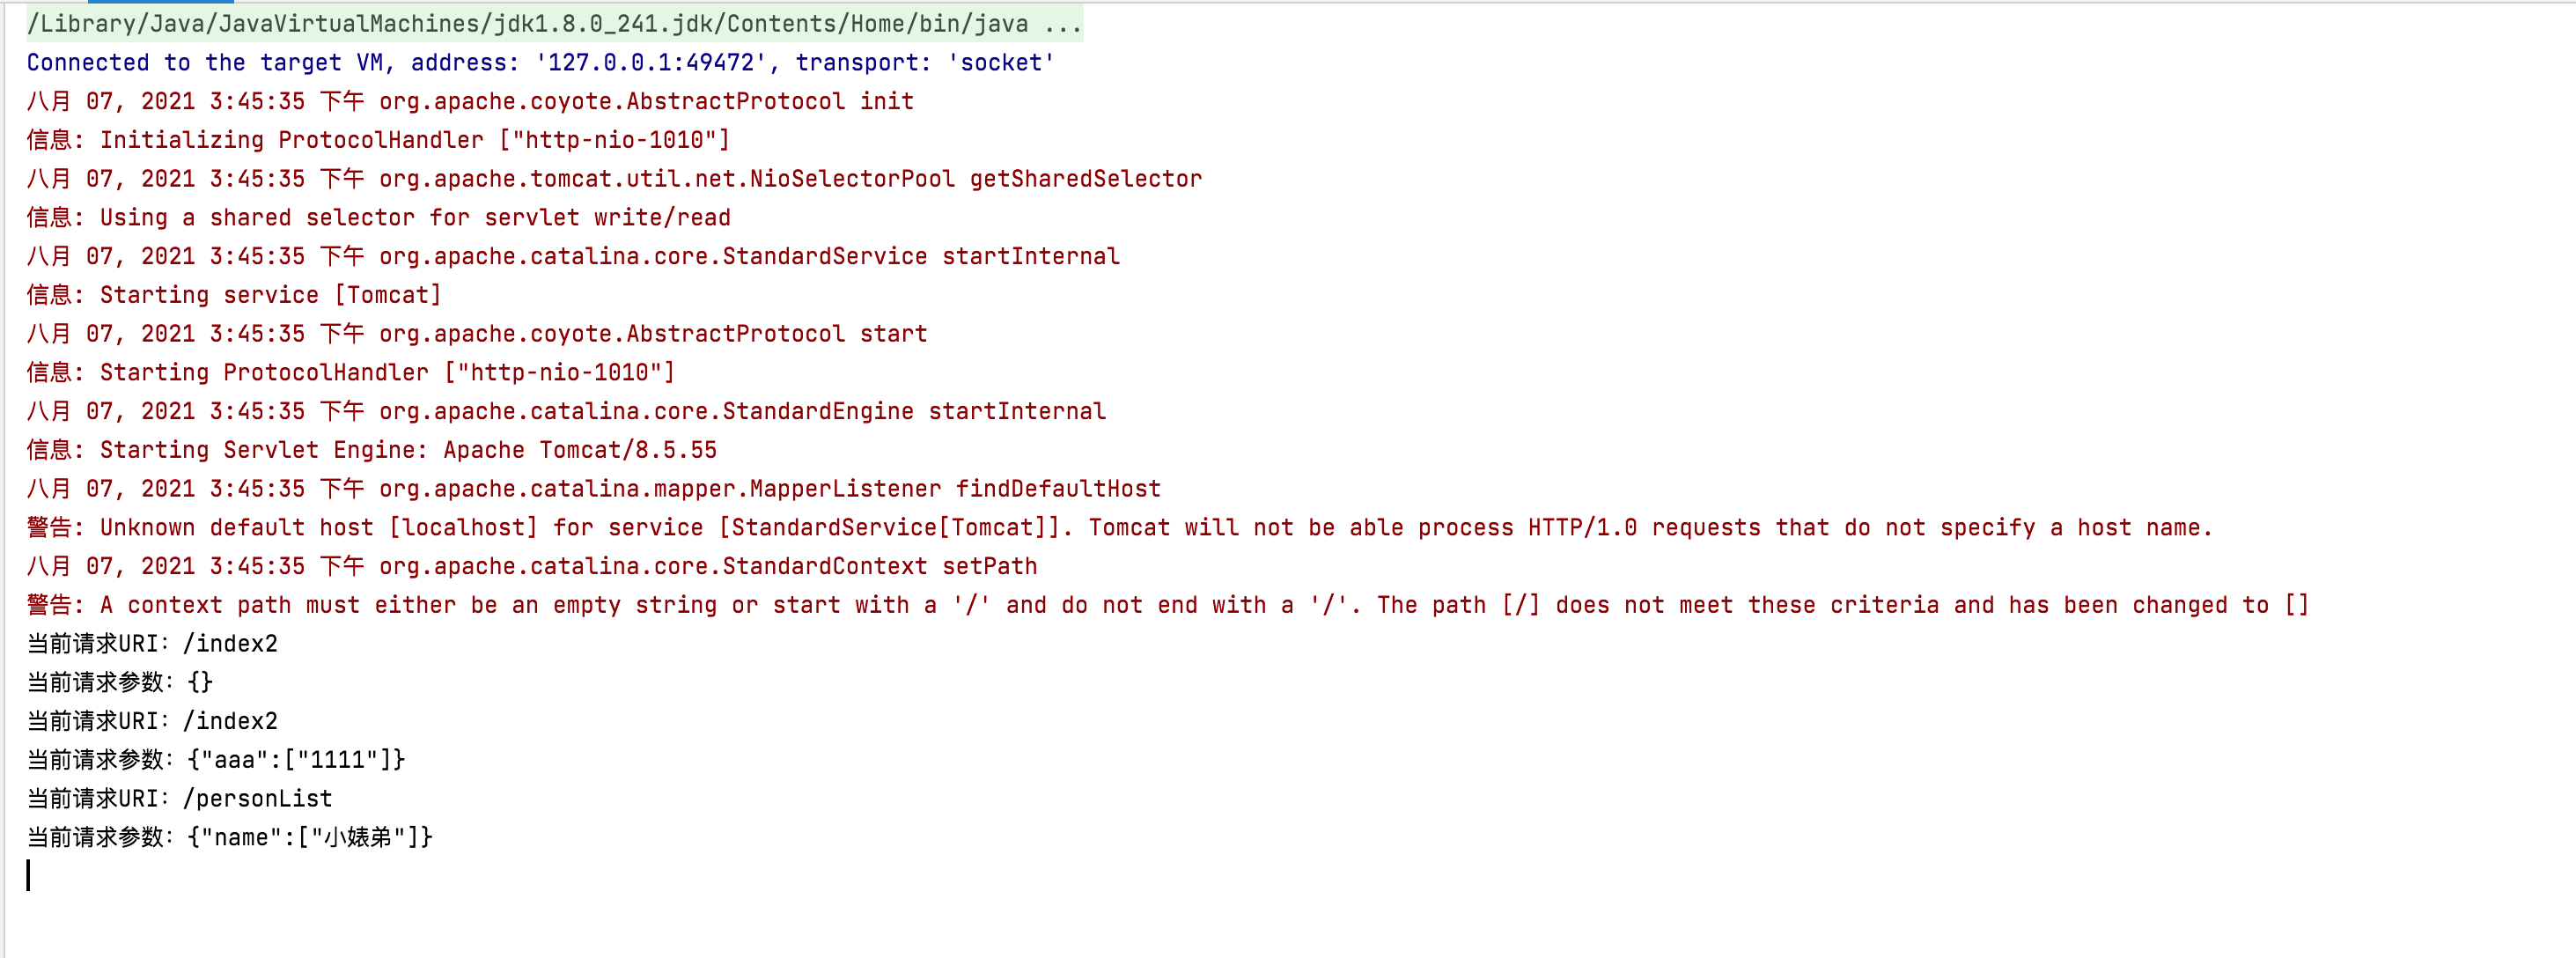
下面我贴一些用于SpringBoot自动化装配所有默认装配的类名
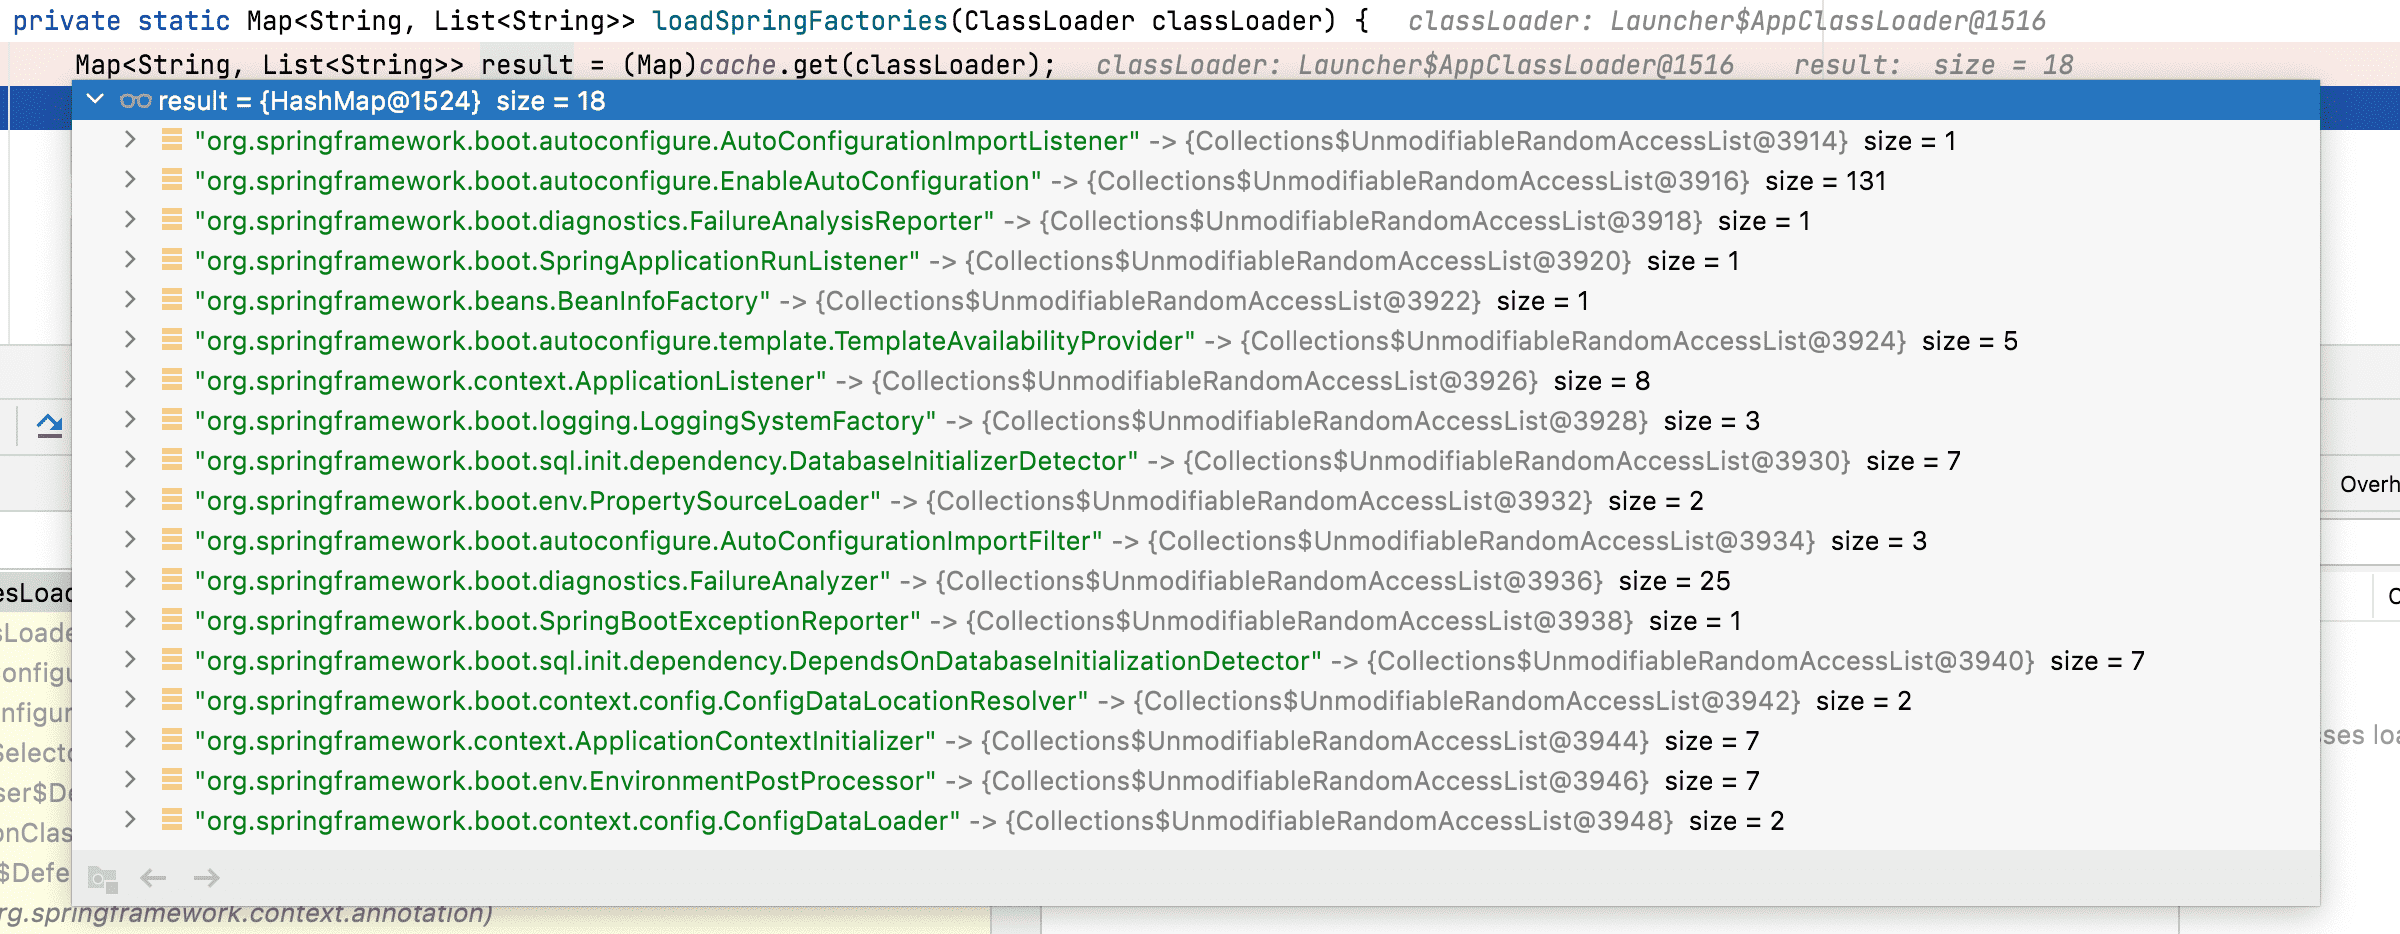
看到这个数据倒是挺多的,其中EnableAutoConfiguration就有131个,但是真正使用到的是根据我们在POM.xml里面配置的starter来决定的,比如我只配置了spring-boot-starter-web那么在你过滤后符合所需的配置类就只有24个了SpringBoot版本不同,配置类的个数不同
看这其中我们挑重要的说明一下,比如AOP切面的配置类,消息转换的配置类,DispatcherServlet配置类,SevletWebSerever工厂配置类,文件上传配置类这些都是十分常见且Web项目必须的。拿这些配置类来讲,看SpringBoot是如何把我们的Web.xml干掉的。
AOP初始化
首先说下AopAutoConfiguration这个配置类,聪明的小可爱就想到这个是AOP自动化配置类,对的这个就是SpringBoot自动化配置里面的AOP自动配置的配置类。那么还有没有小伙伴知道以前XML时代要配置AOP是如何配置的吗?
我贴段官网的配置来糊弄下大家吧🤪,毕竟好多年没这有用XML配置过项目了要我不看文档可能还配置不出来。
    <!-- 车牌地址 https://docs.spring.io/spring-framework/docs/current/reference/html/core.html#spring-core -->
    <!-- this is the object that will be proxied by Spring's AOP infrastructure -->
    <bean id="personService" class="x.y.service.DefaultPersonService"/>

    <!-- this is the actual advice itself -->
    <bean id="profiler" class="x.y.SimpleProfiler"/>

    <aop:config>
        <aop:aspect ref="profiler">

            <aop:pointcut id="theExecutionOfSomePersonServiceMethod"
                expression="execution(* x.y.service.PersonService.getPerson(String,int))
                and args(name, age)"/>

            <aop:around pointcut-ref="theExecutionOfSomePersonServiceMethod"
                method="profile"/>

        </aop:aspect>
    </aop:config>
那么,springBoot把xml文件干掉了,那肯定会以另外一种方式呈现出来,那就一探究竟吧。
回到SpringBoot上来,我们只需要这样简单配置就可以实现上面的逻辑,我可前可后也可以环绕通知
// 同样也可以在官网看到切入点https://docs.spring.io/spring-framework/docs/current/reference/html/core.html#spring-core
@Component
@Aspect
public class AopTest {

    @Before("execution(public * net.ziyoushu.*.*(..))")
    public void before() {
        System.out.println("业务方法前执行");
    }

    @After("execution(public * net.ziyoushu.*.*(..))")
    public void after() {
        System.out.println("业务方法前执行");
    }


    @Around("execution(public * net.ziyoushu.*.*(..))")
    public void aroud(ProceedingJoinPoint pjp) throws Throwable {
        System.out.println("环绕通知前");
        pjp.proceed();
        System.out.println("环绕通知后");
    }

    // 业务方法
    public void doBiz() {
        System.out.println("业务方法执行");
    }
}
使用方式还是很简单的,这个也是Spring里面的注解使用方式,但我们本次关心的springBoot如何帮我们配置AOP的,以及如何扫描我们的切面的。
@Configuration
@ConditionalOnClass({EnableAspectJAutoProxy.class, Aspect.class, Advice.class, AnnotatedElement.class})
@ConditionalOnProperty(
    prefix = "spring.aop",
    name = {"auto"},
    havingValue = "true",
    matchIfMissing = true
)
public class AopAutoConfiguration {
    public AopAutoConfiguration() {
    }

    @Configuration
    @EnableAspectJAutoProxy(
        proxyTargetClass = true
    )
    @ConditionalOnProperty(
        prefix = "spring.aop",
        name = {"proxy-target-class"},
        havingValue = "true",
        matchIfMissing = true
    )
    public static class CglibAutoProxyConfiguration {
        public CglibAutoProxyConfiguration() {
        }
    }

    @Configuration
    @EnableAspectJAutoProxy(
        proxyTargetClass = false
    )
    @ConditionalOnProperty(
        prefix = "spring.aop",
        name = {"proxy-target-class"},
        havingValue = "false",
        matchIfMissing = false
    )
    public static class JdkDynamicAutoProxyConfiguration {
        public JdkDynamicAutoProxyConfiguration() {
        }
    }
}
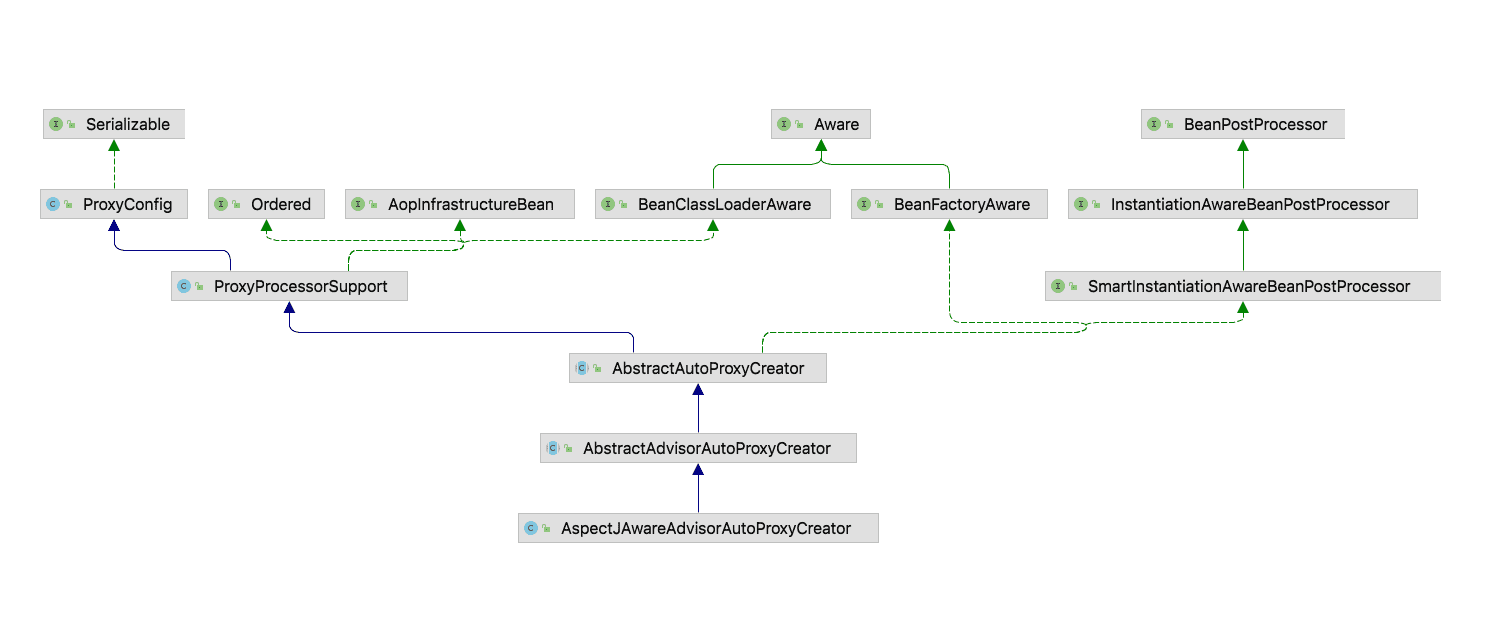
从上面这个类上我们可以看到开启aop其实还是有条件的,首先要引入aop的包,因为@ConditionalOnClass作用是检测classpath下是否有指定的类,如果没指定就不会启用AopAutoConfiguration配置。然后也可以看到这个版本spring默认采用的是cglib作为代理实现,而引起我们重视的是@EnableAspectJAutoProxy这个注解,这个注解引入了一个AspectJAutoProxyRegistrar注册器。而这个注册器的作用是往spring容器里注册一个AnnotationAwareAspectJAutoProxyCreator,这是一个BeanPostProcessor。来看看这类的类关系图可以看到实现了Aware和BeanPostProcessor都是Spring生命周期的步骤
到这里我把铺垫和SpringBoot关于AOP配置相关的前提梳理好了,然后现在来讲解下Spring是如何扫描切面和切点的。首先看下上面我们定义一个切面类,连接点,切点等信息的。
Spring在执行Bean的生命周期时,执行getBean()逻辑时会执行所有的BeanPostProcessor,在这个过程中就会执行到上面提到的AnnotationAwareAspectJAutoProxyCreator。
有朋友可能就会问了,Spring是如何知道一个Bean是被是切面呢?在AnnotationAwareAspectJAutoProxyCreator类里有个方法findCandidateAdvisors()这个方法是获取定义的连接点。在buildAspectJAdvisors()里面有个切面判断
//  为更好的展示,删除部分逻辑,此处是伪码
if (beanType != null && this.advisorFactory.isAspect(beanType)) {
  AspectMetadata amd = new AspectMetadata(beanType, beanName);
  if (amd.getAjType().getPerClause().getKind() == PerClauseKind.SINGLETON) {
    // 扫描连接点
    List<Advisor> classAdvisors = this.advisorFactory.getAdvisors(factory);
    if (this.beanFactory.isSingleton(beanName)) {
      this.advisorsCache.put(beanName, classAdvisors);
    } else {
      this.aspectFactoryCache.put(beanName, factory);
    }

  } else {
    if (this.beanFactory.isSingleton(beanName)) {
      throw new IllegalArgumentException("xxx");
    }

    MetadataAwareAspectInstanceFactory factory = new PrototypeAspectInstanceFactory(this.beanFactory, beanName);
    this.aspectFactoryCache.put(beanName, factory);
    advisors.addAll(this.advisorFactory.getAdvisors(factory));
  }
}
//  其他逻辑
这里advisorFactory.isAspect(beanType)就是检测了定义的类是是前面,依据是判断有@Aspect注解并且是被aspectj编译的。从这个判断就可以得知使用注解方式定义一个切面是必须要使用@Aspect。接下来就是扫描连接点的getAdvisors(factory)这里面的逻辑是扫描前面所有的方法,然后对方法排序,具体逻辑在ReflectiveAspectJAdvisorFactory类的静态块定义了一个排序。
//@see ReflectiveAspectJAdvisorFactory

static {
        adviceMethodFilter = ReflectionUtils.USER_DECLARED_METHODS.and((method) -> {
            return AnnotationUtils.getAnnotation(method, Pointcut.class) == null;
        });
  			// AOP执行连接点的顺序
        Comparator<Method> adviceKindComparator = new ConvertingComparator(new InstanceComparator(new Class[]{Around.class, Before.class, After.class, AfterReturning.class, AfterThrowing.class}), (method) -> {
            AspectJAnnotation<?> ann = AbstractAspectJAdvisorFactory.findAspectJAnnotationOnMethod(method);
            return ann != null ? ann.getAnnotation() : null;
        });
        Comparator<Method> methodNameComparator = new ConvertingComparator(Method::getName);
        adviceMethodComparator = adviceKindComparator.thenComparing(methodNameComparator);
    }
这是一个很偏的地方,但是这里可以看到AOP切面执行的顺序,我觉得还是蛮重要的,并且从这里看到还有返回时和异常时的连接点,我之前也没用过🤪,这也算是对我自己的一个补充。
这里SpringBoot是如何自动化配置AOP的到这里就讲解完了。有不懂的可以关注我:Java极客帮
SpringMvc初始化
提到MVC的配置就不得不说到DispatcherServlet的初始化,那还有朋友记得XML是如何配置DispatcherSerevlet的吗?就是在Web.xml里面配置DispatcherSerevlet,为唤起大家记忆,我把具体配置贴下来
// 官方车牌:https://docs.spring.io/spring-framework/docs/current/reference/html/web.html#spring-web
<web-app>

    <listener>
        <listener-class>org.springframework.web.context.ContextLoaderListener</listener-class>
    </listener>

    <context-param>
        <param-name>contextConfigLocation</param-name>
        <param-value>/WEB-INF/app-context.xml</param-value>
    </context-param>

    <servlet>
        <servlet-name>app</servlet-name>
        <servlet-class>org.springframework.web.servlet.DispatcherServlet</servlet-class>
        <init-param>
            <param-name>contextConfigLocation</param-name>
            <param-value></param-value>
        </init-param>
        <load-on-startup>1</load-on-startup>
    </servlet>

    <servlet-mapping>
        <servlet-name>app</servlet-name>
        <url-pattern>/app/*</url-pattern>
    </servlet-mapping>

</web-app>
但是,现在Spring官网也是不推荐这种方式了,把API配置方式放在第一位,随着SpringBoot的流行和Servlet3的规范,后面估计大家很少会遇到配置web.xml的项目了。好废话不多讲这里我给大家抛个大瓜,我通过DEBUG源码发现网上文章讲SpringBoot初始化SpringMVC也就是自动化配置DispatcherServlet类 90% 都是DispatcherServletAutoConfiguration来配置 但是,我对这个点是不赞同的,我和90%的人观点不一致。我最开始接触Springboot也是网上看文章来学,也曾经一度错误的理解SpringBoot自动化配置DispatcherServlet是通过DispatcherServletAutoConfiguration配置类来初始化的,但我实际上DEBUG后发现不是这样的。
为此我试了内嵌Tomcat和外置Tomcat的情况,两种都是和网上文章不一致,究竟是我的观点错的,还是网上90%都是错的呢?大家看后给结论吧。内置Tomcat上面已经把原理讲过了就不再讲了,但是提到外置Tomcat我忍不住多提一下SPI机制,啥是SPI咱们后面再讲,我们来看下SpringBoot外置Tomcat是如何操作吧,首先把内置tomcat依赖在maven中给移除掉,并引入Servlet 3规范。
        <dependency>
            <groupId>org.springframework.boot</groupId>
            <artifactId>spring-boot-starter-web</artifactId>
            <exclusions>
                <exclusion>
                    <groupId>org.springframework.boot</groupId>
                    <artifactId>spring-boot-starter-tomcat</artifactId>
                </exclusion>
            </exclusions>
        </dependency>
			  <dependency>
            <groupId>javax.servlet</groupId>
            <artifactId>javax.servlet-api</artifactId>
            <version>3.1.0</version>
            <scope>provided</scope>
        </dependency>
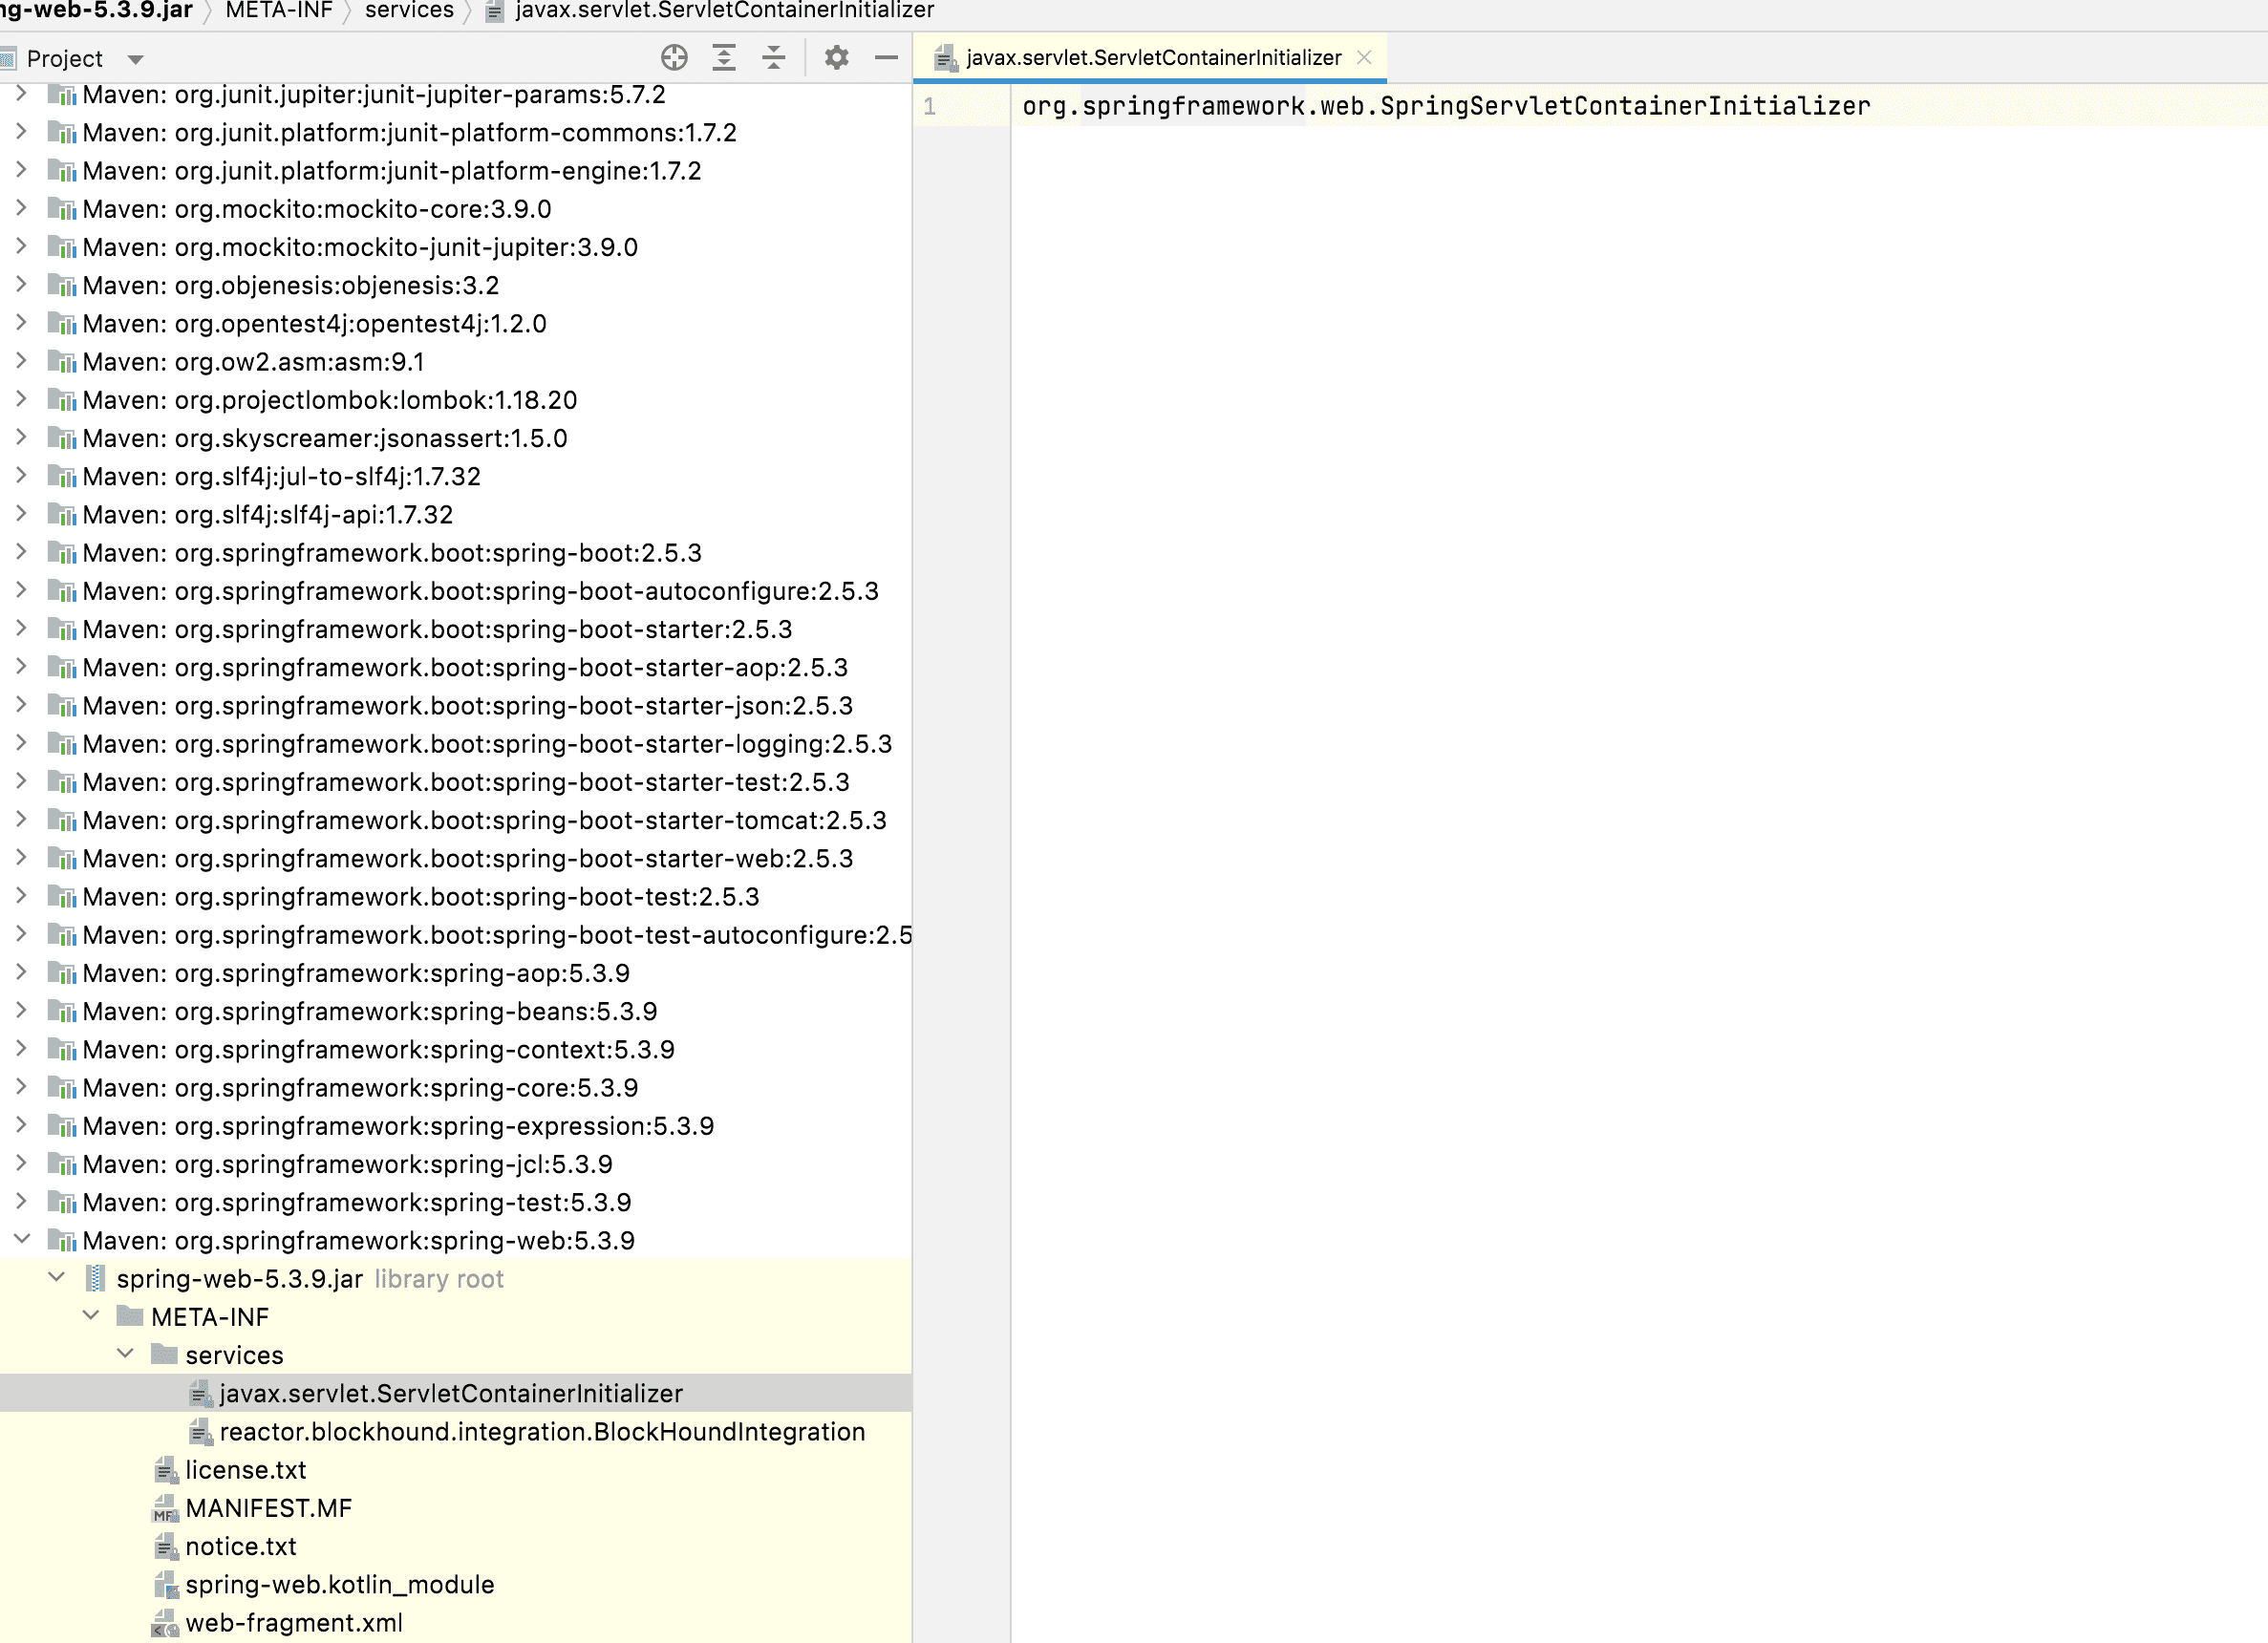
然后在启动类上稍微做些调整就可以了,而SpringBootServletInitializer接口就是Servlet3规范,是配置在/META-INF/services目录下的javax.servlet.ServletContainerInitializer文件中,具体如下:
@SpringBootApplication
public class ZysDemoApplication extends SpringBootServletInitializer implements CommandLineRunner {

    @Override
    protected SpringApplicationBuilder configure(SpringApplicationBuilder builder) {
        return builder.sources(ZysDemoApplication.class);
    }
}
然后再来讲下如何装配DispatcherServlet的,这个DEBUG的过程是比较枯燥的,我直接在初始化DispatcherServlet这个Bean的位置打上断点,看经过哪些步骤。初始化DispatcherServlet这个Bean是在DispatcherServletAutoConfiguration类->DispatcherServletRegistrationConfiguration->dispatcherServletRegistration()方法完成的。我先采用内置Tomcat的方式启动程序看看执行过程。我一步一步反推回去。
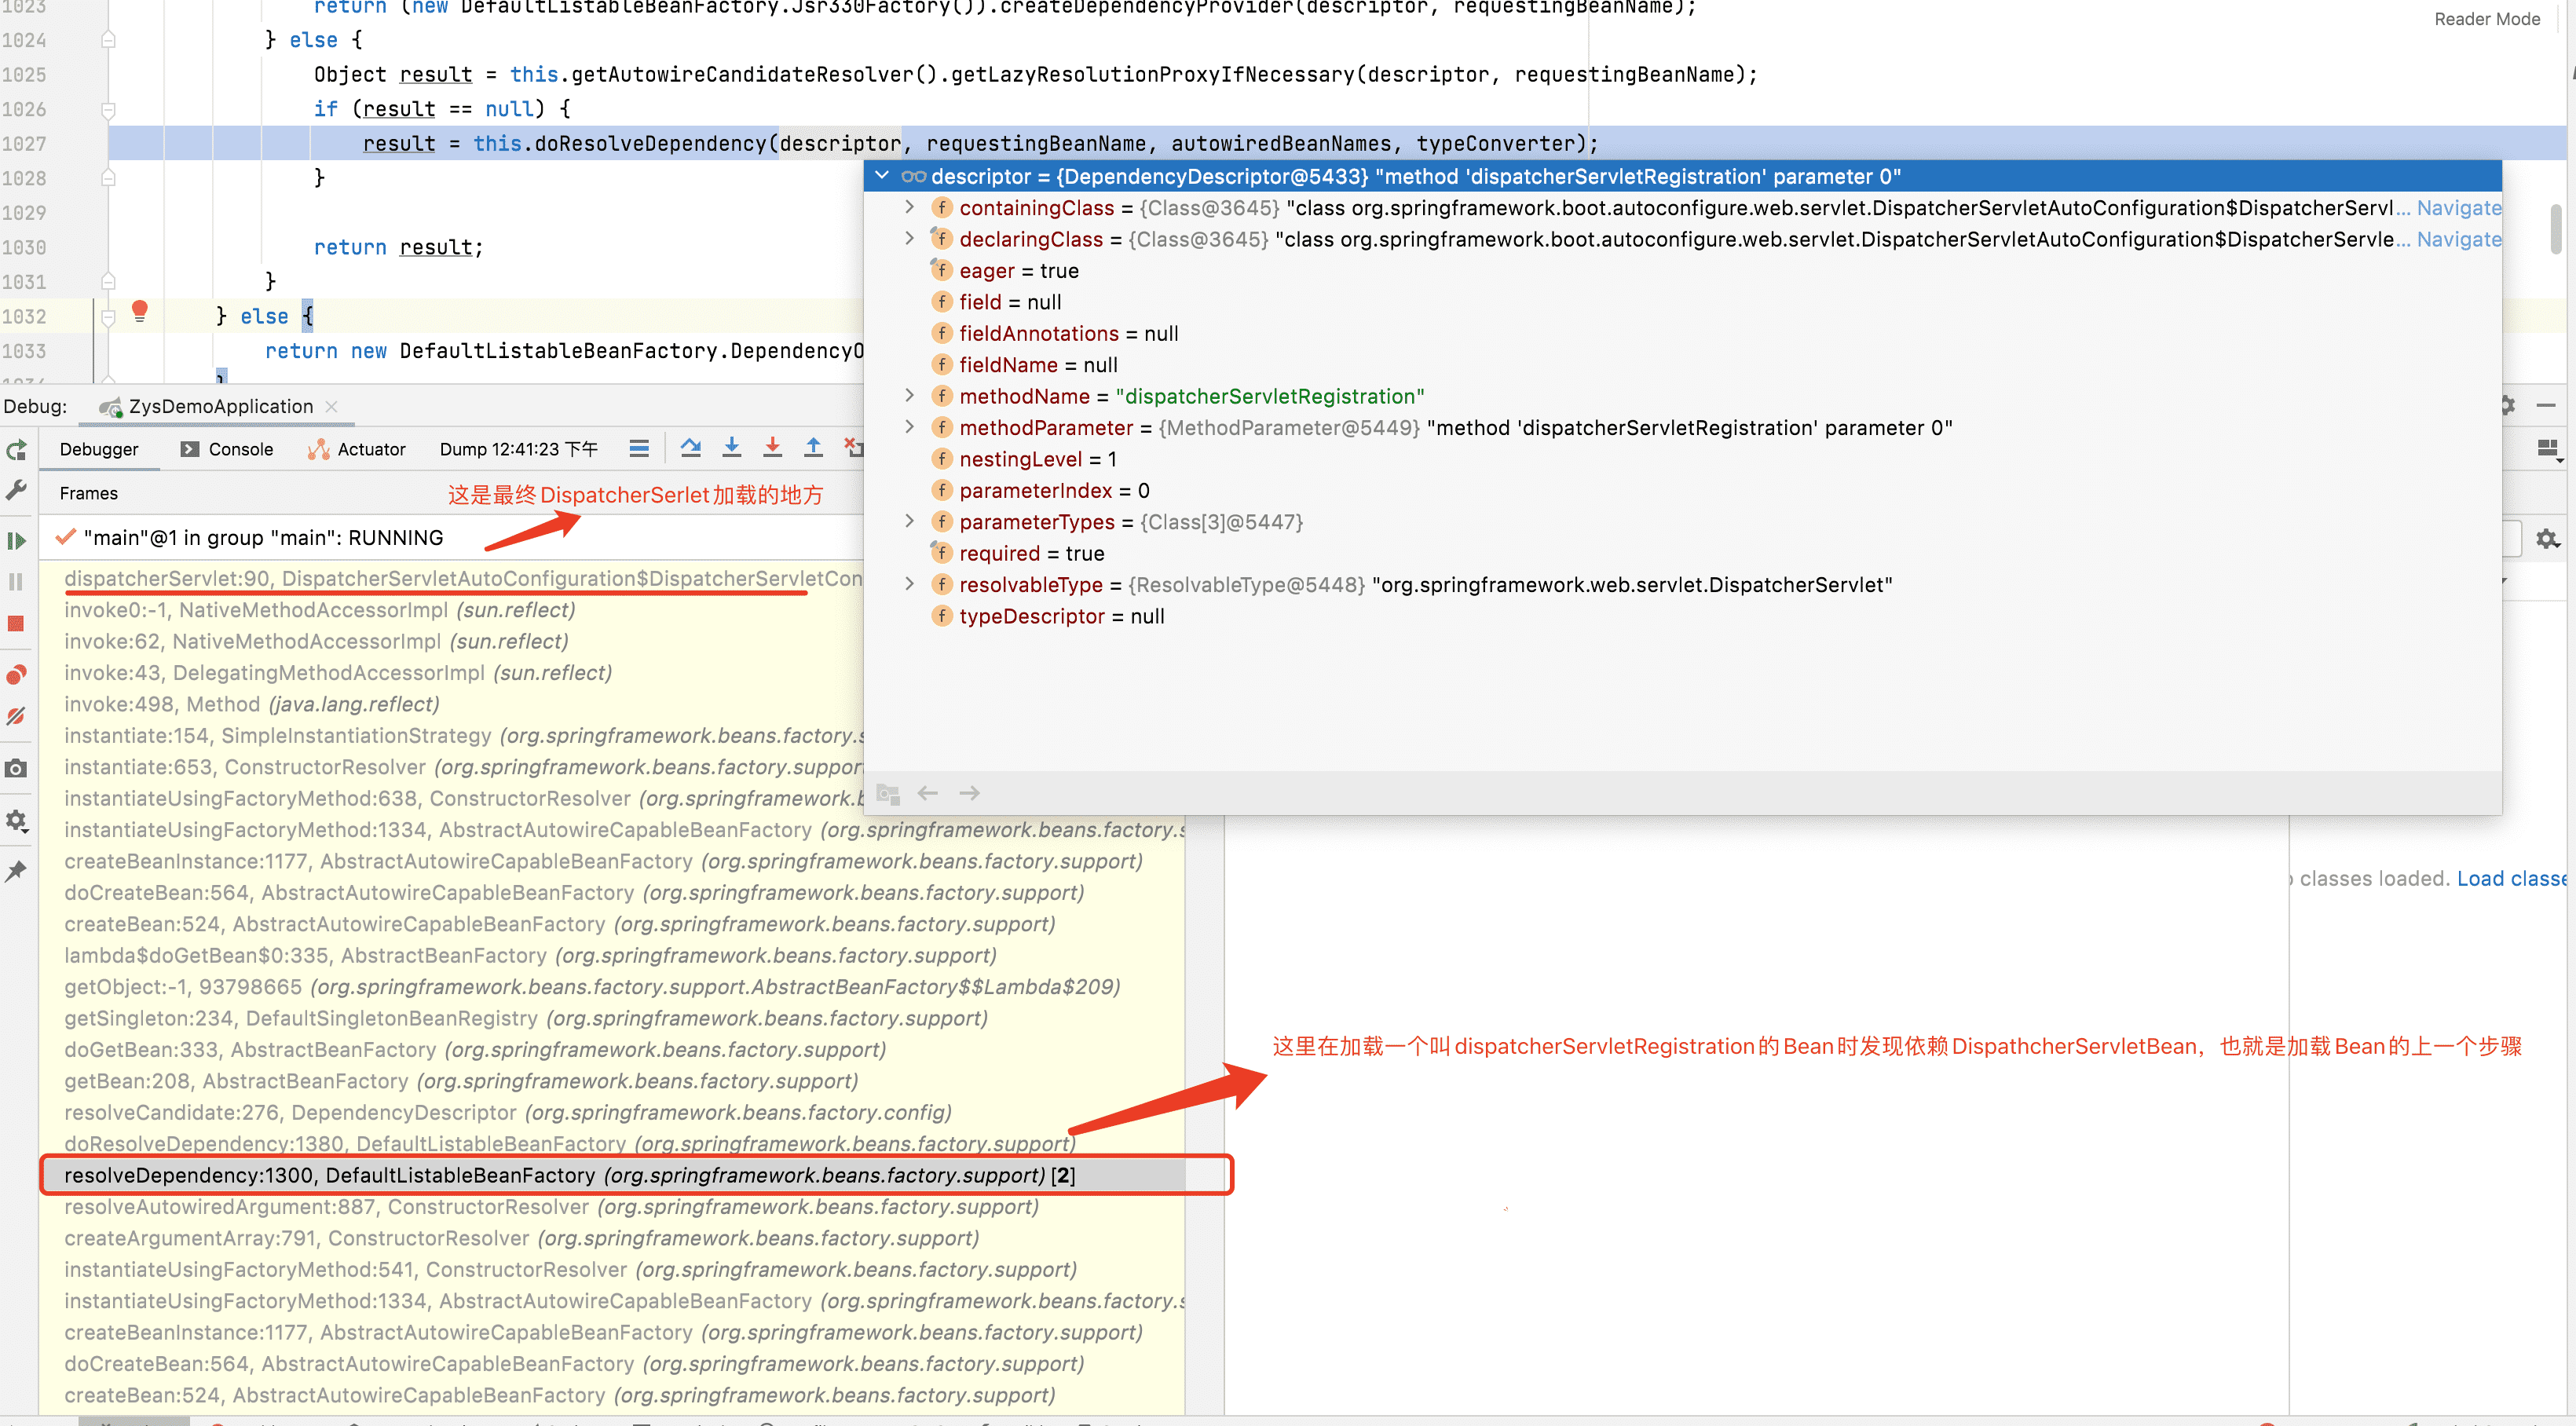
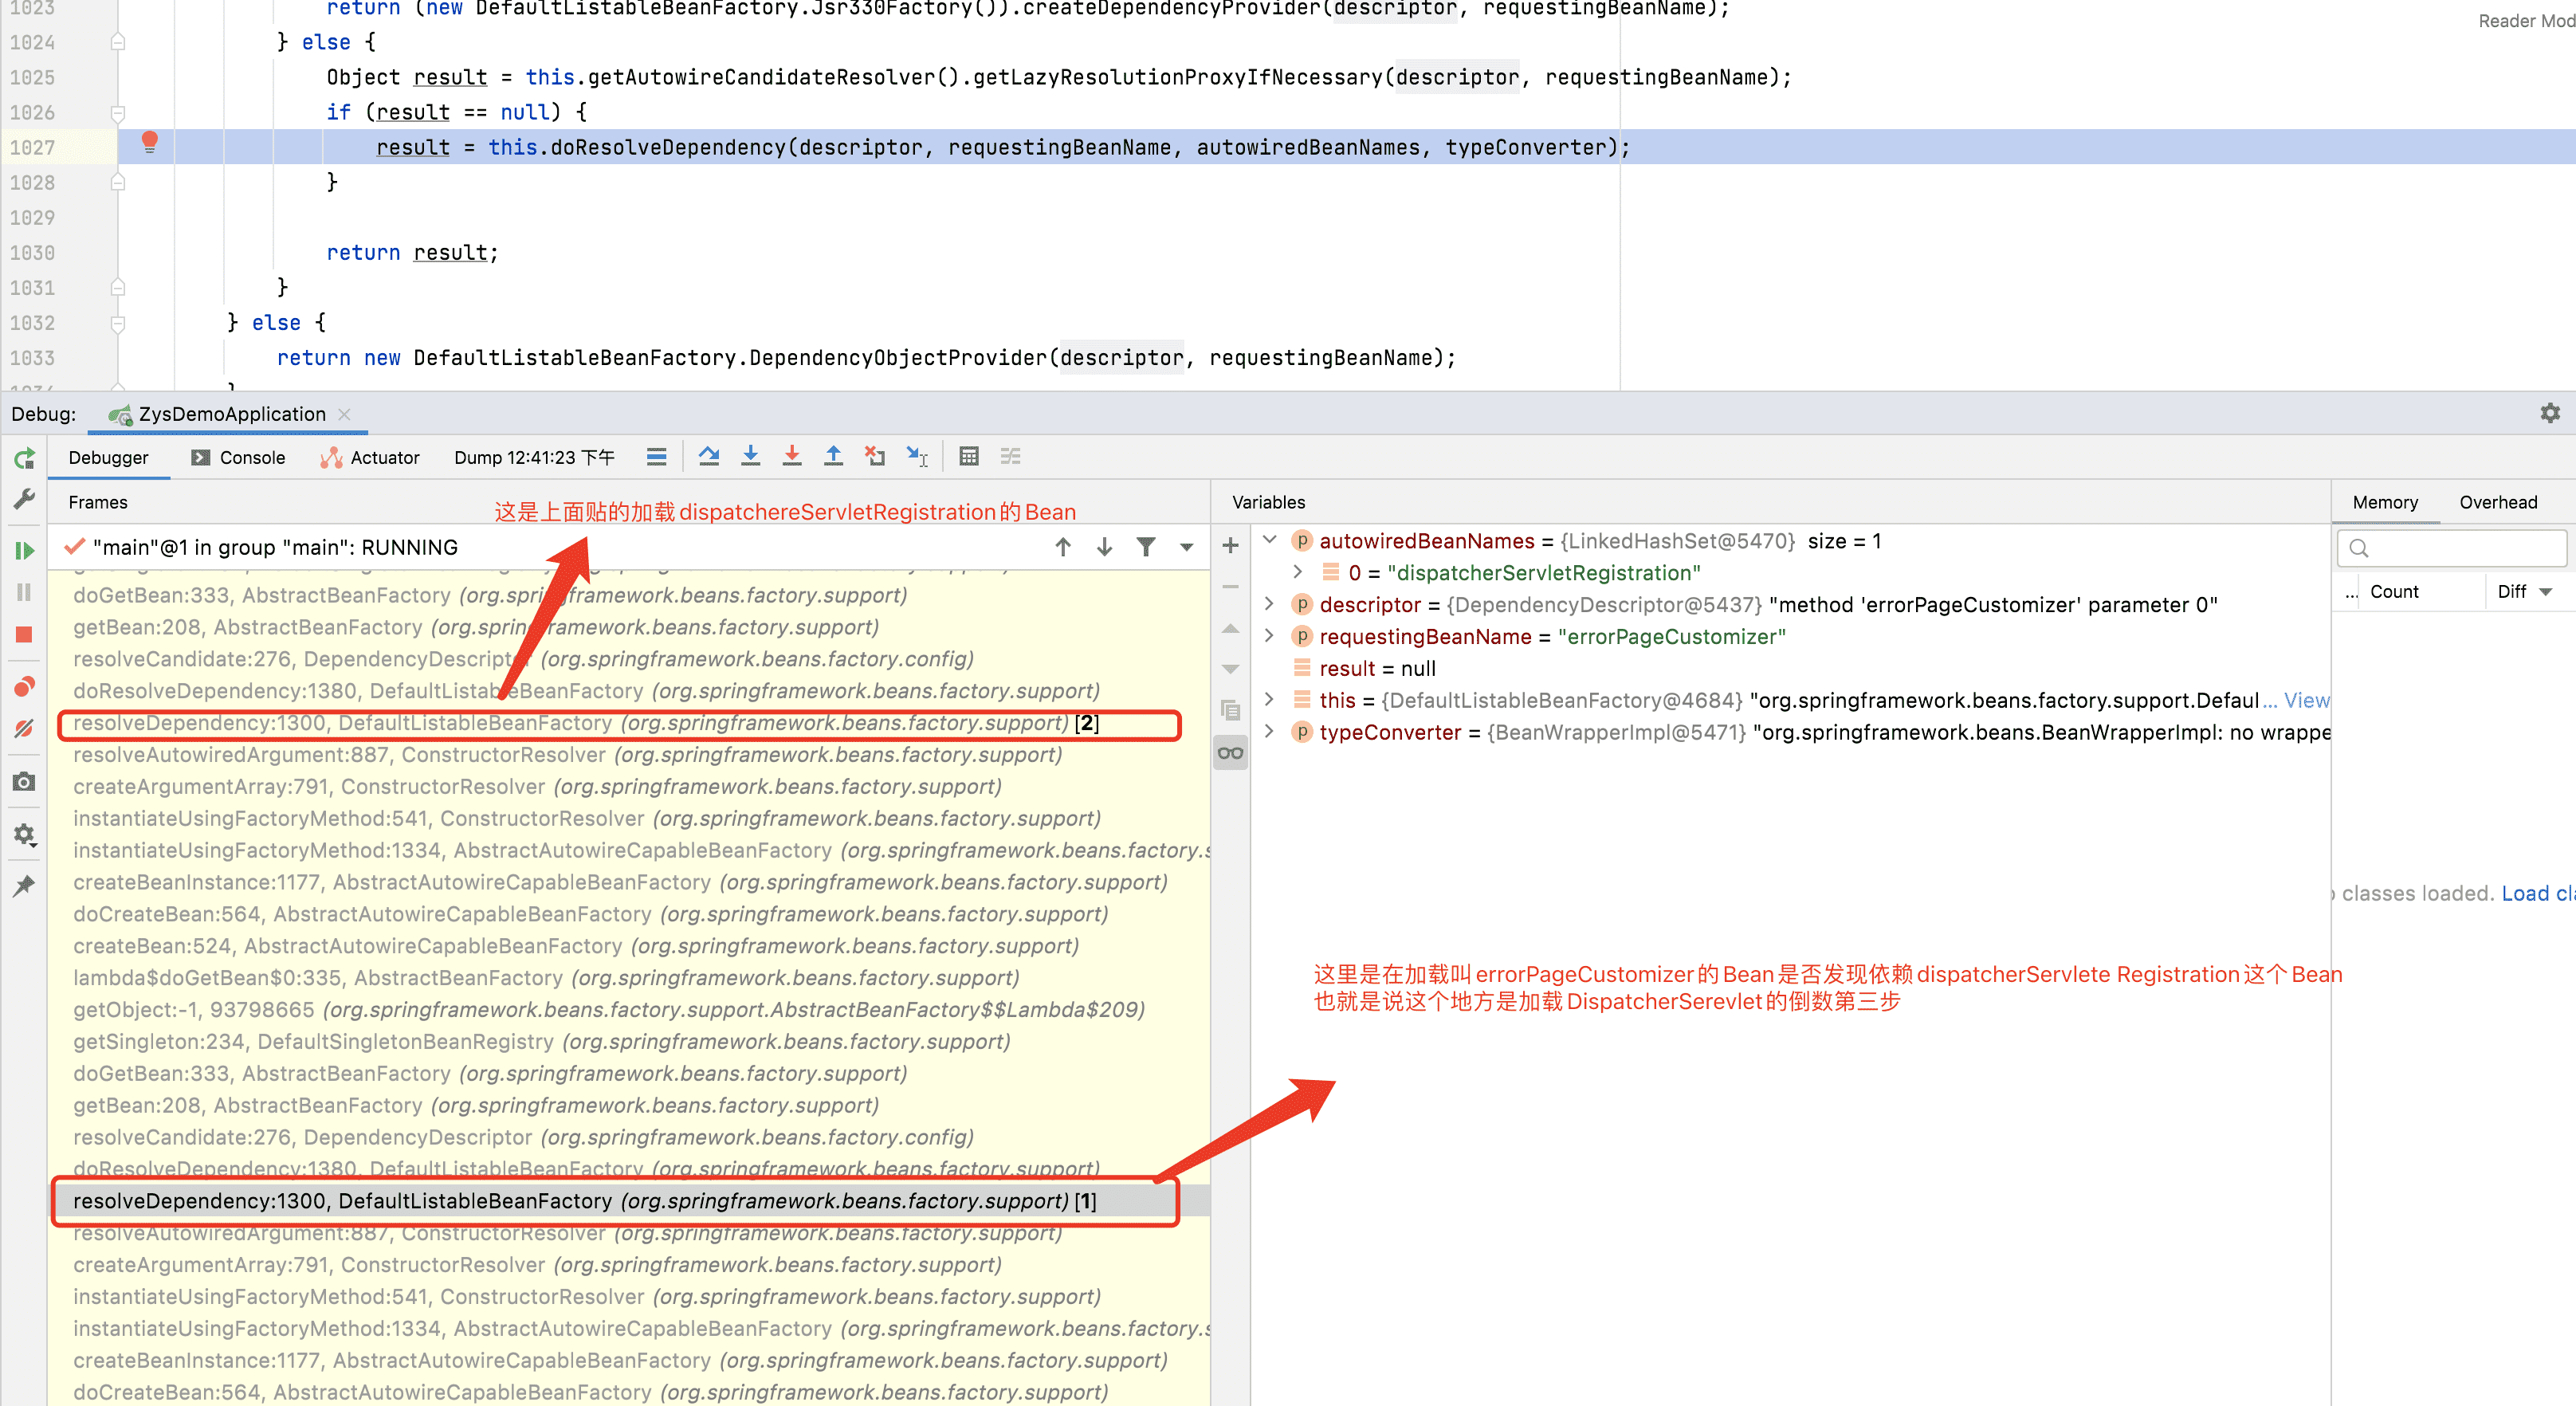

这里在加载一个叫tomcatServleteWebFactory时 因为Bean的生命周期还会执行所有的后置处理器,所以执行了一个后置处理器ErrorPageRegistrarBeanPostProcessor,那么我们再继续找在哪里定义的这个后置处理器呢?
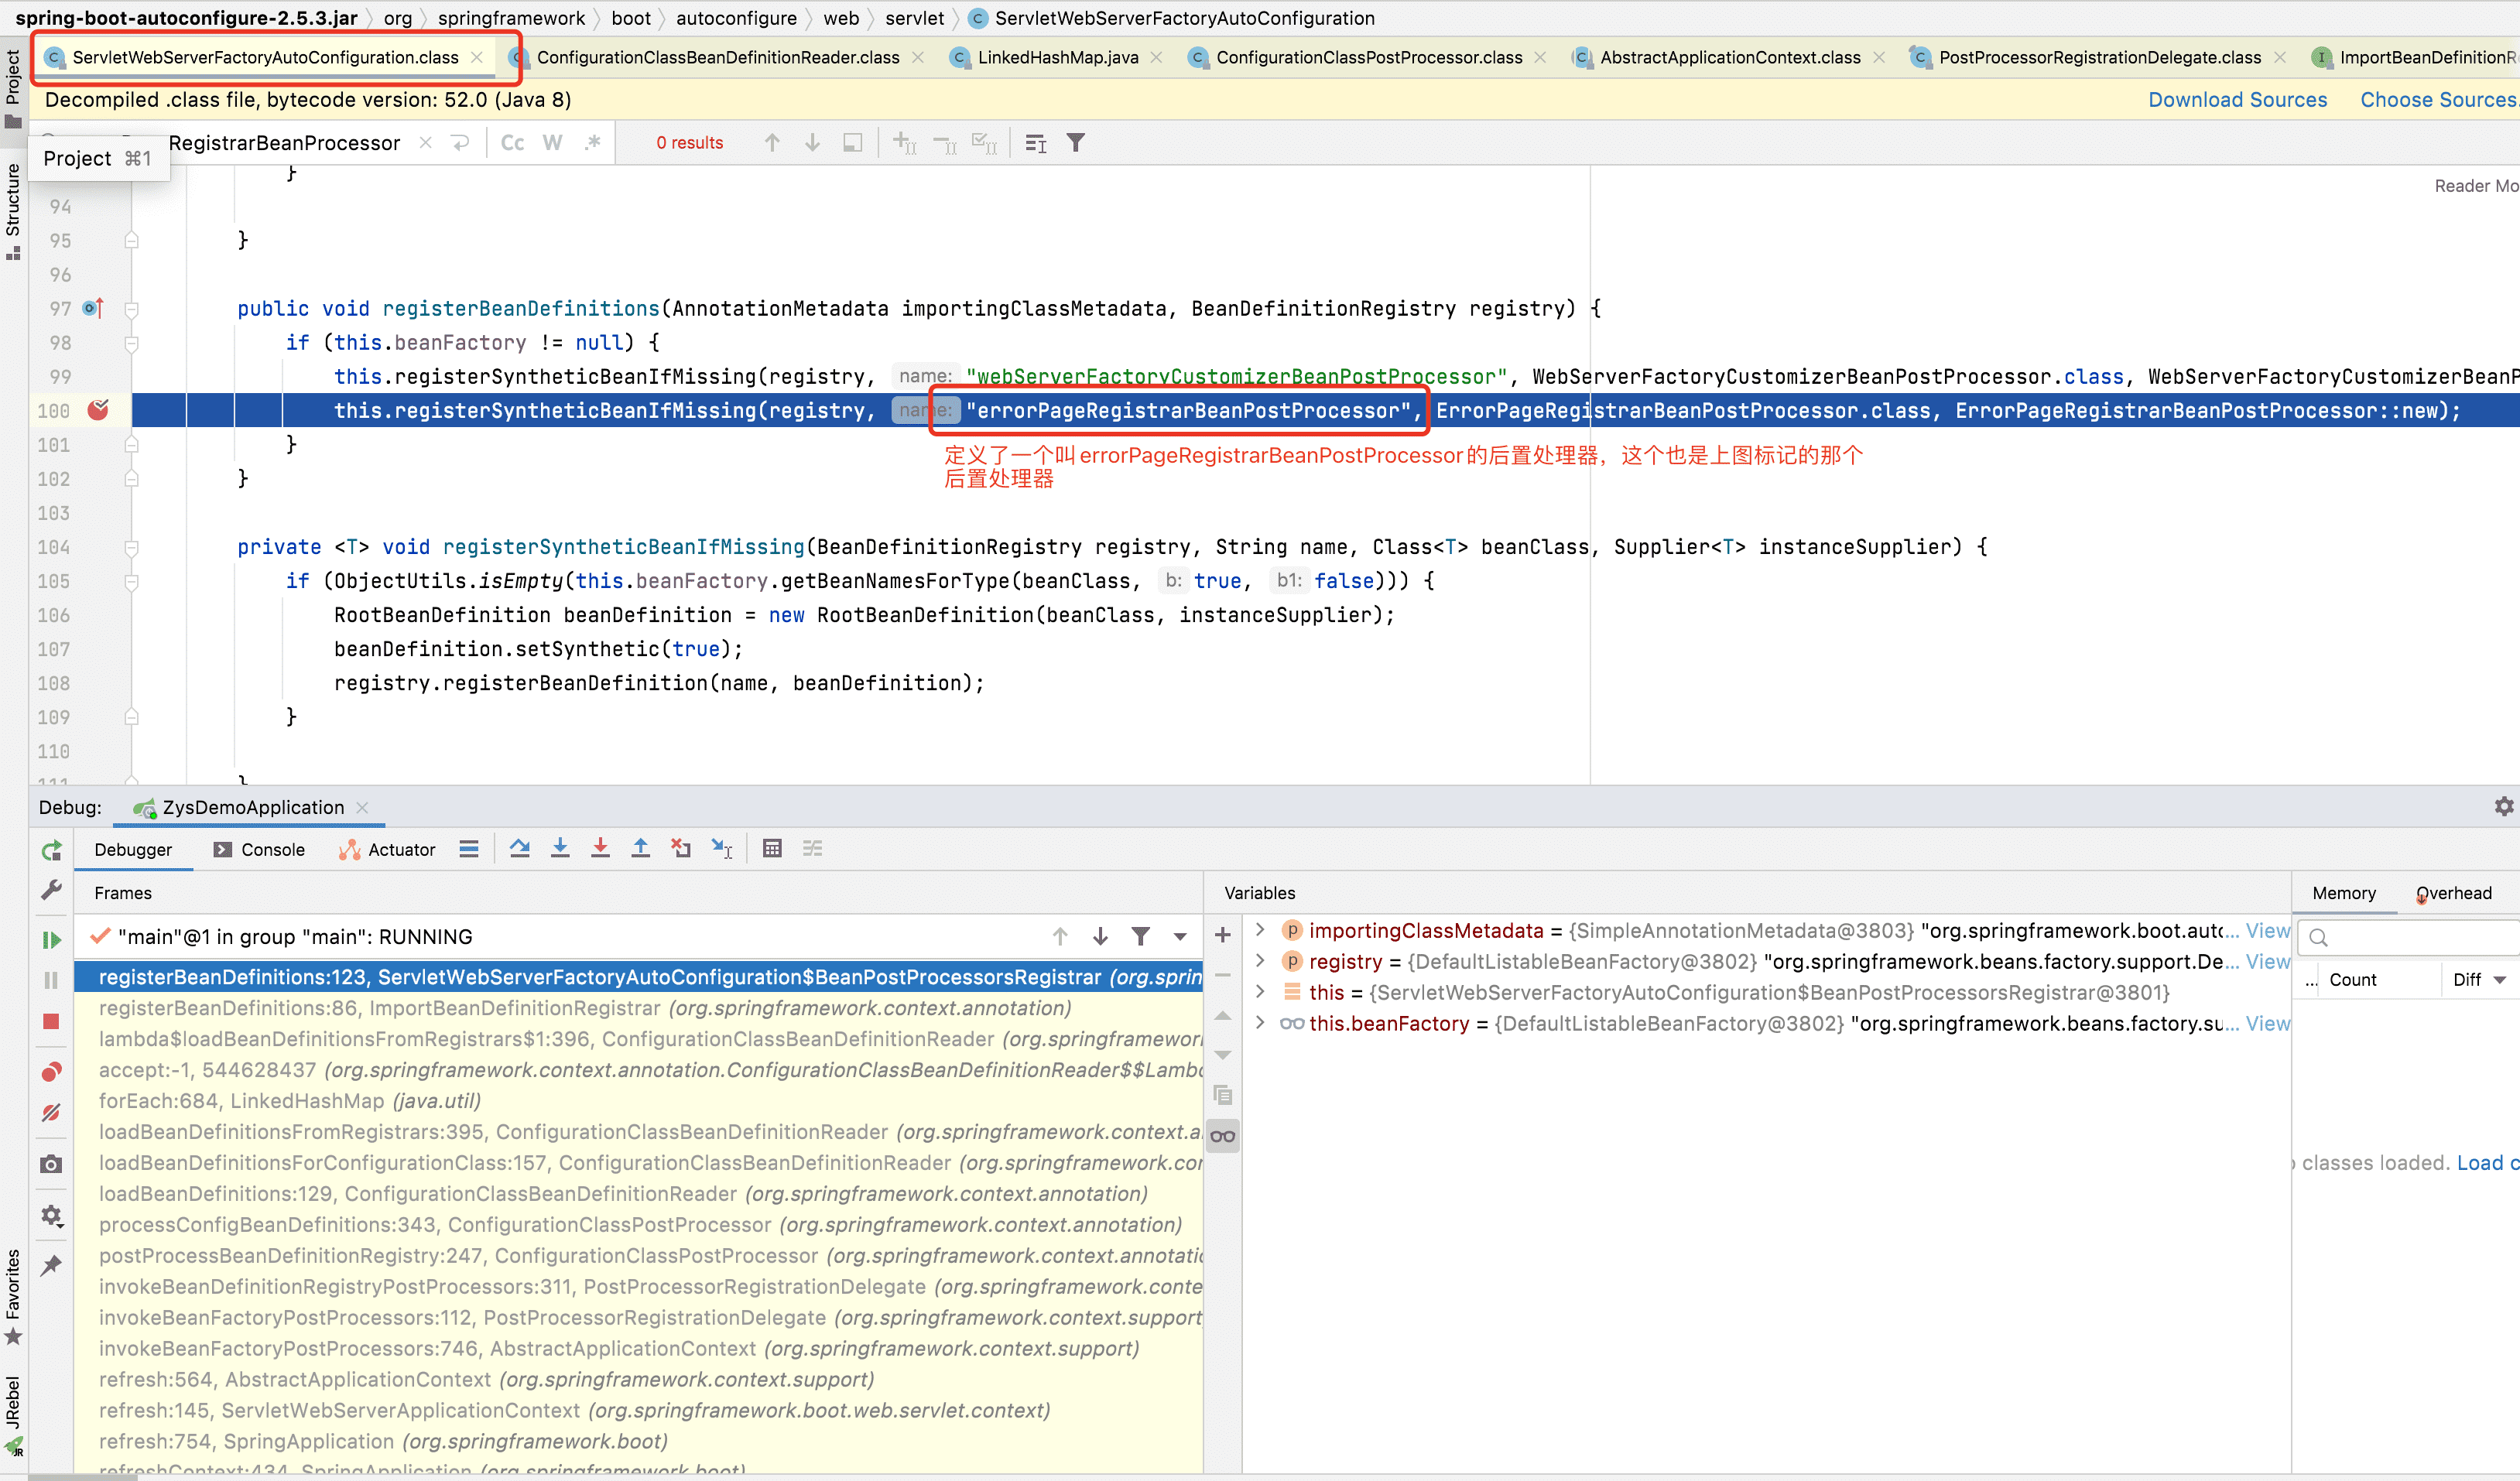
而记忆比较好的朋友可能看到上面在读取spring.factories时有ServletWebServerFactoryAutoConfiguration这个自动化配置类吗,而在DispatcherServletAutoConfiguration这个配置类的上面恰好有个注解@AutoConfigureAfter标记了ServletWebServerFactoryAutoConfiguration
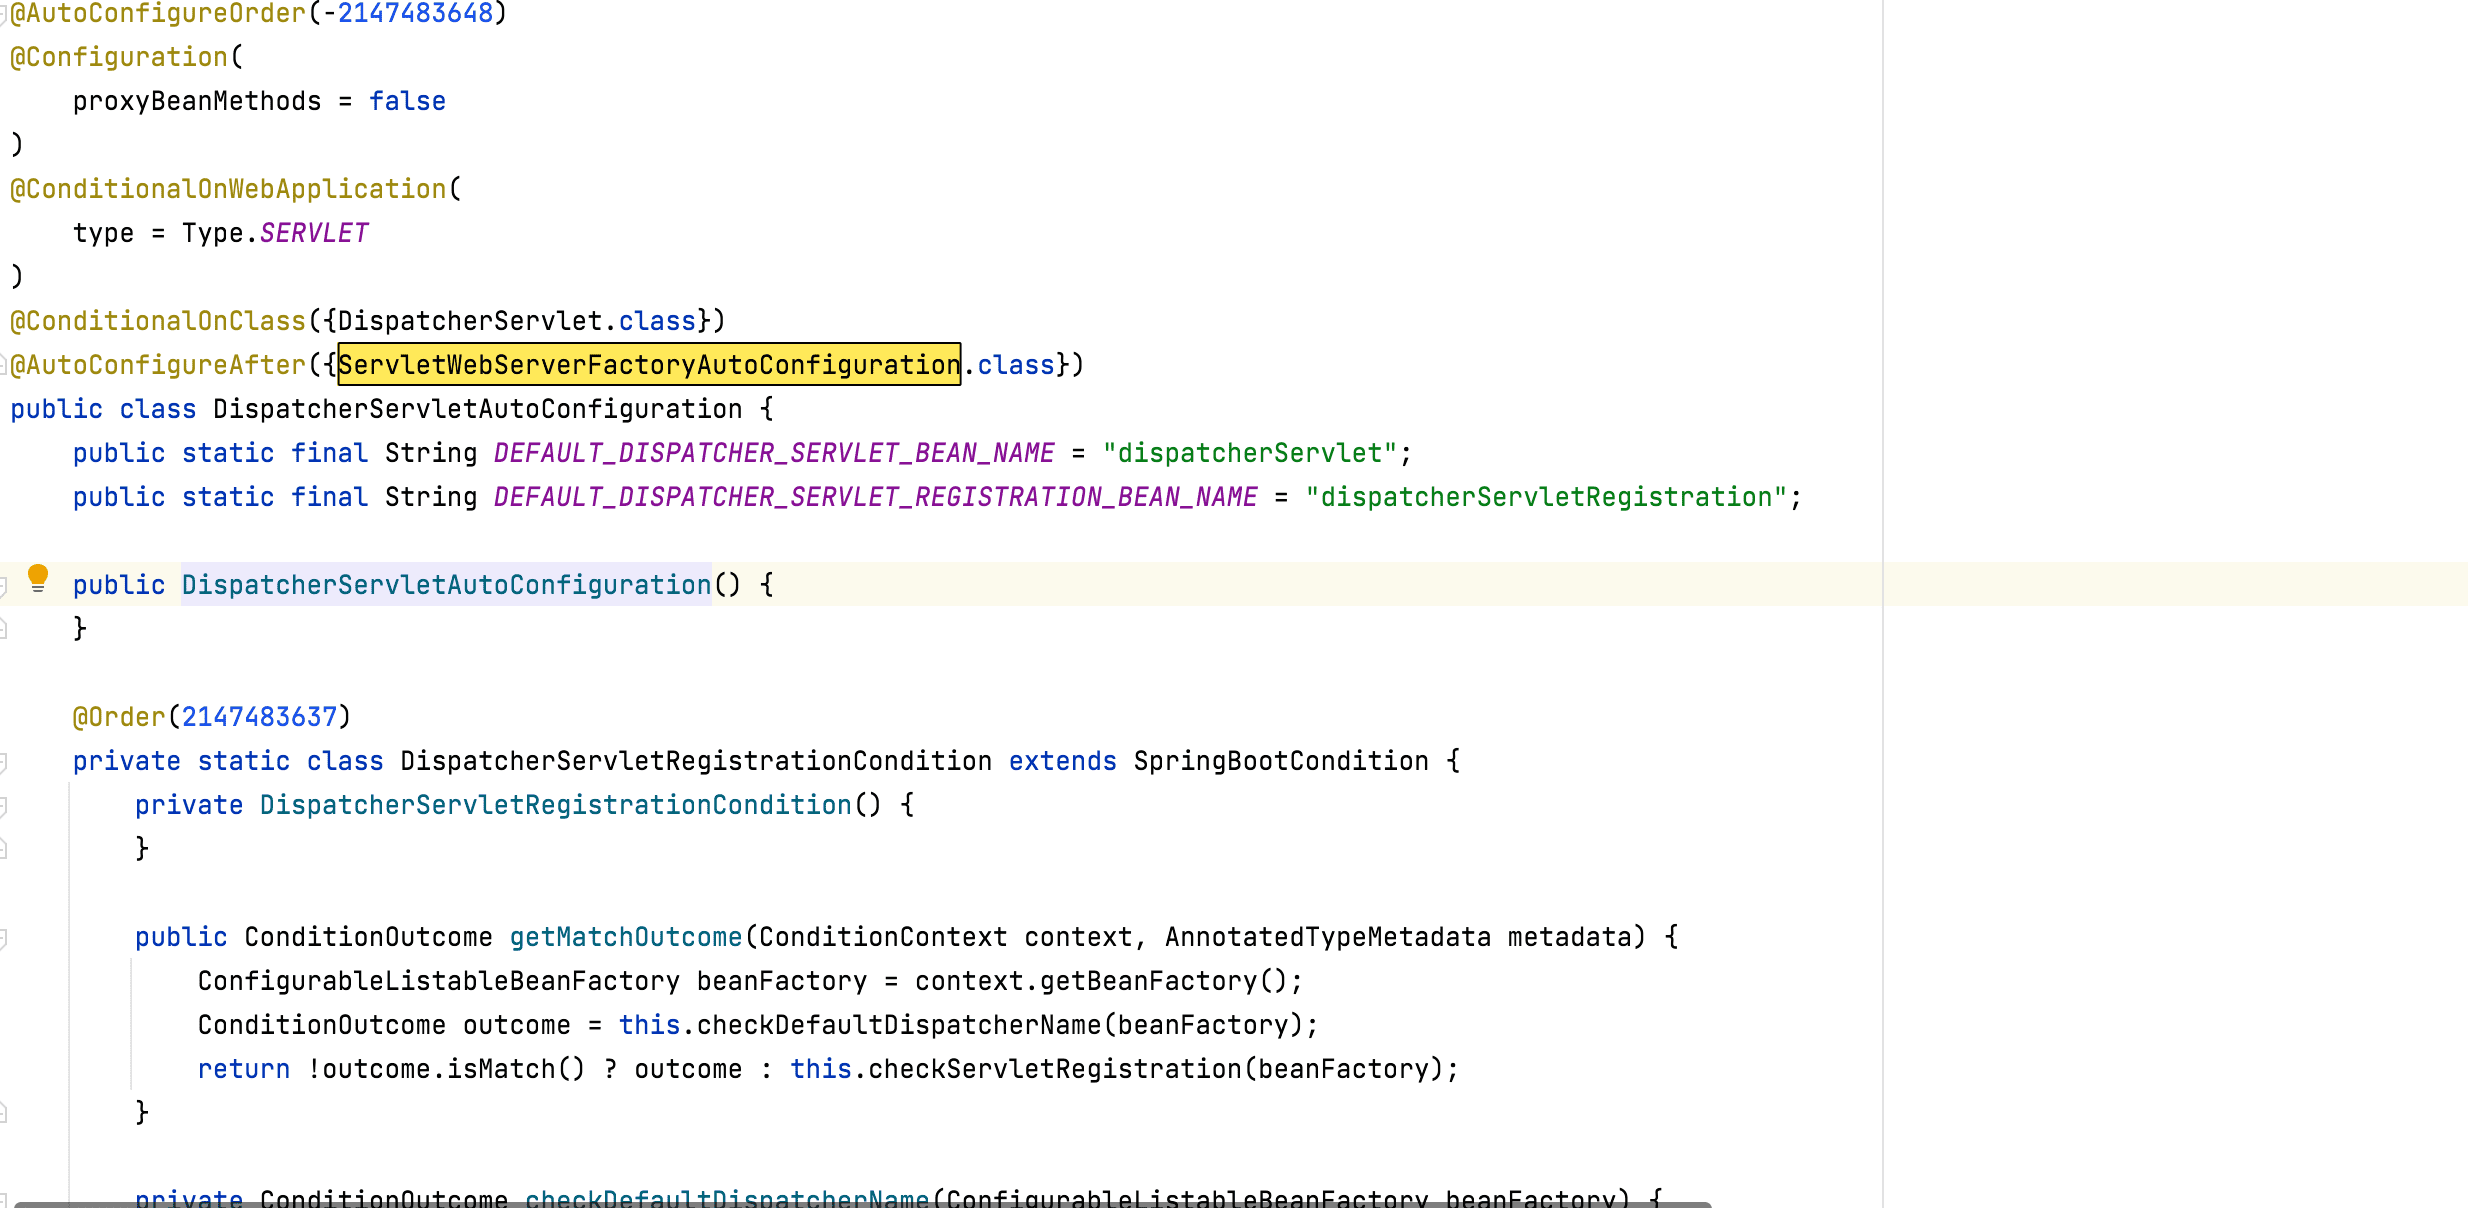
而@AutoConfigureAfter注解是表示在ServletWebServerFactoryAutoConfiguration配置类后才开始加载,所以从我读源码的过程中实例化DispatcherServlet是没有通过DispatcherServletAutoConfiguration配置类来加载的,而ServletWebServerFactoryAutoConfiguration是如何加载的应该不用在讲了吧,上面自动化配置里面有的哦。所以你觉得网上90%的博文讲的对还是我DEBUG的对呢?
可能到这里有朋友不是很清楚的,那我觉得大家可以按照我上面的步骤DEBUG下源码,毕竟文字不是很好描述DEBUG的过程,后续有条件可以通过视频的形式来展现,到此SpringBoot初始化SpringMvc的过程就到这里,有不清楚的朋友关注:Java极客帮 我给你开小灶
到这里我讲了两个自动化配置类,AOP和SpringMvc 大家有没有发现一个规律,就是SpringBoot自动化配置其实就是做了原来Spring XML配置做的事情,就是把组件的核心配置类交给Spring来管理,而在spring管理的配置过程中还有很多配置参数,譬如上传文件的大小,应用的端口,contextPath等,有朋友就想问了,这么多配置我哪记得住呢,不用担心,我给大家准备好了
SpringBoot监控
上面啰啰嗦嗦的把springBoot的特性讲了个大概,讲了内置Tomcat,简化配置,自动化配置,如何去除xml配置,现在来讲讲springBoot的另一个亮点多维度监控,后面自定义一个监控点来实践下。
监控配置
SpringBoot的监控配置也很简单的,在SpringBoot项目中引入下面的依赖就可以了
<dependency>
  <groupId>org.springframework.boot</groupId>
  <artifactId>spring-boot-starter-actuator</artifactId>
</dependency>
然后在启动日志中可以看到以下输出证明一个简单的监控就配置好了
Exposing 1 endpoint(s) beneath base path '/actuator'
Tomcat started on port(s): 8080 (http) with context path ''
Started Demo2Application in 4.704 seconds (JVM running for 12.593)
可以看到SpringBoot默认是暴露了一个/acturator接口,所以在启动后访问http://localhost:8080/actuator是可以看到默认的三个链接,但是仅仅这三个哪够嘛,必须满上!配置参数management.endpoints.web.exposure.include=*表示开启所有监控扩展点
{
  "_links": {
    "self": {
      "href": "http://localhost:8080/actuator",
      "templated": false
    },
    "loggers-name": {
      "href": "http://localhost:8080/actuator/loggers/{name}",
      "templated": true
    },
    "loggers": {
      "href": "http://localhost:8080/actuator/loggers",
      "templated": false
    },
    "mappings": {
      "href": "http://localhost:8080/actuator/mappings",
      "templated": false
    },
    "metrics-requiredMetricName": {
      "href": "http://localhost:8080/actuator/metrics/{requiredMetricName}",
      "templated": true
    },
    "metrics": {
      "href": "http://localhost:8080/actuator/metrics",
      "templated": false
    },
    "threaddump": {
      "href": "http://localhost:8080/actuator/threaddump",
      "templated": false
    },
    "configprops": {
      "href": "http://localhost:8080/actuator/configprops",
      "templated": false
    },
    "configprops-prefix": {
      "href": "http://localhost:8080/actuator/configprops/{prefix}",
      "templated": true
    },
    "info": {
      "href": "http://localhost:8080/actuator/info",
      "templated": false
    },
    "env": {
      "href": "http://localhost:8080/actuator/env",
      "templated": false
    },
    "env-toMatch": {
      "href": "http://localhost:8080/actuator/env/{toMatch}",
      "templated": true
    },
    "scheduledtasks": {
      "href": "http://localhost:8080/actuator/scheduledtasks",
      "templated": false
    },
    "beans": {
      "href": "http://localhost:8080/actuator/beans",
      "templated": false
    },
    "caches": {
      "href": "http://localhost:8080/actuator/caches",
      "templated": false
    },
    "caches-cache": {
      "href": "http://localhost:8080/actuator/caches/{cache}",
      "templated": true
    },
    "conditions": {
      "href": "http://localhost:8080/actuator/conditions",
      "templated": false
    },
    "heapdump": {
      "href": "http://localhost:8080/actuator/heapdump",
      "templated": false
    },
    "health-path": {
      "href": "http://localhost:8080/actuator/health/{*path}",
      "templated": true
    },
    "health": {
      "href": "http://localhost:8080/actuator/health",
      "templated": false
    }
  }
}
各种监控点应有尽有,比如通过health查看应用及各依赖组件的运用状况,通过heapdump可以打包下载HotSpot JVM的dump文件,通过beans可以看到spring容器的bean对象,env可以看到环境变量,操作系统,端口等。是不是要比之前的应用的监控更多呢
关于这些监控其实都是非常敏感的,所以小伙伴如果要在生产环境开启监控的话需要做一些安全策略,比如可以和 Spring Security 集成,或者关闭一些敏感的监控等,这里就不详细讲如果保护监控点了。
集成其他扩展监控
接下来讲些扩展信息,有些有经验的小可爱就可能对这些指标性的监控有意见了,给我看这些有啥用?静态的数据我看都不想看,能不能给我一个驾驶舱视感的监控?巧了,还真有,安排!
在官网上展示了可以集成的监控套件。地址:
https://docs.spring.io/spring-boot/docs/current/reference/html/actuator.html#actuator.metrics.export
具体支持以下套件,我就随便挑选一个吧,就Prometheus吧,因为名字比较好听,普罗米修斯
- 6.2.1. AppOptics
- 6.2.2. Atlas
- 6.2.3. Datadog
- 6.2.4. Dynatrace
- 6.2.5. Elastic
- 6.2.6. Ganglia
- 6.2.7. Graphite
- 6.2.8. Humio
- 6.2.9. Influx
- 6.2.10. JMX
- 6.2.11. KairosDB
- 6.2.12. New Relic
- 6.2.13. Prometheus
- 6.2.14. SignalFx
- 6.2.15. Simple
- 6.2.16. Stackdriver
- 6.2.17. StatsD
- 6.2.18. Wavefront
集成普罗米修斯也比较简单,首先引入相关依赖
<dependency>
    <groupId>io.prometheus</groupId>
    <artifactId>simpleclient_pushgateway</artifactId>
</dependency>
然后启动SpringBoot项目,可以看到监控点多了个链接,他就是普罗米修斯的监控点
// 省略部分其他监控点
"metrics": {
  "href": "http://localhost:8080/actuator/metrics",
  "templated": false
},
"prometheus": {
  "href": "http://localhost:8080/actuator/prometheus",
  "templated": false
},
"configprops": {
  "href": "http://localhost:8080/actuator/configprops",
  "templated": false
}
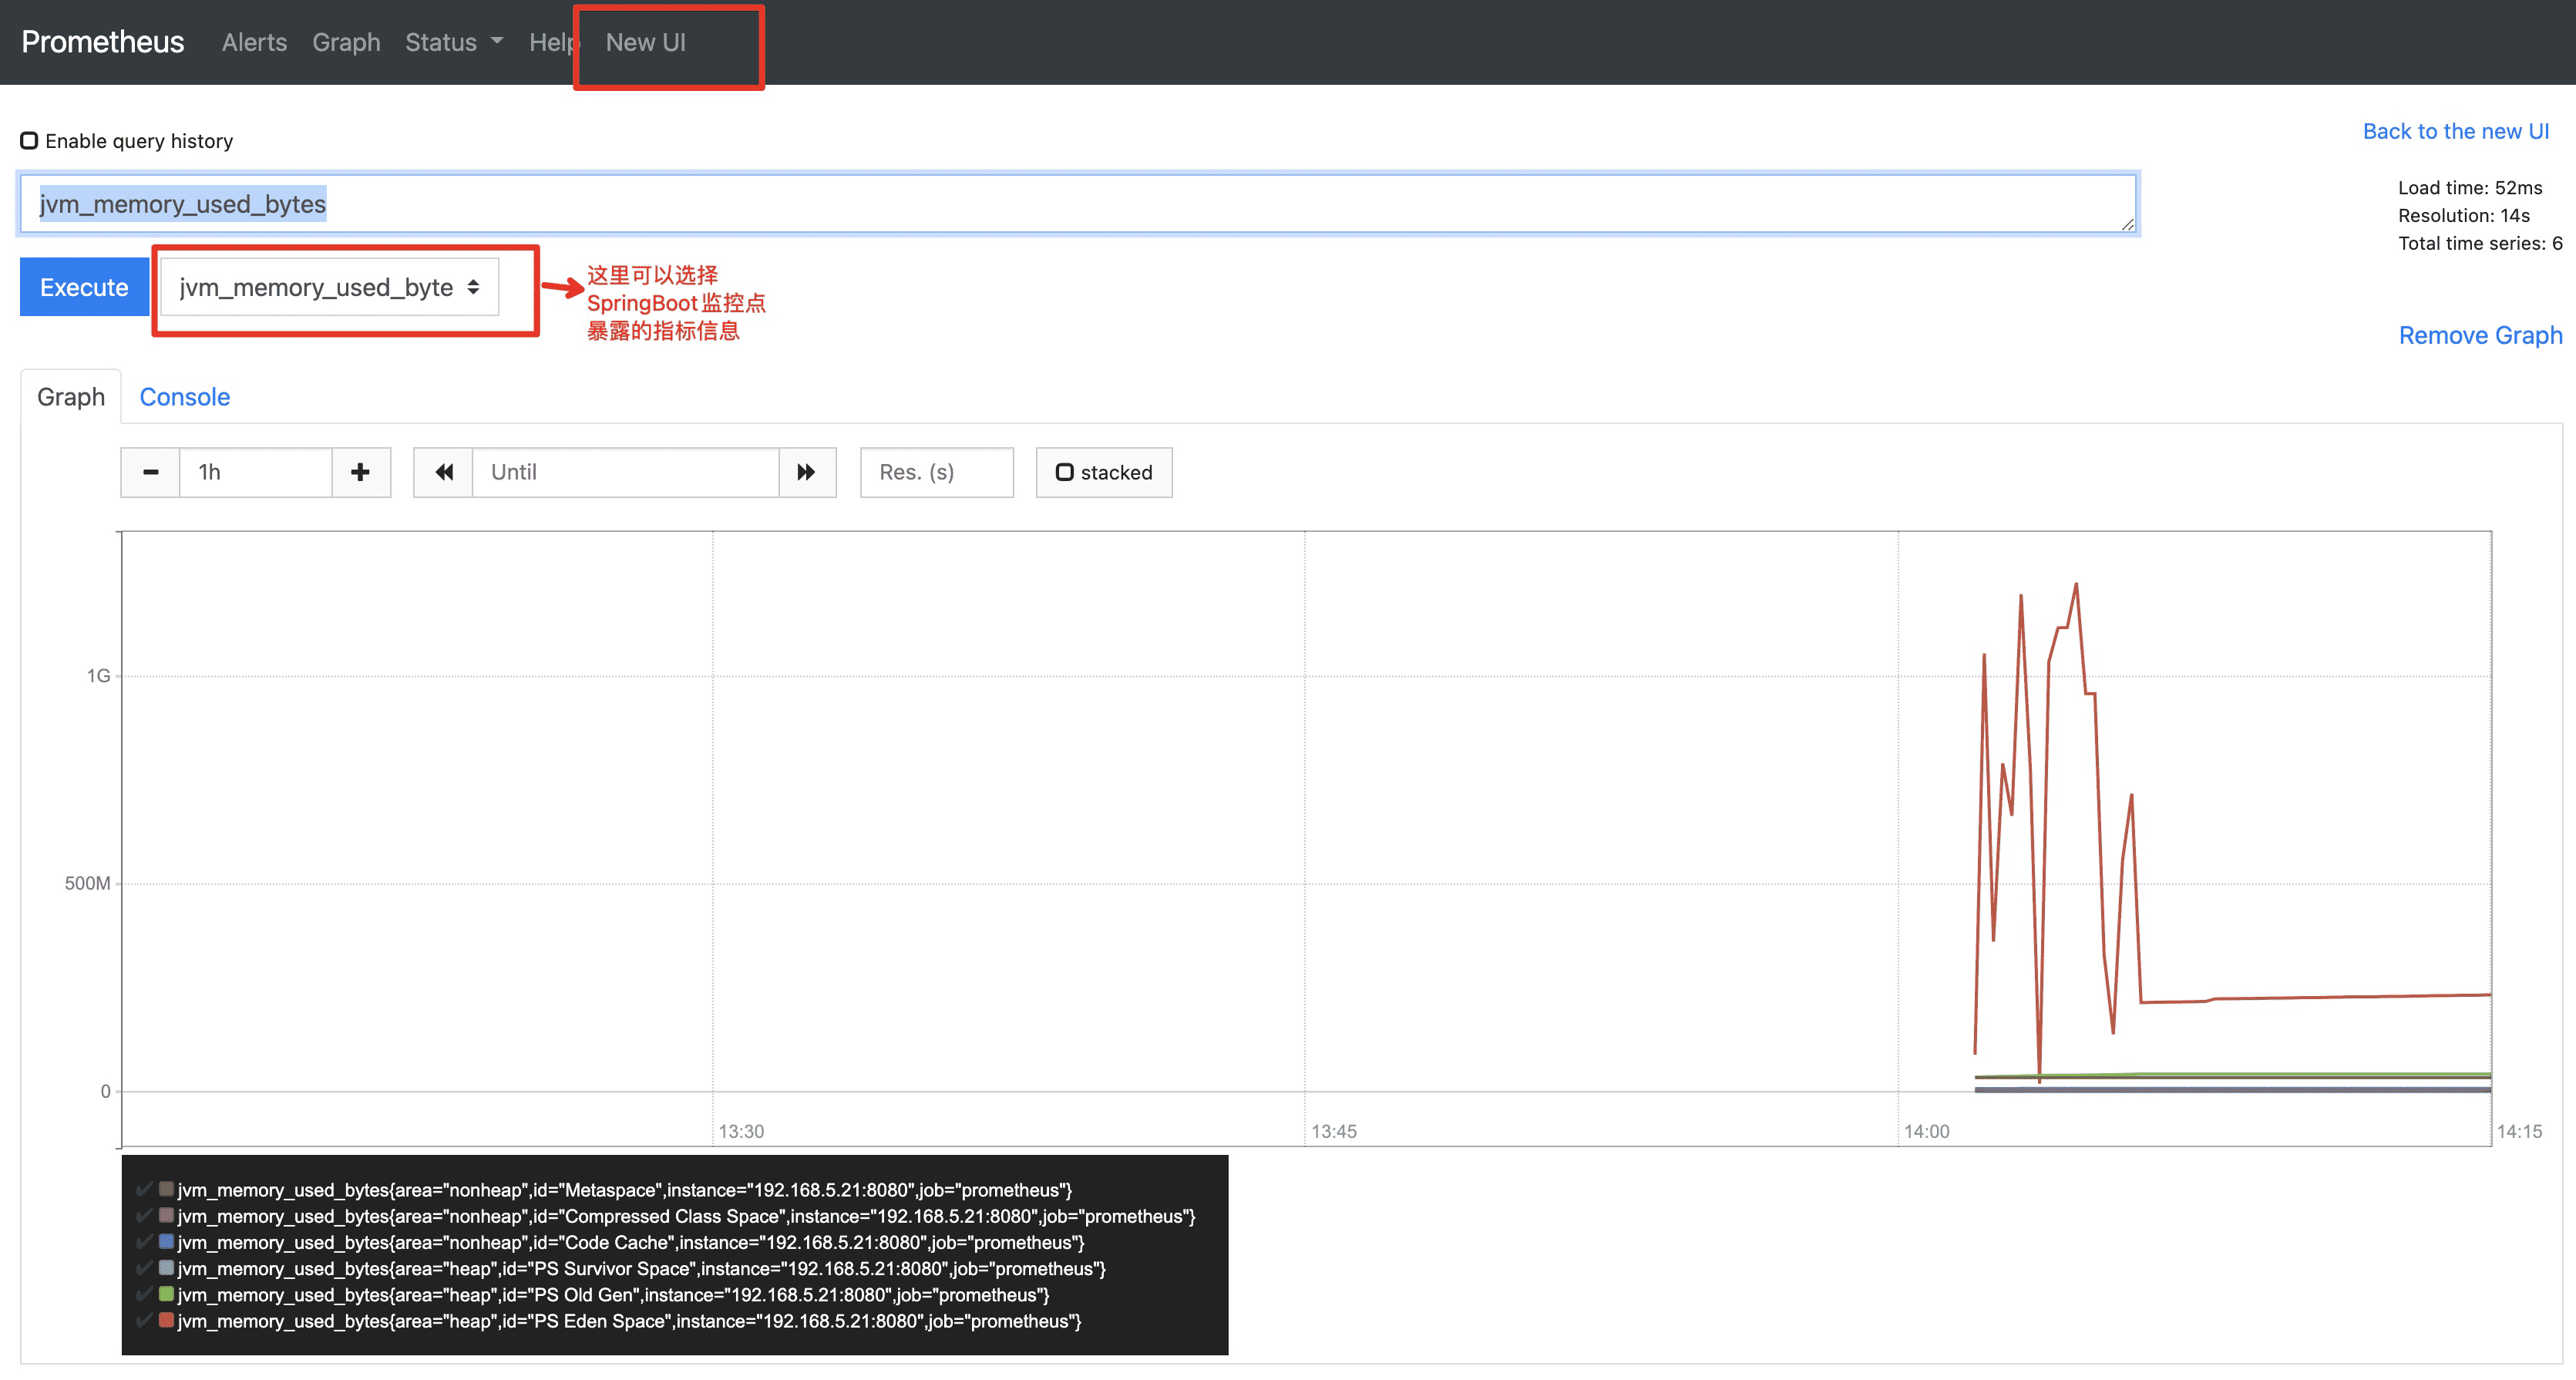
点开普罗米修斯监控点的链接可以看到很多监控指标,比如线程相关的,jvm相关的等。

当然从这些数据指标肯定不直观对吧,那么就点图表的展示吧,接下来看如何集成普罗米修斯吧。在SpringBoot这边能看到上面的这些信息就差不多了,普罗米修斯是个第三方的监控软件。我这里就主要讲SpringBoot的监控功能,其他组件实际操作就省略,有兴趣的朋友可以关注我VX:Java极客帮,我当读开小灶。
普罗米修斯官网:https://prometheus.io
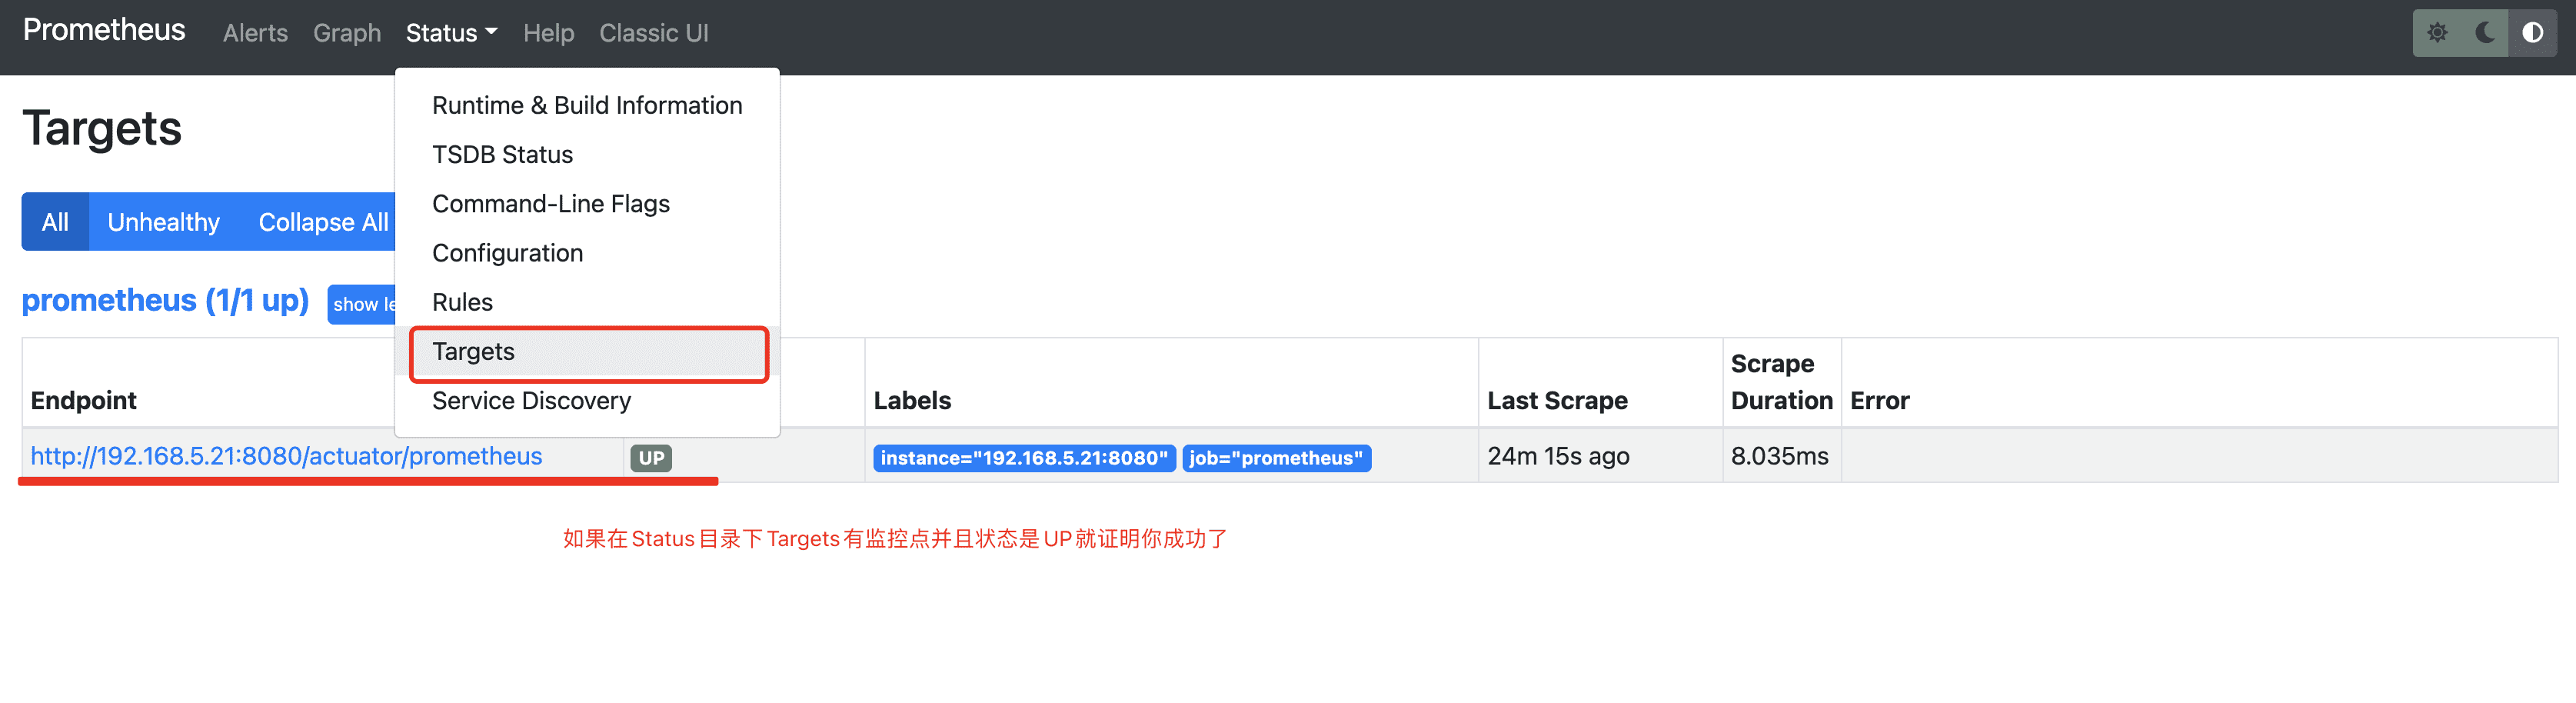
下载对应版本安装后修改下prometheus.yml配置文件。我贴下我的修改地方
scrape_configs:
  # The job name is added as a label `job=<job_name>` to any timeseries scraped from this config.
  - job_name: "prometheus"

    # metrics_path defaults to '/metrics'
    # scheme defaults to 'http'.
    # springBoot的普罗米修斯监控点
    metrics_path: 'actuator/prometheus'
    static_configs:
      # springboot项目地址
      - targets: ["192.168.5.21:8080"]
Grafana展示和集成
看到这里普罗米修斯的监控点就展示完成了,是不是还是很简单呢?但有些极致的朋友肯定想说就这样的监控图标就是驾驶舱体验?所以我给大家还准备了一手,先看效果图咋样
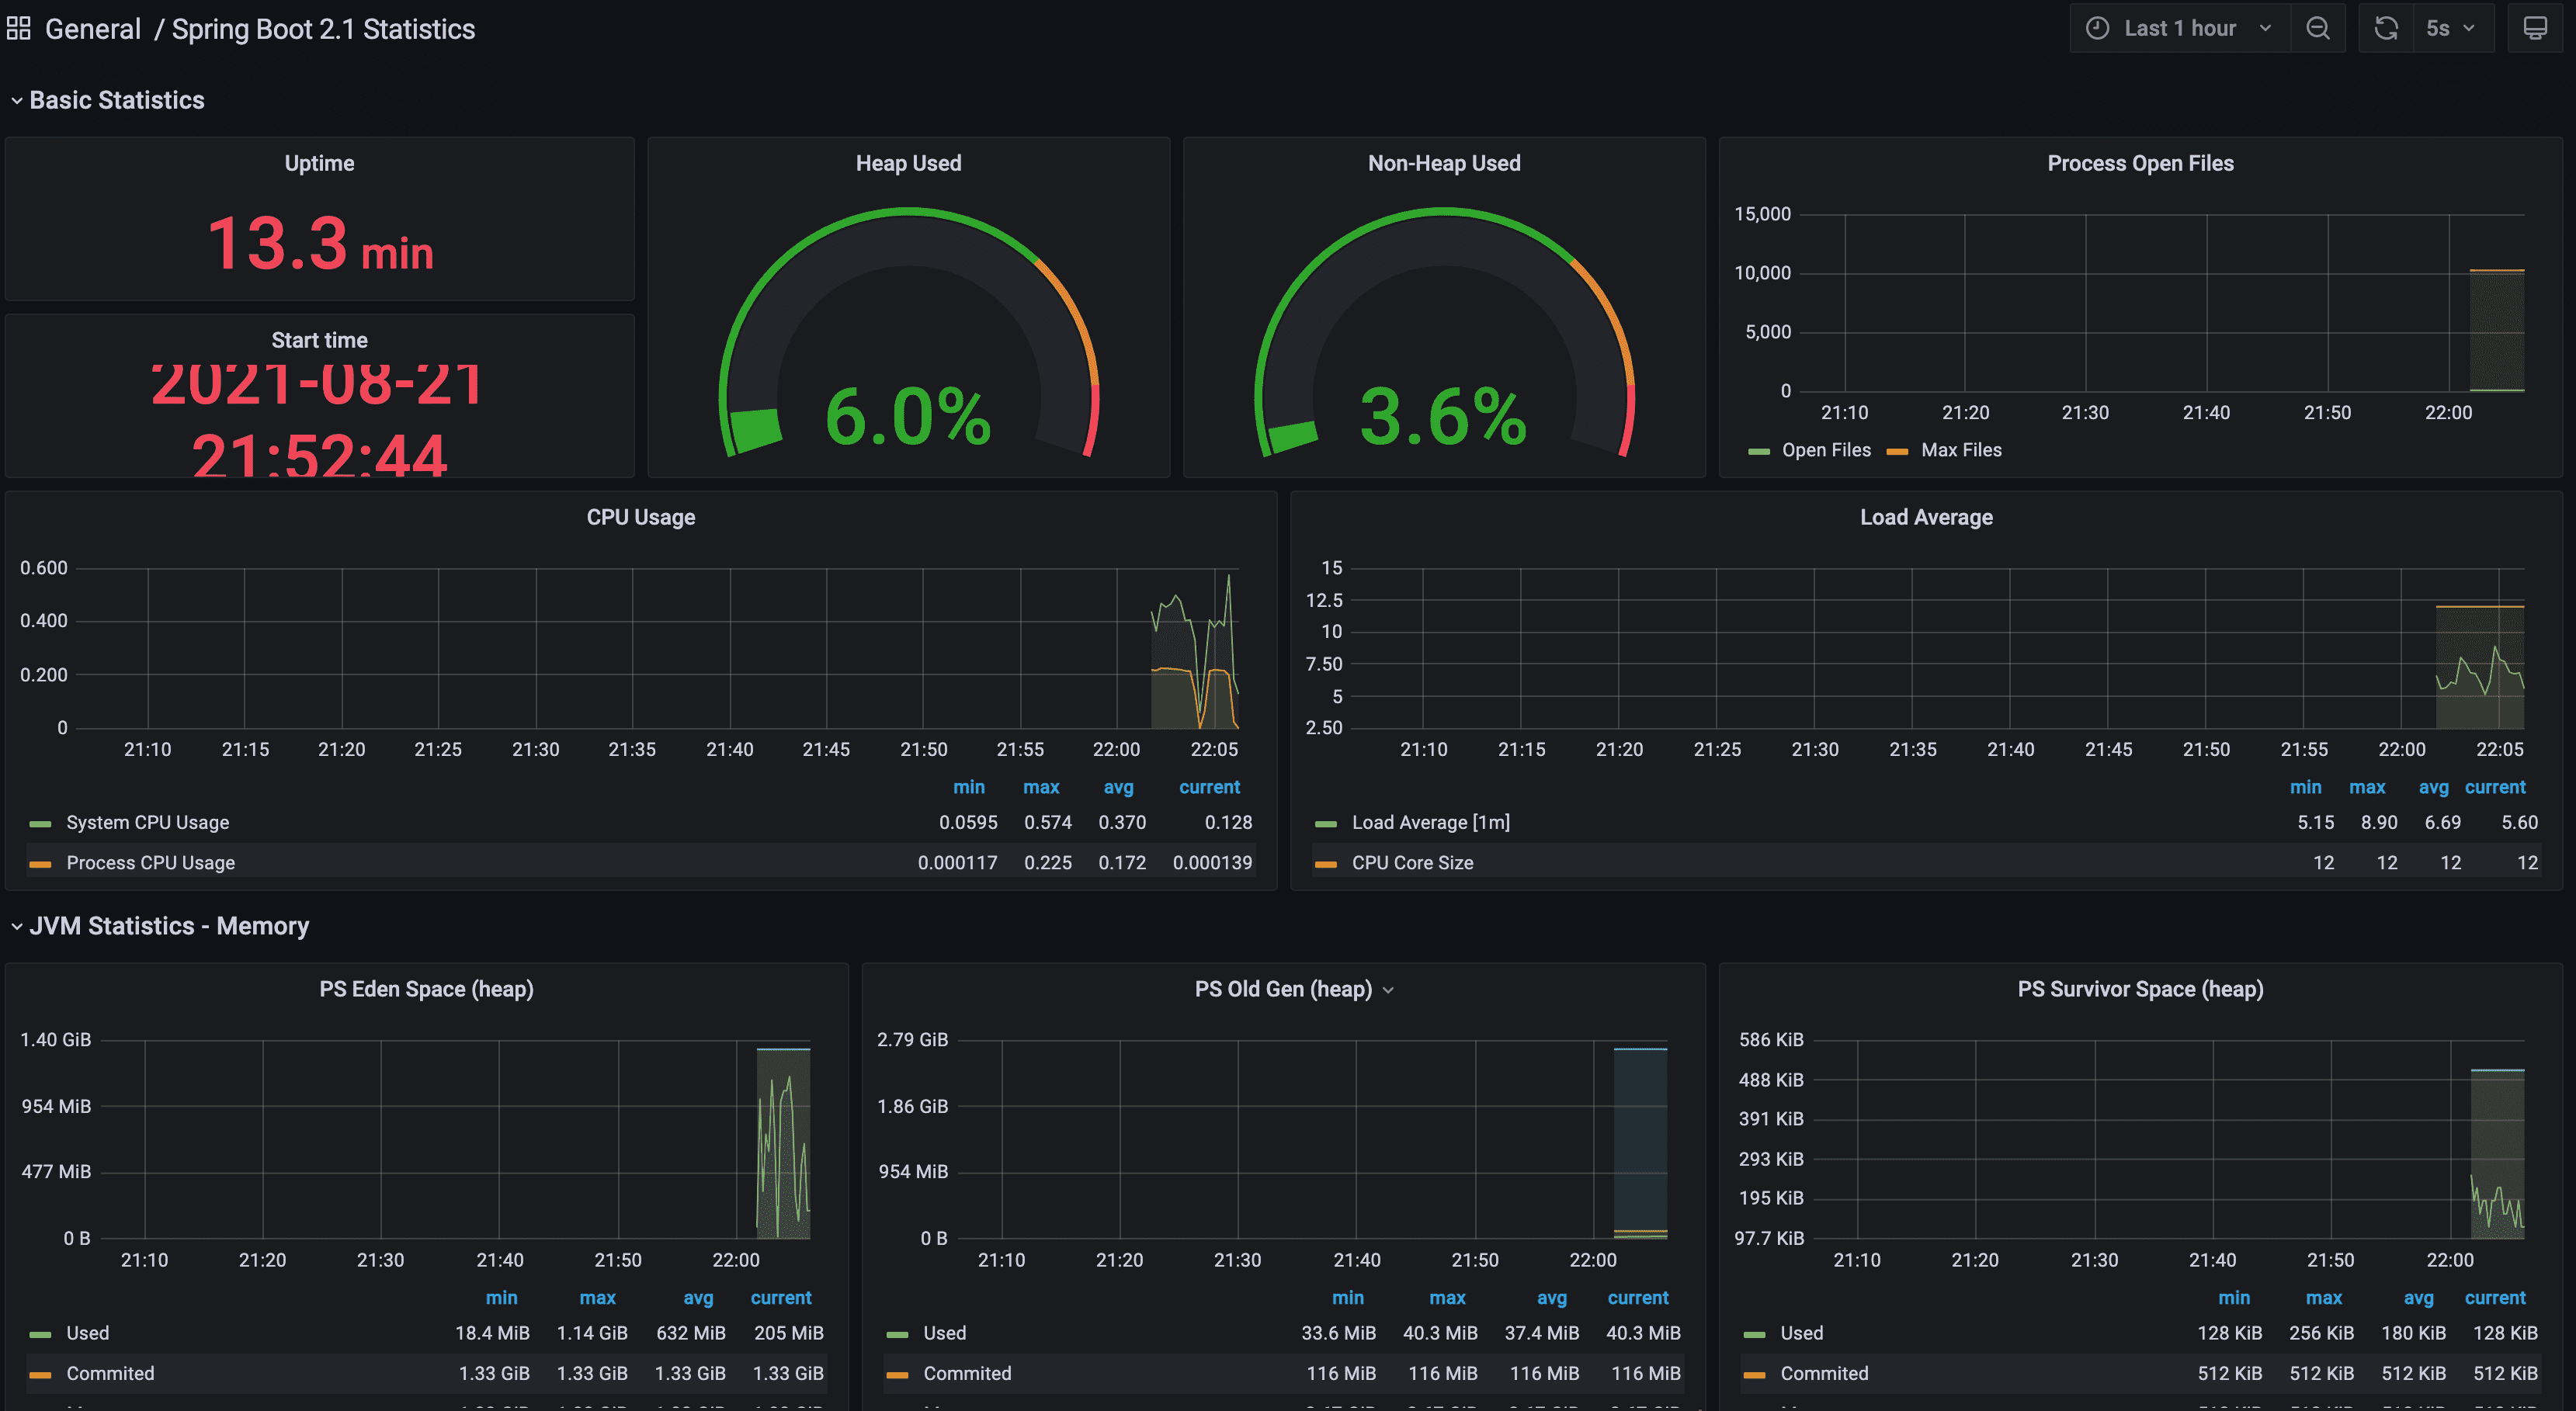
这个就很直观了吧,各种维度已经配置好了,不用我们一个一个添加,默认的基本报表展示了各种维度的监控信息了jvm的信息可以说应有尽有,这个就是监控界的扛把子-Grafana。同样我这里主题是SpringBoot,Grafana我简单讲下配置就行了,证明SpringBoot监控还是很强大的,大家都得忍一忍🤪
我是使用Docker安装的Grafana
具体执行命令
docker run -d -p 3000:3000 --name grafana grafana/grafana
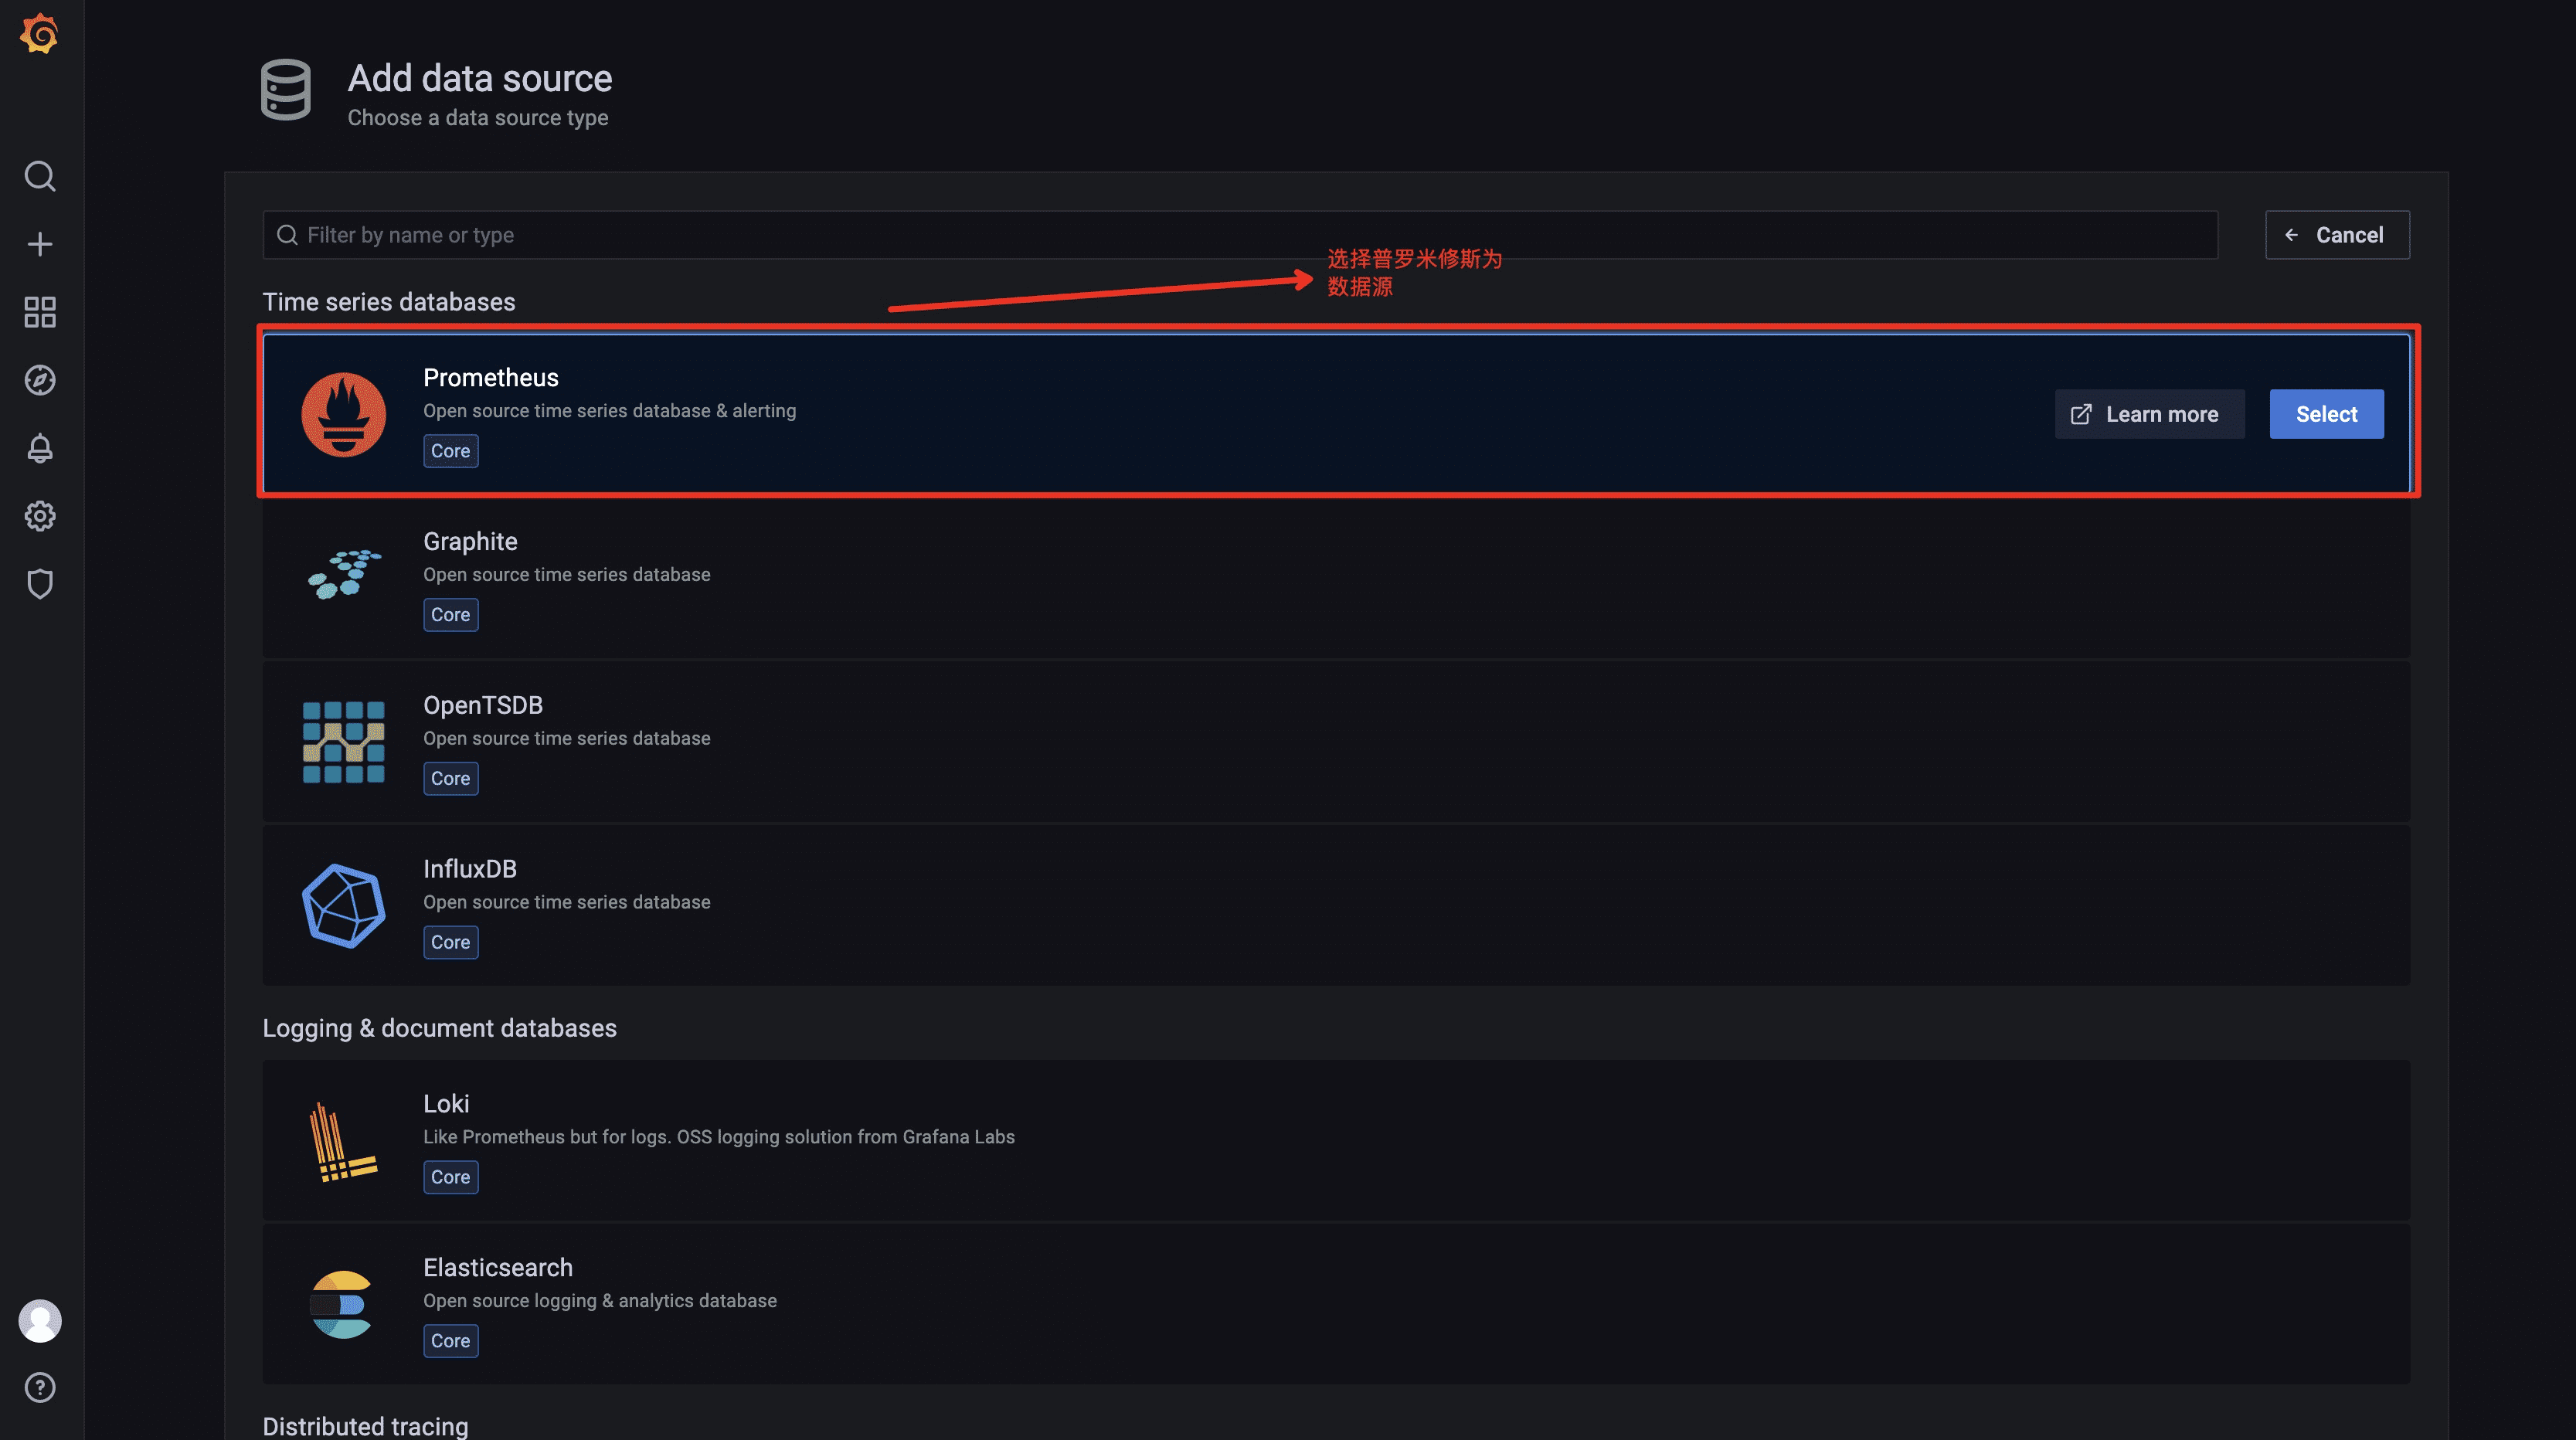
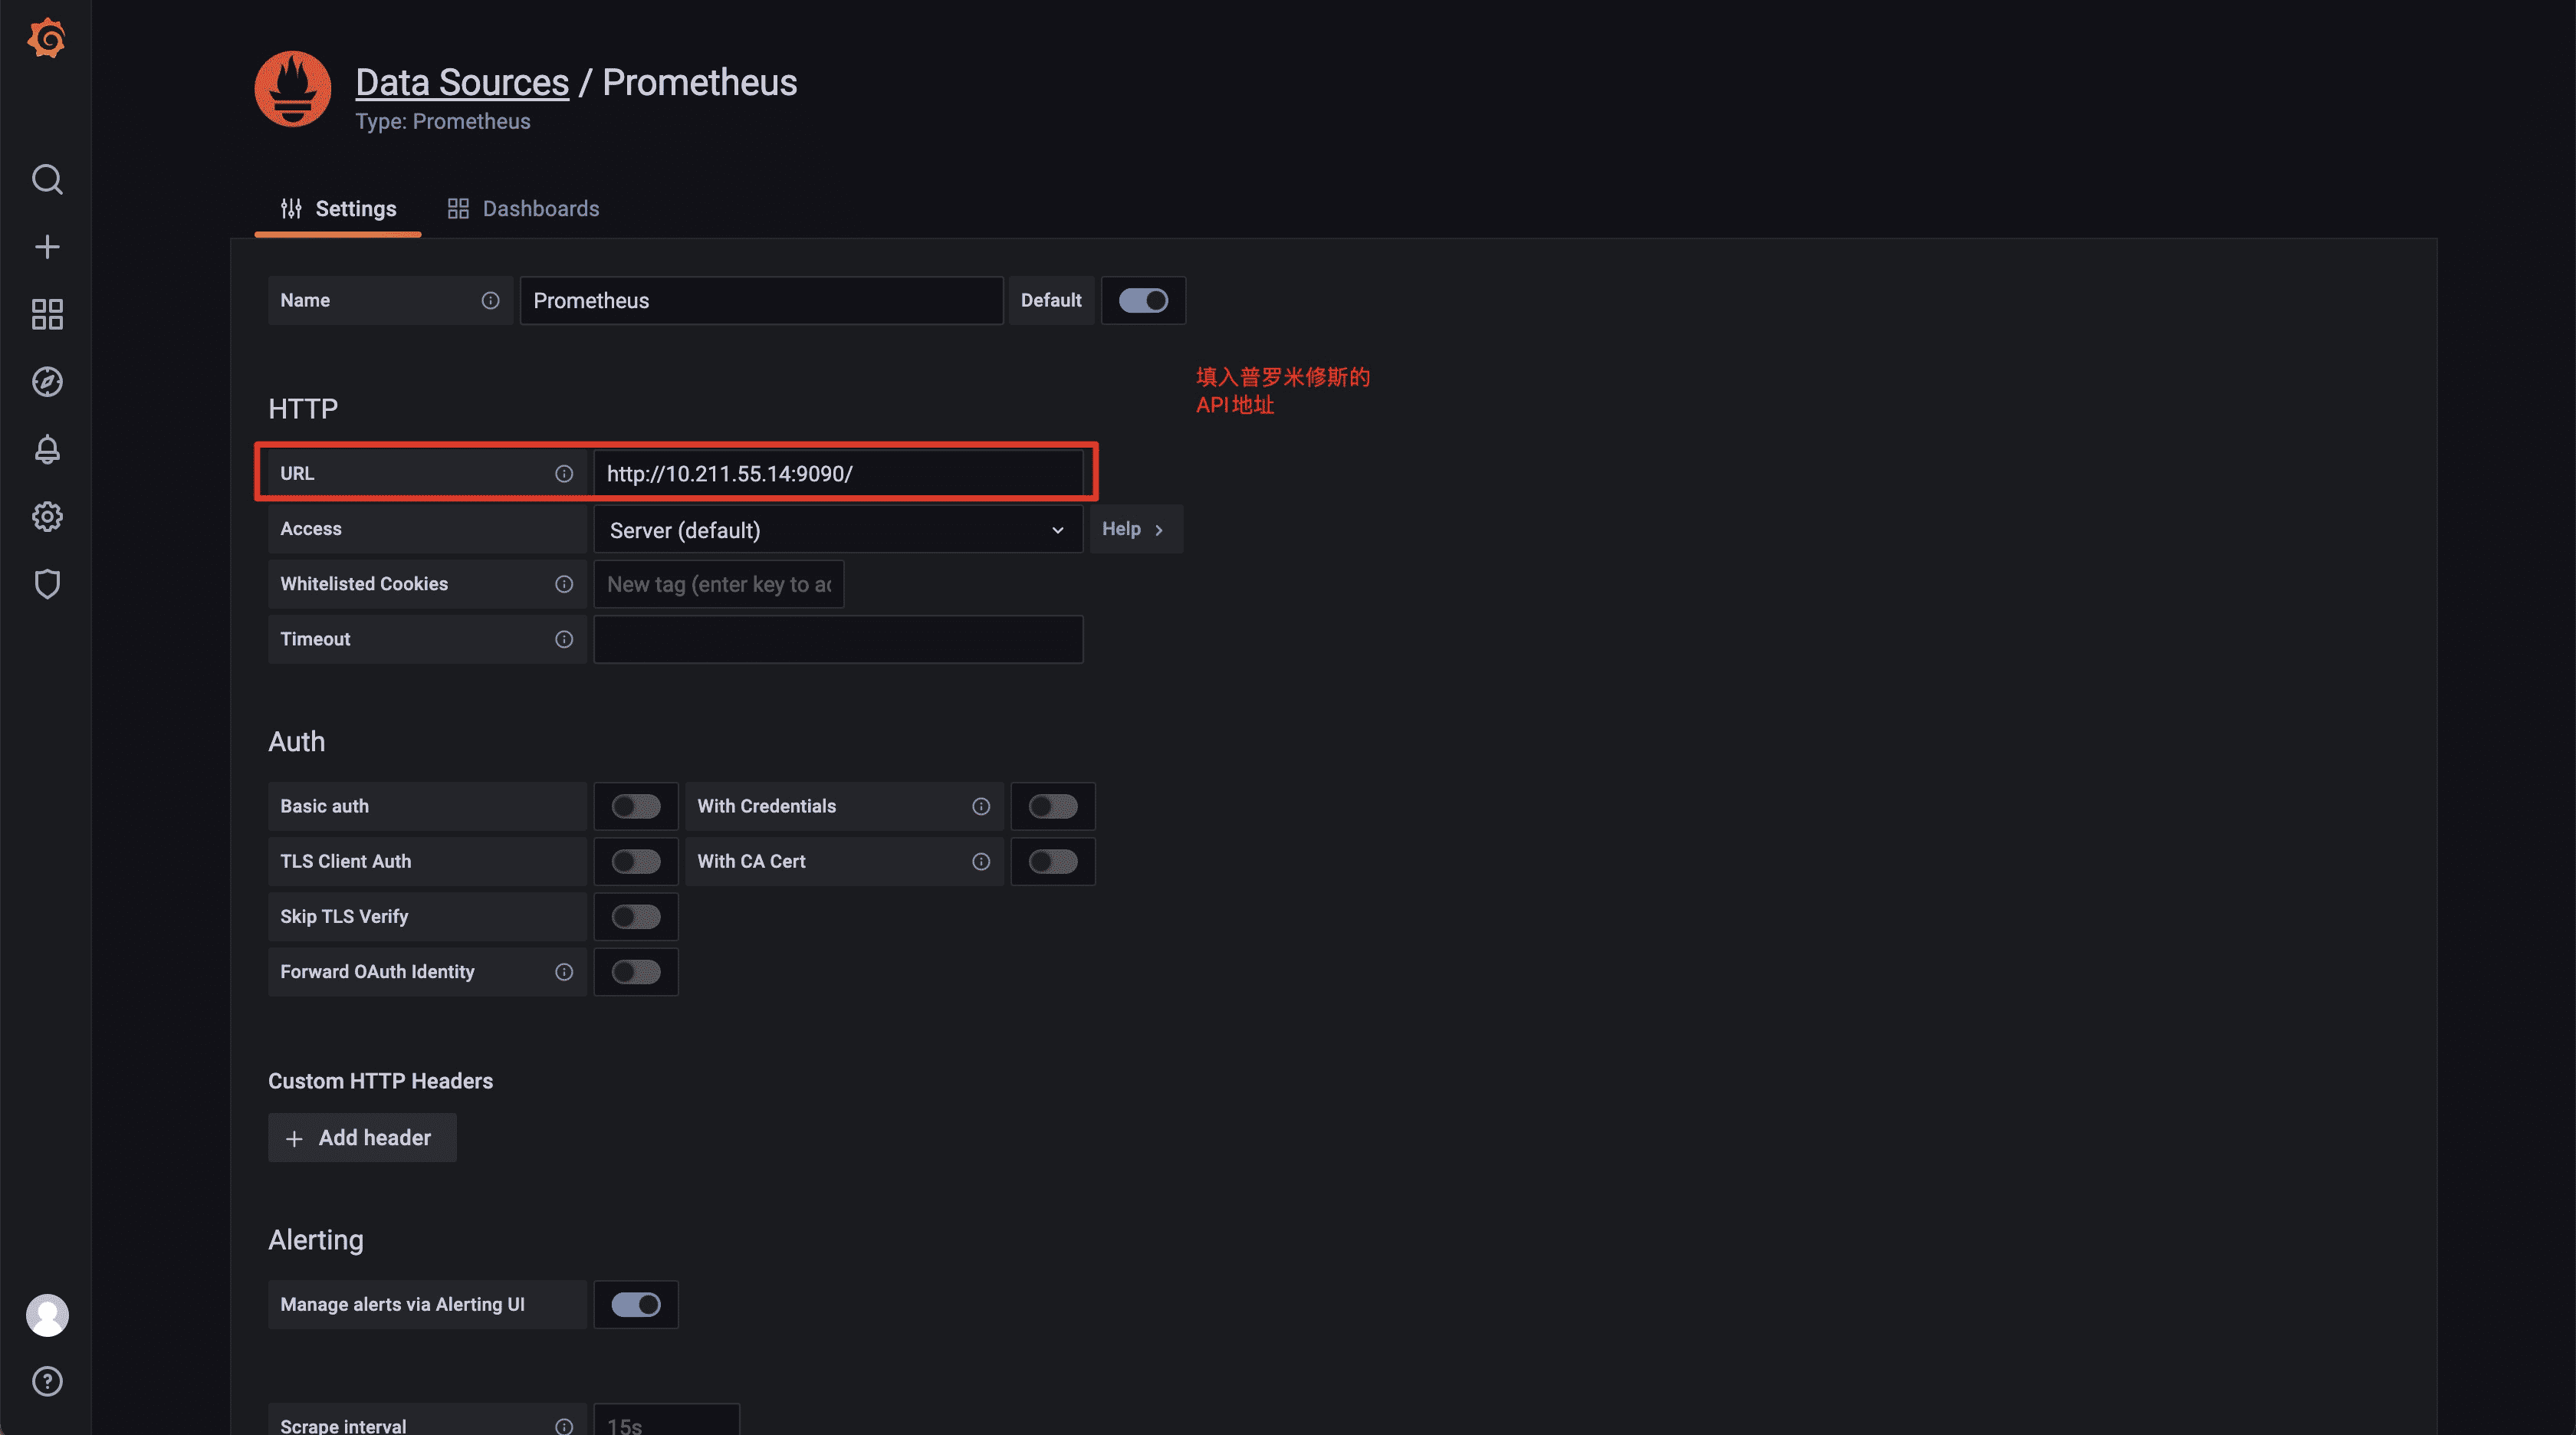
然后选择自己喜欢的模版或者自己添加表格就可以达到上面的各维度监控了。
总结
本文主要从SpringBoot的特性出发详细的讲解了各个特性以及个人的一个观点,如果要从源码角度理解SpringBoot的几点特性还是需要Spring源码功底的。尤其是自动配置这块源码解读,对Spring的Bean生命周期,Spring的扩展点,容器等知识是必不可少的。当然我也是以学习的态度写了本篇分享,如果内容有错误的请大家指正。
如果刚毕业或者工作不久的同学可能没有经历过XML配置吧,直接使用SpringBoot为起点。我个人觉得对项目开发肯定是很高效的,开箱即用。但是对于开发人员来讲就是盲盒,不知道底层是如何运转的、不知道为啥maven配置starter依赖就可以达到配置集成的目的、不知道出了集成问题如何解决。所以适当的了解SpirngBoot是如何实现这几点还是很有必要的,当然我也会继续以学习的角度来分享相关知识点。

|


- 上一条: Java下一代高并发技术——虚拟线程“JEP 425: Virtual Threads (Preview)” 2022-04-14
- 下一条: 一文详解Java日志框架JUL 2022-04-27
- SpringBoot 如何统一后端返回格式? 2021-07-16
- SpringBoot 2.5 版本功能前瞻 2021-06-19
- SpringBoot 集成缓存性能之王 Caffeine 2022-06-22
- 轻松学持续集成工具jenkins 2021-10-12
- 不会用SpringBoot连接Redis,那就赶紧看这篇 2022-02-10